Difference between revisions of "Gullywash"
m (Consistency with other wiki pages) |
m |
||
| Line 53: | Line 53: | ||
== Screenshots == | == Screenshots == | ||
<gallery> | <gallery> | ||
| − | File:CP Gullywash 1. | + | File:CP Gullywash 1.png |
File:CP Gullywash 2.jpg | File:CP Gullywash 2.jpg | ||
File:CP Gullywash 3.png| The center control point | File:CP Gullywash 3.png| The center control point | ||
Revision as of 02:43, 17 January 2024
| Gullywash | |
|---|---|

| |
| Basic Information | |
| Developer(s): | Unknown |
| Map Info | |
| Environment: | Desert |
| Setting: | Daylight, sunny |
| Map Photos | |
| Map Overview | |
| “ | ARE YOU MAN ENOUGH TO OWN LAND IN GULLYWASH? Expensive, but worth it. Your boss will re-evaluate you once he sees your new address. Women will think you are a real man because they will see you live there. They will be too afraid to visit so you have to date with them elsewhere. Everyone will think you are great.
— Gullywash description
|
” |
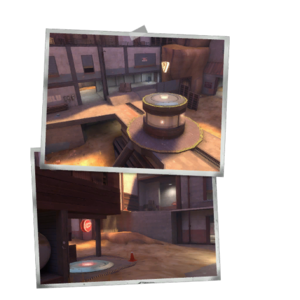
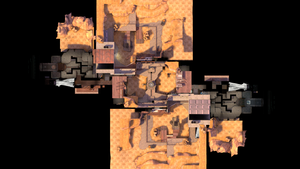
Gullywash is a community-created standard control point map. Set in a desert environment, the map features the RED and BLU teams fighting for control of the only source of water in the area.
Gullywash is commonly used for competitive 6v6 matches in ETF2L, AsiaFortress, ESEA, and ozfortress competitions.
Contents
Locations
Control Point 3
The control point consists of a balcony that is connected to a bridge, and a valley underneath.
- Entrances: Each team has 2 paths to the bridge. One entrance leads to the balcony on the far side of the bridge to the opposing team. Each team also has an access route to the valley to the right of the bridge.
- Ramps: There are two ramps on either side of the area with lead up to the raised balconies from the valley below.
- Cover: There are boxes located on each of the balconies, to the left of the main balcony entrance. These provide cover from enemy fire.
- Capture Point: The capture point itself is raised off the ground and only accessible by Scouts, Soldiers, Pyros, Demomen, and Engineers. However, the capture zone extends past this raised area, so all classes can capture it. The raised point gives a good height advantage for defending.
Control Points 2 & 4
The second capture point is located in an open area, surrounded by many high vantage points. The capture zone for the point is split over two levels, with one at ground level and another at the same level as the high balconies surrounding the area.
- Entrances From Control Point 3: There are two entrances from capture point 3, the main balcony entrance leads to an open area with the capture point at the far side. The entrance from the valley exits to the right of the point (for defenders).
- Capture Point: The split level control point has a ramp on the right (for attackers) to access the higher level. The higher level also has a capture zone, so attackers can capture and have an offensive advantage over defenders on ground level.
- Balcony: Located to the left (for attackers) of the capture point there is a raised balcony, allowing defenders to cover the capture point. This balcony is accessible from the higher level of the capture point structure.
Control Points 1 & 5
The final control points are located inside the complexes at either end of the map. The layout of the final point is similar to that of Badlands.
- Entrances From Control Points 2 & 4: There are three paths to the final control point from the second or fourth control point. Two entrances are on the ground level and lead into a lobby area before the room housing the final capture point. The other route goes down the side to the final control point, acting as a flanking route.
- Lobby: The two ground-level routes access a lobby area before the final room. This lobby area has 3 entrances into the final room, two raised and one at ground level. All the entrances to the final room from the lobby area are located at the far end of the room from the capture point.
- Flanking Route: The route from the raised balcony enters the final room on the right side (for defenders). The entrance itself is a ramp that leads to the ground level. This flanking route also provides access to an underground area.
- Underground Area: Under the final room there is an underground section, it has exits on the flanking route and directly behind the final capture point.
Strategy
 | “Sun Tzu's got nothing on us!” This map's Community strategy page is a stub. As such, it is not complete. You can help the Team Fortress Wiki Community Strategy Project by expanding it. Notes: None added |
Control Point timing
| Control Point | Multiplier | Seconds | ||
|---|---|---|---|---|
| Control Point 1 and 5 | ×1 |
| ||
| ×2 |
| |||
| ×3 |
| |||
| ×4 |
| |||
| Control Point 2 and 4 | ×1 |
| ||
| ×2 |
| |||
| ×3 |
| |||
| ×4 |
| |||
| Control Point 3 | ×1 |
| ||
| ×2 |
| |||
| ×3 |
| |||
| ×4 |
|
Screenshots
Easter eggs
Cosmetics
- A Tyrant's Helm can be found on the balcony near BLU's second point.
- A Pyro's Beanie can be found on top of some lockers just past RED's initial respawn area.
- A Ye Olde Baker Boy can be found at the third capture point, high above BLU's main entrance on top of a box.
- A Professional's Panama can be found just outside BLU's initial respawn area, on top of a barrel to the right.
- A Texas Ten Gallon can be found on a barrel behind a wire fence near the middle point.
- A Respectless Rubber Glove can be found at the middle point on an overhanging metal sheet high above the lower RED entrance
- Both initial RED and BLU respawn areas feature a Stainless Pot in the dressing cabinet on the left.
Weapons
- A jar of Jarate can be found outside BLU's initial respawn area, outside the window on the side path to the right.
- There are two sticky models in the map, which can be moved around. One was a scrapped Scottish Resistance model, while the other is the type used by the Sticky Jumper (which was originally a scrapped Scottish Resistance model as well).
Animals
Gullywash features a number of rubber ducks and a frog.
- The first Rubber Ducky is under the water tank next to BLU's first control point. It is possible to move this duck around using weapons.
- A group of three Rubber Duckies can be seen behind a window to the left of BLU's initial respawn area, right next to the Professional's Panama.
- There are Rubber Duckies hidden in the vents in the ceiling of both teams' final points.
- There is a slightly opened window on the RED side of the middle point where a duck can be seen sitting on a box.
- There is a Rubber Ducky sitting on a box near a small ladder high above the balcony at RED's first point
- The Frog can be found at the base of the waterfall outside RED's initial respawn area; however, it can only be seen using noclip.
- Note: The Ducks are not present anymore. They may have been Easter Eggs for The End of the Line.
Other
- The initial respawn areas of both sides have an inaccessible room behind them. There is a window that can be used to see into the room. There is a metal shutter on the window, which is similar to spawn room doors. It can be opened by standing near it.
- There is a poster of a RED Spy disguised as a BLU Engineer captioned "EMPLOYEE OF THE MONTH" placed on the wall next to the right of the right exit in the BLU spawn.
Update history
- Added Gullywash to the game.
- Removed ladders that looked like they could be climbed.
- Fixed the large curved railing in the Blu Base to mirror the railing in the Red Base.
- Fixed Red Capture Point 2 to prevent capping through a wall behind the point.
- Fixed Gullywash being in the wrong matchmaking category.
- Fixed Gullywash being in the wrong quickplay mapcycle.
- Fixed players getting out of the map near the middle capture point
- Fixed collision exploits near middle capture point
- [Undocumented] Fixed doors crushing players.
- Updated several maps to support Competitive Mode.
- Updated
cp_gullywash_final1to fixfunc_rotatingentities not working in the skybox.
External links
| |||||||||||||||||||||||||||||||||||||||||||||||||||||||||||||||||||


