Difference between revisions of "Cactus Canyon"
(Man, I thought Barnblitz and Thundermountain would stay the most varied pl_ modes. I thought wrong.) |
|||
| Line 29: | Line 29: | ||
* '''Stage One''' – The cart starts in a small basin some distance away from the BLU spawn room gates. It goes through a building and up a hill. Then it comes to the first control point. Here, flanking options become available. There is a small building both teams can go through to get to the final point of stage one. The cart's tracks go around a sharp curve, and nearby is a cliff that players can fall or be airblasted off of. The final point area is wide open, with spaces for Sentry Guns. The small building, which is entered from near the first point, has windows overlooking the final point that Snipers, Demomen, and soldiers can fire through. | * '''Stage One''' – The cart starts in a small basin some distance away from the BLU spawn room gates. It goes through a building and up a hill. Then it comes to the first control point. Here, flanking options become available. There is a small building both teams can go through to get to the final point of stage one. The cart's tracks go around a sharp curve, and nearby is a cliff that players can fall or be airblasted off of. The final point area is wide open, with spaces for Sentry Guns. The small building, which is entered from near the first point, has windows overlooking the final point that Snipers, Demomen, and soldiers can fire through. | ||
* '''Stage Two''' – The second stage starts near a small pool of water and goes up a hill. The cart then turns left and goes down a hill. It will roll down this hill on its own if at the top. Turning right, it comes to a shallow dip of water, and a final turn leads to RED's final point of stage two. The cart must be pushed up a hill that it can fall down. | * '''Stage Two''' – The second stage starts near a small pool of water and goes up a hill. The cart then turns left and goes down a hill. It will roll down this hill on its own if at the top. Turning right, it comes to a shallow dip of water, and a final turn leads to RED's final point of stage two. The cart must be pushed up a hill that it can fall down. | ||
| − | * '''Stage Three''' – This stage of the map features no setup time, so both teams must rush as fast as they can to the cart. A major feature of this stage is the [[train]] that comes through frequently, killing players as normal. Unlike the trains on Well and Freight, however, this train has multiple boxcars behind it, which act as a temporary wall that neither team can pass through. Touching the boxcars as they pass will not do any damage, just the front of the train. There is a gate in the middle of the map on the tracks that only the train can pass through. When the Payload cart reaches the penultimate control point, it goes into a wooden shed, moves on its own inside up a small hill, and then comes to a stop on the other side waiting to be pushed onto the train tracks. | + | * '''Stage Three''' – This stage of the map features almost no setup time, so both teams must rush as fast as they can to the cart. A major feature of this stage is the [[train]] that comes through frequently, killing players as normal. Unlike the trains on Well and Freight, however, this train has multiple boxcars behind it, which act as a temporary wall that neither team can pass through. Touching the boxcars as they pass will not do any damage, just the front of the train. There is a gate in the middle of the map on the tracks that only the train can pass through. When the Payload cart reaches the penultimate control point, it goes into a wooden shed, moves on its own inside up a small hill, and then comes to a stop on the other side waiting to be pushed onto the train tracks. When BLU is able to successfully push the cart onto the train tracks, the game will be won and the final point capped once the train next comes through and hits the Payload cart, causing it to explode, killing anyone nearby, but the train itself seems to be unaffected by the bomb, as it keeps moving through the explosion and will continue to kill anyone in front of it. |
| + | Unique to this map, RED is able to push the cart back in the area near the train tracks on the final point, marked the small red-colored lights on the Payload's tracks. This adds to the frantic and compact gameplay of the final stage, and also gives RED team an edge since the stage is heavily in BLU's favor, with the 5-second setup time and multiple flank-routes. | ||
==Strategy== | ==Strategy== | ||
Revision as of 18:55, 1 August 2014
| “Gotta move that gear up!” This article may contain content that is out of date. You can help improve this article by updating the content as necessary. See the wiki style guide. Notes: None added |
| “You are so small! Is funny to me!” This article is a stub. As such, it is not complete. You can help Team Fortress Wiki by expanding it. |
| Cactus Canyon | |
|---|---|

| |
| Basic Information | |
| Developer(s): | Unknown |
| Map Info | |
| Environment: | Desert |
| Setting: | Daylight (sunset), sunny |
| Hazards: | Train, Pitfall |
| Map Photos | |
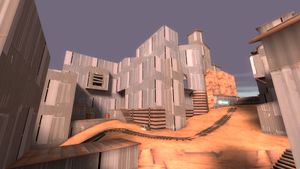
Cactus Canyon is a beta Payload map consisting of three stages.
As with other Payload maps, the BLU team's goal is to escort the cart through the map to the final terminus while the RED team has the task to stop them. Due to the map being in a developmental state; there are multiple incomplete fences around the stages, parts of the map appear blocky, some areas are unbalanced for particular teams, and some buildings don't have textures.
Locations
- Stage One – The cart starts in a small basin some distance away from the BLU spawn room gates. It goes through a building and up a hill. Then it comes to the first control point. Here, flanking options become available. There is a small building both teams can go through to get to the final point of stage one. The cart's tracks go around a sharp curve, and nearby is a cliff that players can fall or be airblasted off of. The final point area is wide open, with spaces for Sentry Guns. The small building, which is entered from near the first point, has windows overlooking the final point that Snipers, Demomen, and soldiers can fire through.
- Stage Two – The second stage starts near a small pool of water and goes up a hill. The cart then turns left and goes down a hill. It will roll down this hill on its own if at the top. Turning right, it comes to a shallow dip of water, and a final turn leads to RED's final point of stage two. The cart must be pushed up a hill that it can fall down.
- Stage Three – This stage of the map features almost no setup time, so both teams must rush as fast as they can to the cart. A major feature of this stage is the train that comes through frequently, killing players as normal. Unlike the trains on Well and Freight, however, this train has multiple boxcars behind it, which act as a temporary wall that neither team can pass through. Touching the boxcars as they pass will not do any damage, just the front of the train. There is a gate in the middle of the map on the tracks that only the train can pass through. When the Payload cart reaches the penultimate control point, it goes into a wooden shed, moves on its own inside up a small hill, and then comes to a stop on the other side waiting to be pushed onto the train tracks. When BLU is able to successfully push the cart onto the train tracks, the game will be won and the final point capped once the train next comes through and hits the Payload cart, causing it to explode, killing anyone nearby, but the train itself seems to be unaffected by the bomb, as it keeps moving through the explosion and will continue to kill anyone in front of it.
Unique to this map, RED is able to push the cart back in the area near the train tracks on the final point, marked the small red-colored lights on the Payload's tracks. This adds to the frantic and compact gameplay of the final stage, and also gives RED team an edge since the stage is heavily in BLU's favor, with the 5-second setup time and multiple flank-routes.
Strategy
Update history
- Added Mann Co. Beta Maps - Early Access program.
- Added 2 new beta maps:
rd_asteroidandpl_cactuscanyon. - Beta maps can be accessed via the Quickplay menu by checking the "Play Beta Maps" option.
- Added 2 new beta maps:
- Updated pl_cactuscanyon
- Prevented players from shooting over the fences by the mid building in stage 2
- Prevented players from shooting between spawns in stage 2
- Fixed a bug which prevented Blu team from winning upon a successful capture
- Fixed players getting under the terrain near the first Blu Spawn in stage 1
- Updated pl_cactuscanyon
- Redesign of the first half of stage 2. Blu team now pushes up the first hill
- Removed the death pit in the first barn building of stage 1
- Ammo increased in stage 2
- Fixed Red building in the spawn room of stage 2
- Updated pl_cactuscanyon
- Redesigned the alternate window route over the choke point by stage 2 capture point 1
- Window overlooking second stage final capture point is now a doorway
- Removed stairs leading to back barn in stage 2 near final capture point
- Back alley behind water tank in stage 2 is now a 1-way drop down
- Added small health pack in the small room off the back stairwell flank near stage 1 capture point 2
- Fixed players building in spawn rooms
- Updated pl_cactuscanyon
- Added stage 3
- Limited Red flanking route near cliff to Blu spawn in stage 1
- Added health and ammo inside underpass by Blu spawn in stage 1
- Adjusted spawn times in stage 2
- Adjusted health and ammo packs
