Difference between revisions of "2Fort Invasion"
Pandawadles (talk | contribs) |
|||
| Line 83: | Line 83: | ||
== Strategy == | == Strategy == | ||
{{main|Community 2Fort strategy}} | {{main|Community 2Fort strategy}} | ||
| + | |||
| + | == Exploits == | ||
| + | *'''Teamkilling''': It is possible to kill a teammate by shooting one of the Aliens with a Rescue Ranger bolt, a Crusader's Crossbow arrow, or a Huntsman arrow, while your teammate is next to it. | ||
== Update history == | == Update history == | ||
Revision as of 00:08, 9 October 2015
| “Let's go, let's go, let's go!” This article documents a recent addition. It may contain speculation, broken links or errors. You can help improve it by editing this page to include new information. |
| 2Fort Invasion | |
|---|---|
| 300px | |
| Basic Information | |
| Variants: | 2Fort |
| Developer(s): | Unknown |
| Map Info | |
| Environment: | Farmland |
| Setting: | Nighttime |
| Map Photos | |
| Map Overview | |
| “ | The aliens are taking over but the teams are too busy trying to figure out better ways to kill each other with alien artifacts.
— Invasion Update
|
” |
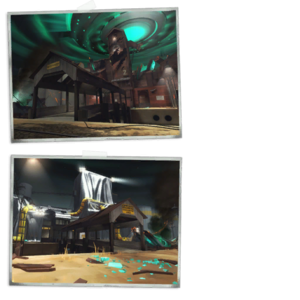
2Fort Invasion is a Capture the Flag map. It is a version of 2Fort made for the Invasion Update.
Set at nighttime, the two bases have been converted into research labs studying the alien technology. The RED base has been destroyed by crashed Saucers, while the BLU base has been put under quarantine.
Destroyed aliens are placed around the map, which explode after being damaged, similar to the Pumpkin bomb.
Contents
Locations
Outside locations
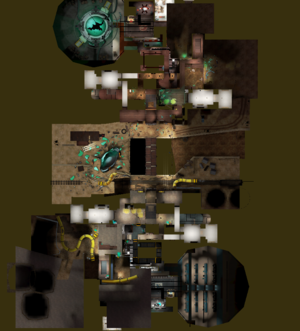
File:2fort Invasion Overview.png
Overview of 2Fort Invasion
- Bridge: The bridge connecting the two forts. The bridge is covered, allowing Scouts to double-jump, Demomen to sticky-jump and Soldiers to rocket jump from the top of the one battlement, run across the bridge roof and then propel themselves onto the opposing Battlement. The roof also provides cover for advancing players and generally moves the map's action into the bases. Commonly, Scouts will have no problem jumping onto the bridge, but will sometimes falter on the second jump to the opposing Battlement landing short in front of one of the doors. The very edge of the bridge roof is bugged; if a Scout attempts to jump from the very edge, in terms of game mechanics, they will be "falling" and thus have only one jump to use, rather than two. Jumping a split-second earlier, using the Force-A-Nature to jump, or using the Atomizer is enough to remedy this problem. Scouts, Demomen, and Soldiers on the roof of the bridge are susceptible to Sniper fire, which limits the distance of jumps, providing another obstacle to attacking classes.
- Entrance: After crossing the bridge, there are two ground entrances into the base. The "Entrance" extends from those two doorways into the base a short distance. From here, the layout of the entrance is a T-shape. Turning left brings the player to the stairs that leads down to the sewers, as well as the narrow corridor linking the Battlement Resupply room to both the entrance and the Courtyard (there is a trapdoor in the ceiling allowing players to drop down from the Resupply room).
- Entrance side room: Turning right from the entrance leads you into a medium-sized room with a door at the opposite end which provides access to the courtyard. This room is heavily trafficked by both teams, as it is the most direct way to reach the courtyard from the main entrance. Engineers can set up small camps in here if the enemy is attempting to push through the entrance. In addition, because the room is large, it is often a hiding place for Spies. In many other parts of 2Fort, corridors are too narrow to provide much cover for an invisible Spy, but this room is an exception, allowing them to move through it undetected.
- Battlements: The Battlements are on the front of the second floor of each base and have a center "bunker" section. This section has large glass-less windows and is a roofed structure. The windows allow almost unbroken lines of sight into the area. The battlements are also often referred to as the "balcony," as well as the "Sniper ledge" or "Sniper deck", due to their main purpose as a camping area for Snipers. The ledges provide Snipers with an excellent view of most of the exterior of 2Fort, with the exception of the bridge and the water beneath it. The RED side has a ledge placed high enough to cause fall damage if walked off of, while the BLU side's ledge is not tall enough.
Fort locations
- Sewers: The tunnels under each base, leading from the water beneath the bridge to the "Entrance", are generally referred to as "The Sewers". They have several sharp turns, creating numerous blind corners around which to fight. The sewers are generally used as a way of entering the enemy base free from the attention of the Snipers above. The narrowness of the sewers and the water makes it difficult for Spies to sneak past enemies who are also using the tunnels.
- Sewer room: In each sewer, there is a room recessed into a corner in such a way that it is impossible to see the entire room from inside the tunnels. On the water-side of the room, the tunnel has two 90 degree bends, but on the base-side of the room there is one long unbroken stretch of tunnel. The long tunnel provides a long-range line of sight between the room and the sewer exit. The rooms are often camped by Engineers, who use Teleporters to allow their team to quickly access the enemy base, or Sentry Guns to prevent the opposing team from using that location.
- Courtyard: The Courtyard is the main means of transition between the ground floor and the second floor in each base. It is an enclosed, roofless space inside each base, next to the main spawn room and on the player's right when they come through the entrance. It is bounded on three sides by high ledges, and there are doors connecting to the spawn room, a staircase leading down to the Intelligence room on the second floor, and a door from the entrance and from the balcony spawn corridor on the ground floor. Two staircases allow access from below to the upper level. Engineers often use the space as a major defensive point, as it provides the only means of access to the Intelligence for most classes. By setting up a Sentry Gun, an Engineer can successfully provide effective defense against assaults on the intelligence, particularly if positioned so as to cover the Battlements' doorway.
- Grate: This is the small room with the grated floor right above the entrance of each base. It is connected directly to the upstairs area, and as a result is often used by players to gain quick access to battles in the entrance. Demomen, Soldiers, Engineers, Scouts and Pyros can jump up to the second story through this, providing another means of access to the second floor. Classes such as the Engineer and Demoman can also camp above the grate, limiting enemy access through the front entrance. Splash damage can be dealt through the grate.
- Upstairs: This is the large room on the second floor, adjacent to the main resupply room. The Upstairs area has an exit to the Battlements, "Grate", "top of the Spiral", and "Courtyard". This room is heavily trafficked as it is a major crossroads in the map, connecting practically every area of the base. It is often used by Scouts who have jumped to the balcony, as it provides a direct route to the Intelligence via the spiral ramp. The Upstairs area is also commonly referred to as the "hay room" or "hayloft" (due to the large piles of hay on the floor,) or simply the "upstairs lobby".
Main base locations
- Spiral: The Spiral ramp that leads from the Basement up and out of the base is one of only two access points to the Intelligence room. Like the Sewers, the Spiral is a narrow corridor with right-angle turns. This tends to result in close quarters fighting, and due to the confined space it is fairly easy to block enemy access with a Dispenser, Sentry Gun, or Heavy. At the top, the Spiral connects to the upstairs area via a small room in which there is a small Health Pack and Ammo Pack, as well as two small corners in which Spies often hide. A direct line of sight can be drawn from the upstairs area along the top length of the Spiral, allowing Snipers to eliminate enemies with the Intelligence as they climb the Spiral.
- Stairs: This area contains a long ramp running from the back of the courtyard into the basement. It is the other exit point for a stolen Intelligence. It is often called the "back stairs", "long stairs", "straight stairs", or simply "straight". It is also called the "L-Shaft", because it contained an elevator in previous incarnations of the 2Fort map.
- Basement: This is the space downstairs between the Spiral ramp and the Stairs. It leads to the Intelligence room and a third resupply point exists at the end nearest to the Stairs. However, no player will ever respawn in that room after they die. There is a Health pack and Ammo box in the middle of the Basement - added in the April 29, 2008 Patch. The addition of these pickups has made camping the Intelligence harder, and attacking the Intelligence slightly easier.
- Intelligence room: The Intelligence room has two entrances from the Basement. This is the primary defensive point of 2Fort, and as such it is frequently camped, especially by Engineers. The Intelligence is on top of a desk in the opposite corner to both entrances. The layout of the room makes it very simple for campers to entrench themselves, and successfully removing them can be almost impossible without an ÜberCharge.
Strategy
Main article: Community 2Fort strategy
Exploits
- Teamkilling: It is possible to kill a teammate by shooting one of the Aliens with a Rescue Ranger bolt, a Crusader's Crossbow arrow, or a Huntsman arrow, while your teammate is next to it.
Update history
October 6, 2015 Patch (Invasion Update)
- [Undocumented] Added 2Fort Invasion
Gallery
See also
| |||||||||||||||||||||||||||||||||||||||||||||||||||||||||||||||||||


