Difference between revisions of "Double Cross"
m (Fixed something) |
HitlineMiamo (talk | contribs) (→Strategy: infobox) |
||
| Line 56: | Line 56: | ||
== Strategy == | == Strategy == | ||
{{main|Community Double Cross strategy}} | {{main|Community Double Cross strategy}} | ||
| + | {{community strategy stub link}} | ||
| + | |||
== Update history == | == Update history == | ||
{{Update history | '''{{Patch name|12|17|2009}}''' ([[WAR! Update]]) | {{Update history | '''{{Patch name|12|17|2009}}''' ([[WAR! Update]]) | ||
Revision as of 00:29, 14 April 2021
This article is about the map. For the cosmetic item of a similar name, see Doublecross-Comm.
| Double Cross | |
|---|---|

| |
| Basic Information | |
| Variants: | Doublefrost |
| Developer(s): | Unknown |
| Map Info | |
| Environment: | Industrial |
| Setting: | Night time |
| Hazards: | Pitfall |
| Map Photos | |
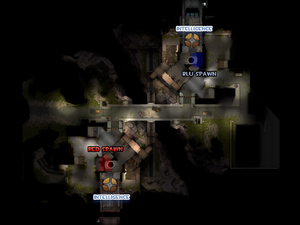
| Map Overview | |
| “ | In the middle of the night, two bridges span a bottomless chasm of certain doom. (Said bridges span the chasm in the day also, but the gate is locked.) Secret bases concealed behind the unassuming facades of a factory and a farm built next door to each other fool absolutely no one in the area, who sometimes gather around to “watch all them mercenaries fight over that Spy base."
|
” |
Double Cross is a Capture the Flag map added in the WAR! Update.
The team must capture the opposing team's Intelligence until the game's capture limit is reached (default limit is 3) while preventing the enemy team from achieving the same.
Contents
Locations
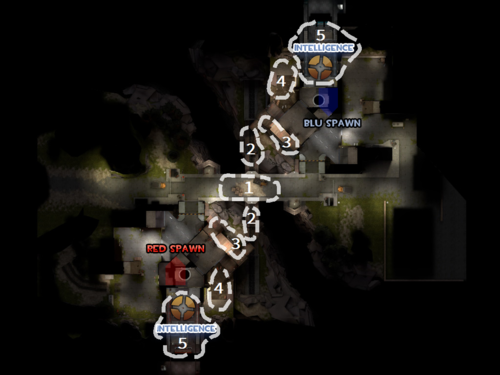
Note: If you're having trouble with finding the locations listed here, you can scroll down to the Helpful overview section to see their exact position marked on the map
Central area
- Main Bridge: Directly opposite each team's spawn room on the floor below lies the main bridge, linking the two bases. A truck, crates, and dirt are scattered across it, partially blocking sight-lines. There is a single toll booth on both sides, each with a small health kit inside. This bridge offers a direct route to the enemy courtyard and Intelligence room.
- Train Bridge: Below and perpendicular to the Main Bridge is the Train Bridge. This can be reached from the Main Bridge via a set of stairs on either side. The Train Bridge offers access to each base's extensive sewer system, with a medium health kit placed in the precise center of the bridge itself. A bottomless pit lies below it - falling off this bridge is certain death.
Bases
- Intelligence Room: The Intelligence sits in the middle of a small room below and to the left of each team's spawn room. It has three access points: An upper gantry leading towards the spawn, the main doorway leading to the courtyard, and another doorway leading to a refuse area, which can be reached from the Battlements. In the Intelligence room, the Announcer security panel featured in Meet the Spy can be seen; this will light up displaying the appropriate message if the Intelligence is taken.
- Courtyard: Opposite the main base entrance and below the spawn room is the Courtyard. This open area links the Main Bridge to the Intelligence room, as well as the spawn to the Intelligence room via an upper gantry. There is a small shed here, providing access to the Sewers via a short drop. A small health kit and ammo box can be found underneath the gantry.
- Battlements: A small Sniper deck can be accessed from the spawn room. This runs parallel to and looks out over the Main Bridge, with each team's deck opposite the other. From here the Intelligence room may also be accessed via a short drop into the refuse area.
- Sewers: The bottom level of each base is comprised of a network of tunnels and maintenance rooms. They are accessed from either inside the base via stairwell near the entrance, the shed in the Courtyard, or from a one-way chute in the spawn room dropping into a pool of deep water. Both sewers exit to the Train Bridge. A small health kit and a medium ammo crate can be found at the foot of the stairs.
Exterior of RED base.
Main Bridge and BLU base.
Basement sewer of RED base.
Entrance to RED base.
A UFO seen on Double Cross in the September 10, 2015 Patch.
Helpful overview
1.Main Bridge
2.Train Bridge
3.Battlements
4.Courtyard
5.Intelligence Room
Strategy
Main article: Community Double Cross strategy
 | “Sun Tzu's got nothing on us!” This map's Community strategy page is a stub. As such, it is not complete. You can help the Team Fortress Wiki Community Strategy Project by expanding it. Notes: None added |
Update history
December 17, 2009 Patch (WAR! Update)
- Added Double Cross to the game.
- Reduced the number of moons in ctf_doublecross. Before the patch, 7 moons could be seen on the map's skyline.
- Fixed the map not ending correctly when using mp_timelimit.
- Changed to prevent Engineers from building on top of the shack in each base.
- Improved clipping to prevent players from getting to unintended places.
- Added a respawnroom visualizer to the dropdown spawn exit to prevent griefing
- [Undocumented] Added a "Carrier tank" to this map.
- [Undocumented] Added saucers and posters to Double Cross.
- [Undocumented] Removed Saucers and Posters from all maps.
- Updated several maps to support Competitive Mode.
Trivia
- Security alarm panels, much like those featured in Meet the Spy, appear in each teams' Intelligence room with the panels 'ALERT', 'INTELLIGENCE' and 'CAPTURED' lighting up when the enemy team has taken the Intelligence.
- The map's original name was Nightfall, but a community map PLR Nightfall was released before the WAR! Update.
- The skybox for Double Cross still bears the filename
sky_nightfall_01.
- The skybox for Double Cross still bears the filename
- This map was originally planned to be 5-Control Point, according to Iikka, the map's creator. [1]
- A "double cross" is an act of betrayal.
References
External links
| ||||||||||||||||||||


