Difference between revisions of "Precipice"
m (Map supports bots) |
(Added 'map-has-magic-spells' to infobox) |
||
| (72 intermediate revisions by 29 users not shown) | |||
| Line 1: | Line 1: | ||
| − | |||
| − | |||
{{Map infobox | {{Map infobox | ||
| − | | game-type | + | | map-status = community |
| − | | file-name | + | | map-game-type = Payload |
| − | | map-image = Precipice main. | + | | map-file-name = pl_precipice_event_final |
| − | | | + | | map-image = Precipice main.png |
| − | + | | map-released = {{Patch name|10|10|2019}} | |
| − | | | + | | map-released-major = Scream Fortress 2019 |
| map-environment = Halloween | | map-environment = Halloween | ||
| map-setting = Night | | map-setting = Night | ||
| − | | map-hazards = [[Pitfall]]s, [[Pumpkin bomb]]s | + | | map-hazards = [[Pitfall]]s, [[Ghosts]], [[Skeletons]]<!-- appear when cart is near Final -->,<br/> [[Pumpkin bomb]]s |
| − | | map-stamp-link = | + | | map-has-magic-spells = yes |
| − | | map-health | + | | map-stamp-link = https://steamcommunity.com/stats/TF2/leaderboards/3833398 |
| − | | map-health | + | | map-pickups-health-small = 4 |
| − | | map-health | + | | map-pickups-health-medium = 9 |
| − | | map-ammo | + | | map-pickups-health-large = 1 |
| − | | map-ammo | + | | map-pickups-ammo-small = 5 |
| − | | map-ammo | + | | map-pickups-ammo-medium = 13 |
| − | | map-special | + | | map-pickups-ammo-large = 1 |
| − | | map-bots | + | | map-pickups-special-pumpkin = yes |
| + | | map-has-bots = yes | ||
}} | }} | ||
| − | '''Precipice''' is a community- | + | '''Precipice''' is a [[Steam Workshop|community-created]] [[Payload]] map released during the [[Scream Fortress 2019]] update that takes place between secret bases in abandoned mills built along the edge of a chasm. |
| − | + | [[BLU]] must push a minecart carrying a bubbling witch's cauldron of potion catalyst through the map to dump in the Pool of Souls defended by [[RED]]. When the cauldron boils over along the way, watch out! | |
| − | = | + | The map is noted for having a more than usual number of chokes along narrow, relatively straight routes, a couple being particularly strong at Points A and D, both requiring exceptionally coordinated team play to defeat any sort of organized defense. |
| + | |||
| + | Precipice was [https://steamcommunity.com/sharedfiles/filedetails/?id=1822483095 contributed] to the Steam Workshop. | ||
| + | |||
| + | {{TOC limit|3}} | ||
| + | == Cauldron Cart == | ||
| + | The cauldron on the Cart contains a brew that sloshes as players capture it. At the start of the round, the content of the cauldron only steams and simmers. After about 15 seconds it starts to boil, and the cauldron starts to bubble over after an additional 15 seconds. After another thirty seconds, for a total of a minute, the cauldron pops off one or more spell effects. These include a large, but brittle, BLU-allied [[Skeleton]] that is summoned from the earth on BLU's side of the cauldron, a small random number of BLU Normal Skeletons that jump out of the cauldron, and a "tornado" that can shield pushers from explosions. The cauldron also has a chance to buff healing, either through supercharged healing beams, or a direct three times buff in cart healing rate. Additionally, one to three [[Magic Spells]] could spawn around the cauldron. Any combination of these effects can happen at the same time. When any of these effects occur, the cauldron simmers down, resetting the effect timer. This event is also triggered when either of the first two points are captured. | ||
| − | ===Checkpoint A=== | + | == Locations == |
| + | {{HelpfulOverviewNote}} | ||
| + | === Checkpoint A === | ||
The BLU team starts at their headquarters with the Payload, with the first checkpoint right around the corner from where they start. | The BLU team starts at their headquarters with the Payload, with the first checkpoint right around the corner from where they start. | ||
| − | * '''Headquarters (BLU Spawn)''': The initial respawn and [[resupply area]] is a | + | * '''Headquarters (BLU Spawn)''': The initial respawn and [[resupply area]] is in a Blue Corn Co. mill with three exits, two for the left and one for the right. The center-most exit deposits players directly onto the cart in the middle of a field, whereas the far left exit leads to an elevated area to the side of the Payload. The right exit, meanwhile, allows players to take a route slightly further ahead of the Payload. There are two [[resupply cabinet]]s: one located in the middle of the respawn room and one in the hallway to the right spawn exit. |
| − | * '''Courtyard''': Located directly outside the respawn building is the courtyard where the Payload track starts. This courtyard features basic elevated platforms and partial walling | + | * '''Courtyard''': Located directly outside the respawn building is the courtyard where the Payload track starts. This courtyard features basic elevated platforms and partial walling. The only building in this courtyard (other than the BLU spawn) houses the only [[Pickups|health kit]] for this area. |
| − | * '''Buildings''': At the end of the courtyard lies the first checkpoint. On the left of the checkpoint is a series of buildings, which not only connect from checkpoint A to checkpoint B | + | * '''Buildings''': At the end of the courtyard lies the first checkpoint. On the left of the checkpoint is a series of buildings, which not only connect from checkpoint A to checkpoint B but also house a RED resupply room. On the right of the checkpoint lies the cliff edge, which acts as an environmental hazard for any classes that fall off. |
| + | |||
| + | RED initially respawns at the neutral spawn about halfway along the map with two gates, one a shortcut to the first point. Capturing the first point closes that short route. | ||
<gallery widths=140px heights=80px> | <gallery widths=140px heights=80px> | ||
| − | File:Precipice A1. | + | File:Precipice A1.png| BLU spawn. |
| − | File:Precipice A2. | + | File:Precipice A2.png| The left-most exit to the courtyard. |
| − | + | File:Precipice BLU1.png| The distance between BLU spawn and the first checkpoint. | |
| − | File:Precipice BLU1. | + | File:Precipice A3.png| An overview of the first checkpoint. |
| − | File:Precipice A3. | + | File:Precipice A4.png| Some of the interiors alongside the checkpoints. |
| − | File:Precipice A4. | ||
</gallery> | </gallery> | ||
| Line 48: | Line 56: | ||
Checkpoint B is located running parallel to a series of hallways, with the cliff edge running on its other side. | Checkpoint B is located running parallel to a series of hallways, with the cliff edge running on its other side. | ||
| − | * '''Buildings''': | + | * '''Loading Zone''': Beyond the checkpoint, A choke is a wider area around which RED defenders can spread out, but focus their attention and fire on the single BLU access. |
| + | * '''Lean-to''': Left of the single BLU access is a Lean-to shack offering excellent cover for an Engineer's nest. | ||
| + | * '''Buildings''': Continuing on from checkpoint A are a series of elevated hallways running through the two sections. A RED resupply room is featured, as well as a one-way door that allows players to step onto the patio surrounding the cart track. The other end of the hallway deposits directly in front of checkpoint B, with the aforementioned patio circling the outer perimeter of the building. | ||
* '''Cliff Edge''': The cliff also continues from checkpoint A, growing in size to be a more formidable threat. | * '''Cliff Edge''': The cliff also continues from checkpoint A, growing in size to be a more formidable threat. | ||
* '''Shacks''': Hanging on the cliff are two shacks. The first shack has a staircase leading up to a three-walled room, with [[Pickups|health and ammo]] present. The second stops right before the cliff, with a treacherous platform hanging off with the promise of ammo. This platform is situated directly opposite of the RED resupply room, with a sign acting as a barrier between the two. | * '''Shacks''': Hanging on the cliff are two shacks. The first shack has a staircase leading up to a three-walled room, with [[Pickups|health and ammo]] present. The second stops right before the cliff, with a treacherous platform hanging off with the promise of ammo. This platform is situated directly opposite of the RED resupply room, with a sign acting as a barrier between the two. | ||
| + | |||
| + | Capturing the second point moves RED respawn to their final base and moves BLU respawn to Point A. | ||
<gallery widths=140px heights=80px perrow=5> | <gallery widths=140px heights=80px perrow=5> | ||
| − | File:Precipice B. | + | File:Precipice B.png| The checkpoint. |
File:Precipice B1.jpg| More interiors. | File:Precipice B1.jpg| More interiors. | ||
| − | File:Precipice B2. | + | File:Precipice B2.png| Some of the patios overlooking the checkpoint. |
| − | File:Precipice B3. | + | File:Precipice B3.png| The stretches of track beyond the checkpoint. |
</gallery> | </gallery> | ||
| Line 62: | Line 74: | ||
Checkpoint C is located tightly within a tunnel. At the end of this tunnel is a hallway, and to the outside is a path running parallel. | Checkpoint C is located tightly within a tunnel. At the end of this tunnel is a hallway, and to the outside is a path running parallel. | ||
| − | * '''Caves''': To the left is the path which the Payload track follows, going into a tight mining tunnel. At the end of this tunnel is a platform, connected to a hallway that ultimately leads to the final control point | + | * '''Flank''': Just before the entrance to the cave lies a one-way gate to the right, only opening from the defending team's side. Once Checkpoint C is captured, this gate opens permanently, allowing access from both sides. |
| − | + | * '''Caves''': To the left is the path which the Payload track follows, going into a tight mining tunnel. At the end of this tunnel is a platform, connected to a hallway that ultimately leads to the final control point. There are also two inlays in the center of the tunnel, one with health and ammo, allowing players to take cover. | |
| + | |||
| + | Capturing the third point moves BLU respawn to the neutral respawn. | ||
<gallery widths=140px heights=80px perrow=5> | <gallery widths=140px heights=80px perrow=5> | ||
| − | File:Precipice | + | File:Precipice C2.jpg|The main tunnel flank gate. |
| − | File:Precipice | + | File:Precipice C1.jpg|The tunnel, as seen from the platform. |
</gallery> | </gallery> | ||
| Line 73: | Line 87: | ||
The final checkpoint lies behind two main pushes. The first one requires teams to push through the gates of an open shipping yard, where cover is plentiful and some minimal flanking is available. The second one opens up into a center surrounded by a building, where numerous hallways and vantage points allow the cart to be seen from just about every angle. | The final checkpoint lies behind two main pushes. The first one requires teams to push through the gates of an open shipping yard, where cover is plentiful and some minimal flanking is available. The second one opens up into a center surrounded by a building, where numerous hallways and vantage points allow the cart to be seen from just about every angle. | ||
| − | * '''Shipping Yard''': Between points C and D lies an open yard with various shipping containers and crates. To the left of this yard | + | * '''Shipping Yard''': Between points C and D lies an open yard with various shipping containers and crates. To the left of this yard is the hallway that connects C to D, acting as a way for classes to traverse between the points without having to take the frontlines. There is also a broken dock, which can act as a smaller-scale side route. |
| − | * ''' | + | * '''Pool of Souls''': Situated in the center of a hallway complex, the Final Point is a wide, open space, directly exposed to pathways both around and above the Payload track. |
| − | * '''Hallways''': Similar to the final point on [[Upward]], a RED respawn room is inside the walls of a building. This building has multiple narrow, small hallways, with the outside wrapped in patios | + | * '''Hallways''': Similar to the final point on [[Upward]], a RED respawn room is inside the walls of a building, Captain Dan's Wood Pulp mill. This building has multiple narrow, small hallways, with the outside wrapped in patios. This route allows for great visibility on the Payload cart and is easily accessible by either team. |
| + | * '''Hidden Room''': When standing on the balcony on the left side (when facing the point), one can see another balcony on the other side reachable only by technical [[Jumping]]. In this room is a medium health pack and a small ammo pack. A ghost also spawns here and spawns from the door and leaves through the other door on the balcony. | ||
<gallery widths=140px heights=80px perrow=5> | <gallery widths=140px heights=80px perrow=5> | ||
| − | File:Precipice final. | + | File:Precipice final.png|The final checkpoint. |
| − | File:Precipice D1. | + | File:Precipice D1.png|The broken port of the shipping yard. |
| − | File:Precipice D2. | + | File:Precipice D2.png|Looking down on the last push from one of the buildings. |
| − | File:Precipice D3.jpg| Entering the mazes of hallways. | + | File:Precipice D3.jpg|Entering the mazes of hallways. |
| + | File:Precipice D4.png|The Hidden Room with a health pack and an ammo pack. | ||
</gallery> | </gallery> | ||
| + | |||
| + | == Helpful overview == | ||
| + | [[File:Precipice overview2with lines.png|550px|Precipice's locations|left]] | ||
| + | 1.Courtyard | ||
| + | 2.Buildings | ||
| + | 3.Loading zone | ||
| + | 4.Shack A | ||
| + | 5.Shack B | ||
| + | 6.Caves | ||
| + | 7.Flank | ||
| + | 8.Shipping yard | ||
| + | 9.Hidden Room | ||
| + | |||
| + | Blue/red diagonal lines: Blu/Red first spawn | ||
| + | Blue/red double diagonal lines: Blu/Red second spawn | ||
| + | Blue/red double diagonal lines w/ a circle: Blu/Red third spawn | ||
| + | |||
| + | Yellow circle: First checkpoint | ||
| + | Green circle: Second checkpoint | ||
| + | Pink circle: Third checkpoint | ||
| + | White circle: Final checkpoint and the Pool of Souls | ||
== Strategy == | == Strategy == | ||
| − | + | {{map strategy link|Precipice|main=yes|stub=yes}} | |
== Update history == | == Update history == | ||
| + | {{Update history| | ||
'''{{Patch name|10|10|2019}}''' ([[Scream Fortress 2019]]) | '''{{Patch name|10|10|2019}}''' ([[Scream Fortress 2019]]) | ||
* Added Precipice to the game. | * Added Precipice to the game. | ||
| + | |||
| + | '''{{Patch name|10|16|2019}}''' | ||
| + | * Removed the right side path from BLU spawn near control point A to help BLU in keep momentum during coordinated pushes. | ||
| + | * BLU main spawn has been rearranged to outlet the BLU team to the left of the courtyard. | ||
| + | * Removed upper balcony for control point D on the RED team's side. | ||
| + | * Added additional cover near control point A and control point D to block long headshot sightlines. | ||
| + | * Redesigned RED spawn to support missing balcony level. | ||
| + | * Added a ramp inside the Cave to allow players to jump up onto the dropdown platform that leads to control point D. | ||
| + | * Fixed Engineers being able to build in certain doorways. | ||
| + | * Moved the health cabinet in the neutral spawn closer to the exit doors. | ||
| + | * Fixed one-way doors closing too soon, trapping players. | ||
| + | * Fixed the cliff-side one way door not closing properly, leaving behind invisible collision. | ||
| + | * Added additional health and ammo pickups between control point A and control point C. | ||
| + | * Fixed several spots players shouldn't be able to reach. | ||
| + | * Extended spawn room [[vdc:Triggers|triggers]] to better encapsulate the neutral forward spawn room. | ||
| + | * Made several shed rooftops non-buildable areas for Engineers{{sic}}. | ||
| + | * Added more [[pumpkin bomb]]s. | ||
| + | * [[Magic spells|Spell]]s cast by the cauldron are now helpful for the BLU team. The cauldron will only cast the tornado, jump pad, and skeleton spell. [[Skeletons]] will target and attack RED team. | ||
| + | * Fixed the cauldron spell audio not always playing correctly. | ||
| + | |||
| + | '''{{Patch name|10|17|2019}}''' | ||
| + | * Fixed being able to build in [[BLU]] spawn in one very particular small spot. | ||
| + | * Fixed heal [[Magic spells|spell]] from the cauldron cart not always applying properly. | ||
| + | * Fixed being able to damage BLU through the spawn exit on the top balcony of BLU's main spawn before the round has begun. | ||
| + | |||
| + | '''{{Patch name|10|24|2019}}''' | ||
| + | * Adjusted prop fade distances for improved performance near control point A and control point B. | ||
| + | * Adjusted flank route direction between control point C and control point D. | ||
| + | * Lowered the high-ground flank at control point A to make it accessible for Scouts. | ||
| + | * Changed the small health kits to medium sized near the cliff edge choke path. | ||
| + | |||
| + | '''{{Patch name|10|8|2020}}''' | ||
| + | * Lowered amount of entities on the map to prevent crashing | ||
| + | * Adjusted some misaligned textures around the map | ||
| + | * Simplified some detail for better performance | ||
| + | * Combined some models for better performance | ||
| + | * Removed some clutter to improve readability and fluid movement | ||
| + | * Fixed some lighting bugs around the map | ||
| + | * Added a one way door to left flank on last CP for Blu | ||
| + | * Removed build limitations on both Shack (CP1) and the isolated balcony (final CP) | ||
| + | * Adjusted health kits in last to be less favorable to defense | ||
| + | |||
| + | '''{{Patch name|10|9|2020}}''' | ||
| + | * Fixed missing models. | ||
| + | }} | ||
| + | |||
| + | == Bugs == | ||
| + | * After the third capture, the BLU Normal Skeleton spawns usually fail to crawl back out of the ground. The Developer accepts this as a serendipitous balancing factor. | ||
| + | * The cart will sometimes appear shaking and turned sideways. | ||
== Trivia == | == Trivia == | ||
| − | + | * A rock with a smiley face drawn onto it can be found by the side around the second point. This is in reference to [[wikia:w:c:jontronshow:Rockington|Rockington]], a character featured in a video made by YouTuber JonTron. | |
== Gallery == | == Gallery == | ||
<gallery> | <gallery> | ||
| − | File:Precipice | + | File:Precipice Cauldron Cart.png|The unique payload being pushed on the map. |
| − | |||
| − | |||
| − | |||
| − | |||
File:Precipice ghostroom.jpg|The developer room that houses the [[Ghost]] when not in use. | File:Precipice ghostroom.jpg|The developer room that houses the [[Ghost]] when not in use. | ||
| + | File:Precipice Rockington.png|The "Rockington" rock on the side around the second point. | ||
| + | File:Precipice Workshop image.jpg|Steam Workshop thumbnail for Precipice. | ||
| + | File:Pl precipice cart bug.jpg|Bug showing the cart turned sideways. | ||
</gallery> | </gallery> | ||
Latest revision as of 02:48, 22 August 2024
| Precipice | |
|---|---|
| |
| Basic Information | |
| Map type: | Payload |
| File name: | pl_precipice_event_final
|
| Released: | October 10, 2019 Patch (Scream Fortress XI) |
| Developer(s): | TheHorseStrangler TanookiSuit3 |
| Map Info | |
| Environment: | Halloween |
| Setting: | Night |
| Hazards: | Pitfalls, Ghosts, Skeletons, Pumpkin bombs |
| Magic spells: | Yes |
| Bot support: | Yes |
| Map Items | |
| Map Photos | |
| Map Overview | |
| Map Stamp | |
| Supporters Leaderboard | |
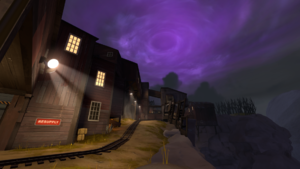
Precipice is a community-created Payload map released during the Scream Fortress 2019 update that takes place between secret bases in abandoned mills built along the edge of a chasm.
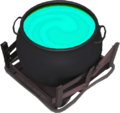
BLU must push a minecart carrying a bubbling witch's cauldron of potion catalyst through the map to dump in the Pool of Souls defended by RED. When the cauldron boils over along the way, watch out!
The map is noted for having a more than usual number of chokes along narrow, relatively straight routes, a couple being particularly strong at Points A and D, both requiring exceptionally coordinated team play to defeat any sort of organized defense.
Precipice was contributed to the Steam Workshop.
Cauldron Cart
The cauldron on the Cart contains a brew that sloshes as players capture it. At the start of the round, the content of the cauldron only steams and simmers. After about 15 seconds it starts to boil, and the cauldron starts to bubble over after an additional 15 seconds. After another thirty seconds, for a total of a minute, the cauldron pops off one or more spell effects. These include a large, but brittle, BLU-allied Skeleton that is summoned from the earth on BLU's side of the cauldron, a small random number of BLU Normal Skeletons that jump out of the cauldron, and a "tornado" that can shield pushers from explosions. The cauldron also has a chance to buff healing, either through supercharged healing beams, or a direct three times buff in cart healing rate. Additionally, one to three Magic Spells could spawn around the cauldron. Any combination of these effects can happen at the same time. When any of these effects occur, the cauldron simmers down, resetting the effect timer. This event is also triggered when either of the first two points are captured.
Locations
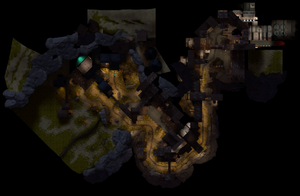
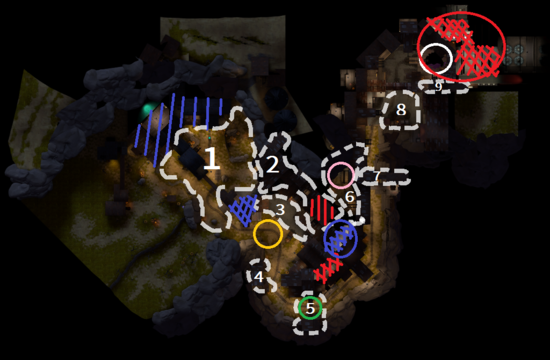
Note: If you are having trouble with finding the locations listed here, see the Helpful overview section to see their exact position marked on the map.
Checkpoint A
The BLU team starts at their headquarters with the Payload, with the first checkpoint right around the corner from where they start.
- Headquarters (BLU Spawn): The initial respawn and resupply area is in a Blue Corn Co. mill with three exits, two for the left and one for the right. The center-most exit deposits players directly onto the cart in the middle of a field, whereas the far left exit leads to an elevated area to the side of the Payload. The right exit, meanwhile, allows players to take a route slightly further ahead of the Payload. There are two resupply cabinets: one located in the middle of the respawn room and one in the hallway to the right spawn exit.
- Courtyard: Located directly outside the respawn building is the courtyard where the Payload track starts. This courtyard features basic elevated platforms and partial walling. The only building in this courtyard (other than the BLU spawn) houses the only health kit for this area.
- Buildings: At the end of the courtyard lies the first checkpoint. On the left of the checkpoint is a series of buildings, which not only connect from checkpoint A to checkpoint B but also house a RED resupply room. On the right of the checkpoint lies the cliff edge, which acts as an environmental hazard for any classes that fall off.
RED initially respawns at the neutral spawn about halfway along the map with two gates, one a shortcut to the first point. Capturing the first point closes that short route.
Checkpoint B
Checkpoint B is located running parallel to a series of hallways, with the cliff edge running on its other side.
- Loading Zone: Beyond the checkpoint, A choke is a wider area around which RED defenders can spread out, but focus their attention and fire on the single BLU access.
- Lean-to: Left of the single BLU access is a Lean-to shack offering excellent cover for an Engineer's nest.
- Buildings: Continuing on from checkpoint A are a series of elevated hallways running through the two sections. A RED resupply room is featured, as well as a one-way door that allows players to step onto the patio surrounding the cart track. The other end of the hallway deposits directly in front of checkpoint B, with the aforementioned patio circling the outer perimeter of the building.
- Cliff Edge: The cliff also continues from checkpoint A, growing in size to be a more formidable threat.
- Shacks: Hanging on the cliff are two shacks. The first shack has a staircase leading up to a three-walled room, with health and ammo present. The second stops right before the cliff, with a treacherous platform hanging off with the promise of ammo. This platform is situated directly opposite of the RED resupply room, with a sign acting as a barrier between the two.
Capturing the second point moves RED respawn to their final base and moves BLU respawn to Point A.
Checkpoint C
Checkpoint C is located tightly within a tunnel. At the end of this tunnel is a hallway, and to the outside is a path running parallel.
- Flank: Just before the entrance to the cave lies a one-way gate to the right, only opening from the defending team's side. Once Checkpoint C is captured, this gate opens permanently, allowing access from both sides.
- Caves: To the left is the path which the Payload track follows, going into a tight mining tunnel. At the end of this tunnel is a platform, connected to a hallway that ultimately leads to the final control point. There are also two inlays in the center of the tunnel, one with health and ammo, allowing players to take cover.
Capturing the third point moves BLU respawn to the neutral respawn.
Checkpoint D
The final checkpoint lies behind two main pushes. The first one requires teams to push through the gates of an open shipping yard, where cover is plentiful and some minimal flanking is available. The second one opens up into a center surrounded by a building, where numerous hallways and vantage points allow the cart to be seen from just about every angle.
- Shipping Yard: Between points C and D lies an open yard with various shipping containers and crates. To the left of this yard is the hallway that connects C to D, acting as a way for classes to traverse between the points without having to take the frontlines. There is also a broken dock, which can act as a smaller-scale side route.
- Pool of Souls: Situated in the center of a hallway complex, the Final Point is a wide, open space, directly exposed to pathways both around and above the Payload track.
- Hallways: Similar to the final point on Upward, a RED respawn room is inside the walls of a building, Captain Dan's Wood Pulp mill. This building has multiple narrow, small hallways, with the outside wrapped in patios. This route allows for great visibility on the Payload cart and is easily accessible by either team.
- Hidden Room: When standing on the balcony on the left side (when facing the point), one can see another balcony on the other side reachable only by technical Jumping. In this room is a medium health pack and a small ammo pack. A ghost also spawns here and spawns from the door and leaves through the other door on the balcony.
Helpful overview
1.Courtyard
2.Buildings
3.Loading zone
4.Shack A
5.Shack B
6.Caves
7.Flank
8.Shipping yard
9.Hidden Room
Blue/red diagonal lines: Blu/Red first spawn
Blue/red double diagonal lines: Blu/Red second spawn
Blue/red double diagonal lines w/ a circle: Blu/Red third spawn
Yellow circle: First checkpoint
Green circle: Second checkpoint
Pink circle: Third checkpoint
White circle: Final checkpoint and the Pool of Souls
Strategy
 | “Sun Tzu's got nothing on us!” This map's Community strategy page is a stub. As such, it is not complete. You can help the Team Fortress Wiki Community Strategy Project by expanding it. Notes: None added |
Update history
- Added Precipice to the game.
- Removed the right side path from BLU spawn near control point A to help BLU in keep momentum during coordinated pushes.
- BLU main spawn has been rearranged to outlet the BLU team to the left of the courtyard.
- Removed upper balcony for control point D on the RED team's side.
- Added additional cover near control point A and control point D to block long headshot sightlines.
- Redesigned RED spawn to support missing balcony level.
- Added a ramp inside the Cave to allow players to jump up onto the dropdown platform that leads to control point D.
- Fixed Engineers being able to build in certain doorways.
- Moved the health cabinet in the neutral spawn closer to the exit doors.
- Fixed one-way doors closing too soon, trapping players.
- Fixed the cliff-side one way door not closing properly, leaving behind invisible collision.
- Added additional health and ammo pickups between control point A and control point C.
- Fixed several spots players shouldn't be able to reach.
- Extended spawn room triggers to better encapsulate the neutral forward spawn room.
- Made several shed rooftops non-buildable areas for Engineers(sic).
- Added more pumpkin bombs.
- Spells cast by the cauldron are now helpful for the BLU team. The cauldron will only cast the tornado, jump pad, and skeleton spell. Skeletons will target and attack RED team.
- Fixed the cauldron spell audio not always playing correctly.
- Fixed being able to build in BLU spawn in one very particular small spot.
- Fixed heal spell from the cauldron cart not always applying properly.
- Fixed being able to damage BLU through the spawn exit on the top balcony of BLU's main spawn before the round has begun.
- Adjusted prop fade distances for improved performance near control point A and control point B.
- Adjusted flank route direction between control point C and control point D.
- Lowered the high-ground flank at control point A to make it accessible for Scouts.
- Changed the small health kits to medium sized near the cliff edge choke path.
- Lowered amount of entities on the map to prevent crashing
- Adjusted some misaligned textures around the map
- Simplified some detail for better performance
- Combined some models for better performance
- Removed some clutter to improve readability and fluid movement
- Fixed some lighting bugs around the map
- Added a one way door to left flank on last CP for Blu
- Removed build limitations on both Shack (CP1) and the isolated balcony (final CP)
- Adjusted health kits in last to be less favorable to defense
- Fixed missing models.
Bugs
- After the third capture, the BLU Normal Skeleton spawns usually fail to crawl back out of the ground. The Developer accepts this as a serendipitous balancing factor.
- The cart will sometimes appear shaking and turned sideways.
Trivia
- A rock with a smiley face drawn onto it can be found by the side around the second point. This is in reference to Rockington, a character featured in a video made by YouTuber JonTron.
Gallery
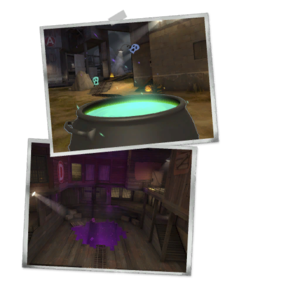
The developer room that houses the Ghost when not in use.
| ||||||||||||||||||||||||||||||||||||||||||||||
| |||||||||||||||||||||||||||||||||||||||||||||||||||||||||||||||||||
