Difference between revisions of "Borneo"
m (→Checkpoint 1) |
BrazilianNut (talk | contribs) m (Moved "Trivia" to before "Gallery".) |
||
| (21 intermediate revisions by 10 users not shown) | |||
| Line 1: | Line 1: | ||
{{Map infobox | {{Map infobox | ||
| − | | game-type | + | | map-status = community |
| − | | file-name | + | | map-game-type = Payload |
| + | | map-file-name = pl_borneo | ||
| map-image = Pl Borneo.jpg | | map-image = Pl Borneo.jpg | ||
| − | | | + | | map-released = {{Patch name|7|2|2015}} |
| − | + | | map-released-major = Gun Mettle Update | |
| map-environment = Jungle | | map-environment = Jungle | ||
| map-setting = Daylight, overcast | | map-setting = Daylight, overcast | ||
| − | | map- | + | | map-stamp-link = https://steamcommunity.com/stats/TF2/leaderboards/893626 |
| − | | map-health | + | | map-pickups-health-small = 10 |
| − | | map-health | + | | map-pickups-health-medium = 9 |
| − | | map-ammo | + | | map-pickups-health-large = 1 |
| − | | map-ammo | + | | map-pickups-ammo-small = 6 |
| − | | map-ammo | + | | map-pickups-ammo-medium = 9 |
| + | | map-pickups-ammo-large = 4 | ||
}} | }} | ||
| Line 20: | Line 22: | ||
{{campaign pass map commission|Gun Mettle}} | {{campaign pass map commission|Gun Mettle}} | ||
| + | |||
| + | Borneo was [https://steamcommunity.com/sharedfiles/filedetails/?id=454139147 contributed] to the Steam Workshop. | ||
== Locations == | == Locations == | ||
| − | + | {{HelpfulOverviewNote}} | |
| − | |||
=== Checkpoint 1 === | === Checkpoint 1 === | ||
| − | The cart starts outside the BLU [[Respawn|Spawn]] and runs past a small shed, and underneath a raised catwalk near a small house. From there, it | + | The cart starts outside the BLU [[Respawn|Spawn]] and runs past a small shed, and underneath a raised catwalk near a small house. From there, it goes through a maintenance building. |
* '''BLU Base''': The BLU Spawn is small with one [[Respawn#Resupply|resupply cabinet]] and three exits. One on each side, and one in the front where the cart is. | * '''BLU Base''': The BLU Spawn is small with one [[Respawn#Resupply|resupply cabinet]] and three exits. One on each side, and one in the front where the cart is. | ||
| − | |||
* '''Shed''': The shed is to the right of the track. Inside is a small Health kit. | * '''Shed''': The shed is to the right of the track. Inside is a small Health kit. | ||
| − | |||
* '''Small House''': The house on the left of the track is raised above the ground, and has a bridge to the Maintenance Building. [[Engineer]]s and [[Snipers]] can use the raised area as a vantage point to get the higher ground. Inside the house is a Max [[Ammo|Ammo kit]], and a medium [[Health#Health kits|Health kit]]. | * '''Small House''': The house on the left of the track is raised above the ground, and has a bridge to the Maintenance Building. [[Engineer]]s and [[Snipers]] can use the raised area as a vantage point to get the higher ground. Inside the house is a Max [[Ammo|Ammo kit]], and a medium [[Health#Health kits|Health kit]]. | ||
| − | + | * '''Maintenance Building''': Outside the second point is a house-like structure with the cart checkpoint underneath a maintenance area. Inside the building itself is a medium health and ammo kit. There is also a BLU resupply room at the end of the structure. Next to the resupply room is a secret passage to use as an exit. | |
| − | * '''Maintenance Building''': Outside the second point is a house like structure with the cart checkpoint underneath a maintenance area. Inside the building itself is a medium health and ammo kit. There is also a BLU resupply room at the end of the structure. Next to the resupply room is secret passage to use as an exit. | ||
<gallery> | <gallery> | ||
| Line 41: | Line 41: | ||
=== Checkpoint 2 === | === Checkpoint 2 === | ||
| − | From the other side of the Maintenance area, the cart | + | From the other side of the Maintenance area, the cart moves forward towards a left turn by a grey color structure. Once turned, it climbs up a small wooden bridge over a ditch to the checkpoint in front of a concrete tunnel through a hill. |
| − | |||
| − | |||
| − | |||
| − | |||
| + | * '''Grey Structure''': The grey-colored building has a dropoff which players can use as a location to fight the BLU team players on the bridge over the ditch. Inside the building is a max Ammo kit and a medium Health kit. | ||
| + | * '''Ditch''': The ditch under the bridge can serve as a tactical advantage. Players who drop down into it can climb back up near the grey structure, where it leads them straight to the second checkpoint. Along the way are a medium Health and Ammo kit. | ||
* '''Tunnel Entrance''': In front of the entrance to the tunnel is the second checkpoint. To the left of the checkpoint is an entrance into a hill interior that allows for access to more tactical vantage points as well as alternate routes for players. | * '''Tunnel Entrance''': In front of the entrance to the tunnel is the second checkpoint. To the left of the checkpoint is an entrance into a hill interior that allows for access to more tactical vantage points as well as alternate routes for players. | ||
| − | |||
* '''Hill Interior''': Inside the facility is a small hallway that leads to the next area past the tunnel. There is also a stairway to a balcony overlooking the second checkpoint, which serves as a perfect position for Snipers. There is also another hallway that leads into the interior of the tunnel. | * '''Hill Interior''': Inside the facility is a small hallway that leads to the next area past the tunnel. There is also a stairway to a balcony overlooking the second checkpoint, which serves as a perfect position for Snipers. There is also another hallway that leads into the interior of the tunnel. | ||
| − | |||
<gallery> | <gallery> | ||
| Line 58: | Line 54: | ||
=== Checkpoint 3 === | === Checkpoint 3 === | ||
| − | Past the tunnel the cart | + | Past the tunnel, the cart arrives in a large open area and head forward towards a large garage structure where checkpoint 3 is held. Along the way is a resupply room for both teams. |
* '''RED Resupply''': The RED Resupply is underneath the Hill Interior shortcut, through an unmarked metal door. | * '''RED Resupply''': The RED Resupply is underneath the Hill Interior shortcut, through an unmarked metal door. | ||
| − | |||
* '''BLU Resupply''': The BLU Resupply is at a wooden platform between the Hill Interior shortcut, and one of the entrances to the garage. | * '''BLU Resupply''': The BLU Resupply is at a wooden platform between the Hill Interior shortcut, and one of the entrances to the garage. | ||
| − | + | * '''Giant Garage''': The garage is a three-story structure with three floors of catwalks and medium and small Health and Ammo kits. Inside is the third checkpoint at the other end. There are entrances on the second floor from the sides, and a main entrance on the first floor along the track. The track exits through the right side; two more exits are in the front on the second floor. | |
| − | * '''Giant Garage''': The garage is a three story structure with three floors of catwalks and medium and small Health and Ammo kits. Inside is the third checkpoint at the other end. There are entrances on the second floor from the sides, and a main entrance on the first floor along the track. The track exits through the right side; two more exits are in the front on the second floor. | ||
| − | |||
<gallery> | <gallery> | ||
| Line 75: | Line 68: | ||
=== Checkpoint 4 === | === Checkpoint 4 === | ||
| − | From the garage it is a straight path to the cart target: a hatch in the RED Base down into a pit full of explosive barrels. Along the left side are a few smaller structures with supplies | + | From the garage, it is a straight path to the cart target: a hatch in the RED Base down into a pit full of explosive barrels. Along the left side are a few smaller structures with supplies. |
| − | |||
| − | |||
| + | * '''Roadside Structure''': Next to a little dirt road is a small structure. The structure contains a medium Health kit. | ||
* '''Casali Building''': The [[List of companies|Casali Shafting Co.]] structure has several small Health and Ammo kits around the structure. It can also be used as a flanking point to avoid direct fire coming from inside the RED Base. | * '''Casali Building''': The [[List of companies|Casali Shafting Co.]] structure has several small Health and Ammo kits around the structure. It can also be used as a flanking point to avoid direct fire coming from inside the RED Base. | ||
| − | |||
* '''RED Base''': The BLU cart's main target is a hatch at the center of the facility. The facility itself has several vantage points for RED team members ranging from barrels for cover to catwalks with small walls to duck under. There are two side entrances inside for BLU team players to go through to flank RED mercs. | * '''RED Base''': The BLU cart's main target is a hatch at the center of the facility. The facility itself has several vantage points for RED team members ranging from barrels for cover to catwalks with small walls to duck under. There are two side entrances inside for BLU team players to go through to flank RED mercs. | ||
| − | |||
<gallery> | <gallery> | ||
| Line 90: | Line 80: | ||
</gallery> | </gallery> | ||
| + | == Helpful overview == | ||
| + | [[File:Borneo overview with lines.png|400px|Borneo's locations|left]] | ||
| + | <big>1.Shed</big> | ||
| + | <big>2.Small House</big> | ||
| + | <big>3.Maintenance Building</big> | ||
| + | <big>4.Grey Structure</big> | ||
| + | <big>5.Bridge</big> | ||
| + | <big>6.Hill interior</big> | ||
| + | <big>7.Tunnel</big> | ||
| + | <big>8.Giant Garage</big> | ||
| + | <big>9.Casali building</big> | ||
| + | |||
| + | <big>Blue/red diagonal lines: Blu/Red first spawn</big> | ||
| + | <big>Blue/red double diagonal lines:Blu/Red second spawn</big> | ||
| + | <big>Blue/red double diagonal lines w/ a circle: Blu/Red third spawn</big> | ||
| + | |||
| + | <big>Yellow circle: First checkpoint</big> | ||
| + | <big>Blue circle: Second checkpoint</big> | ||
| + | <big>Pink circle: Third checkpoint</big> | ||
| + | <big>Area in front of the Red second spawn: Final checkpoint</big> | ||
| + | |||
| + | {{clr}} | ||
== Strategy == | == Strategy == | ||
| − | |||
{{main|Community Borneo strategy}} | {{main|Community Borneo strategy}} | ||
| − | + | {{community strategy stub link}} | |
== Changelog == | == Changelog == | ||
| Line 166: | Line 177: | ||
== Trivia == | == Trivia == | ||
* Borneo is an island in Southeast Asia. It's the largest island in Asia, and is the third largest island in the world. It's divided amongst Indonesia, Brunei, and Malaysia. It is home to one of the [[w:Borneo lowland rain forests|oldest existing rainforests]], hence the map's jungle design. | * Borneo is an island in Southeast Asia. It's the largest island in Asia, and is the third largest island in the world. It's divided amongst Indonesia, Brunei, and Malaysia. It is home to one of the [[w:Borneo lowland rain forests|oldest existing rainforests]], hence the map's jungle design. | ||
| + | |||
| + | == Gallery == | ||
| + | <gallery> | ||
| + | File:Steamworkshop tf2 borneo thumb.jpg|Steam Workshop thumbnail for Borneo. | ||
| + | </gallery> | ||
== External links == | == External links == | ||
| − | * [ | + | * [https://forums.tf2maps.net/showthread.php?t=17011 TF2maps.net page] |
{{Gun Mettle Update Nav}} | {{Gun Mettle Update Nav}} | ||
{{Maps Nav}} | {{Maps Nav}} | ||
Latest revision as of 13:05, 7 November 2024
| Borneo | |
|---|---|

| |
| Basic Information | |
| Map type: | Payload |
| File name: | pl_borneo
|
| Released: | July 2, 2015 Patch (Gun Mettle Update) |
| Developer(s): | Sean "Heyo" Cutino Matt "vhalin" Leahy |
| Map Info | |
| Environment: | Jungle |
| Setting: | Daylight, overcast |
| Map Items | |
| Map Overview | |
| Map Stamp | |
| Supporters Leaderboard | |
| “ | I am melting!
Click to listen
— The Medic feeling the jungle's humidity
|
” |
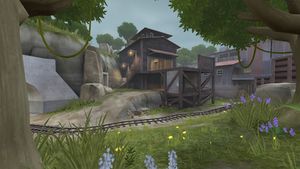
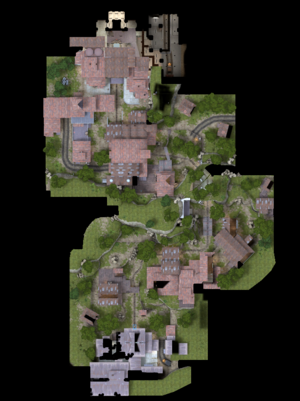
Borneo is a community-made single-stage Jungle-themed Payload map. It was included in the Gun Mettle Update.
A portion of the money made from the sales of the Gun Mettle Campaign Pass goes to the authors of the map.
Borneo was contributed to the Steam Workshop.
Contents
Locations
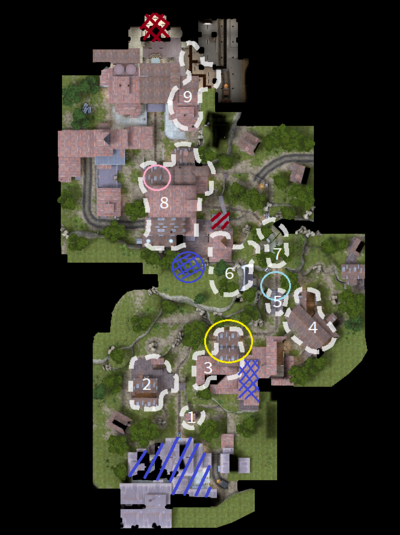
Note: If you are having trouble with finding the locations listed here, see the Helpful overview section to see their exact position marked on the map.
Checkpoint 1
The cart starts outside the BLU Spawn and runs past a small shed, and underneath a raised catwalk near a small house. From there, it goes through a maintenance building.
- BLU Base: The BLU Spawn is small with one resupply cabinet and three exits. One on each side, and one in the front where the cart is.
- Shed: The shed is to the right of the track. Inside is a small Health kit.
- Small House: The house on the left of the track is raised above the ground, and has a bridge to the Maintenance Building. Engineers and Snipers can use the raised area as a vantage point to get the higher ground. Inside the house is a Max Ammo kit, and a medium Health kit.
- Maintenance Building: Outside the second point is a house-like structure with the cart checkpoint underneath a maintenance area. Inside the building itself is a medium health and ammo kit. There is also a BLU resupply room at the end of the structure. Next to the resupply room is a secret passage to use as an exit.
Checkpoint 2
From the other side of the Maintenance area, the cart moves forward towards a left turn by a grey color structure. Once turned, it climbs up a small wooden bridge over a ditch to the checkpoint in front of a concrete tunnel through a hill.
- Grey Structure: The grey-colored building has a dropoff which players can use as a location to fight the BLU team players on the bridge over the ditch. Inside the building is a max Ammo kit and a medium Health kit.
- Ditch: The ditch under the bridge can serve as a tactical advantage. Players who drop down into it can climb back up near the grey structure, where it leads them straight to the second checkpoint. Along the way are a medium Health and Ammo kit.
- Tunnel Entrance: In front of the entrance to the tunnel is the second checkpoint. To the left of the checkpoint is an entrance into a hill interior that allows for access to more tactical vantage points as well as alternate routes for players.
- Hill Interior: Inside the facility is a small hallway that leads to the next area past the tunnel. There is also a stairway to a balcony overlooking the second checkpoint, which serves as a perfect position for Snipers. There is also another hallway that leads into the interior of the tunnel.
Checkpoint 3
Past the tunnel, the cart arrives in a large open area and head forward towards a large garage structure where checkpoint 3 is held. Along the way is a resupply room for both teams.
- RED Resupply: The RED Resupply is underneath the Hill Interior shortcut, through an unmarked metal door.
- BLU Resupply: The BLU Resupply is at a wooden platform between the Hill Interior shortcut, and one of the entrances to the garage.
- Giant Garage: The garage is a three-story structure with three floors of catwalks and medium and small Health and Ammo kits. Inside is the third checkpoint at the other end. There are entrances on the second floor from the sides, and a main entrance on the first floor along the track. The track exits through the right side; two more exits are in the front on the second floor.
Checkpoint 4
From the garage, it is a straight path to the cart target: a hatch in the RED Base down into a pit full of explosive barrels. Along the left side are a few smaller structures with supplies.
- Roadside Structure: Next to a little dirt road is a small structure. The structure contains a medium Health kit.
- Casali Building: The Casali Shafting Co. structure has several small Health and Ammo kits around the structure. It can also be used as a flanking point to avoid direct fire coming from inside the RED Base.
- RED Base: The BLU cart's main target is a hatch at the center of the facility. The facility itself has several vantage points for RED team members ranging from barrels for cover to catwalks with small walls to duck under. There are two side entrances inside for BLU team players to go through to flank RED mercs.
Helpful overview
1.Shed
2.Small House
3.Maintenance Building
4.Grey Structure
5.Bridge
6.Hill interior
7.Tunnel
8.Giant Garage
9.Casali building
Blue/red diagonal lines: Blu/Red first spawn
Blue/red double diagonal lines:Blu/Red second spawn
Blue/red double diagonal lines w/ a circle: Blu/Red third spawn
Yellow circle: First checkpoint
Blue circle: Second checkpoint
Pink circle: Third checkpoint
Area in front of the Red second spawn: Final checkpoint
Strategy
 | “Sun Tzu's got nothing on us!” This map's Community strategy page is a stub. As such, it is not complete. You can help the Team Fortress Wiki Community Strategy Project by expanding it. Notes: None added |
Changelog
RC4 Changelog
- Removed side entrance in the forward defensive holding building at 1st.
- Removed 3rd story entrance into the 3rd point house.
- Cut off part of the 3rd story level in the 3rd point house. (It does not overlook the left entry anymore.)
- Added covered walkway up to the defensive highground on the right side of the final point.
RC3 Changelog
- Expanded the space in the yard after the 1st.
- Removed the large pillar in the interior flank route after 1st.
- Added more doorways lining the tunnel after 2nd opening up the space more.
- Completely reconstructed the building housing the 3rd point, added in a third floor, expanded the space, etc.
- Removed roof flank route that went over 3rd building.
- Reconstructed the left entryway into final building, the entrance is now further to the side of the building.
- Widened the right doorway into final building.
- Removed the window that allowed defense to see the right entry into final.
- Expanded the space of the right entryway into final.
- Reconstructed some of the geometry next to the final point.
- Removed the pillars in final.
RC2 Changelog
- Changed the shack building in 1st into a watch tower, players can no longer go on top of the building.
- Added more stairs to the side route in in 2nd, so blue has more options.
- Moved red's forward spawn to a different location further back from 2nd point.
- Opened up the space around the cart tracks in yard before 3rd.
- Moved blue's final forward spawn further up.
- Opened up the space in the yard right before the final building interior.
- Modified the placement of health and ammo packs in general.
RC1 Changelog
For this update we redid a lot of the map. Basically, we opened up a lot of the areas because it was too restrictive before. We also made many areas more interesting, by adding highground, more routes, etc. It's pretty much a different map than it was before.
Here's a general description of the changes:
- Moved blue spawn at 1st back, so there's now a lot more open space in the area.
- Added a route behind the left building in 1st
- Made more space on the cliff highground in 1st
- Added a route behind the 1st capture point building and knocked out some of the walls
- Added a drop down route in 2nd that avoids Snipers
- Moved the terrain wall back in the flank route in 2nd so there's more space
- Widened the tunnel
- Redid the bunker area in-between 2nd and 3rd entirely, there's now a second floor and a lot more space
- Added a highground area in the middle of the yard before 3rd
- Added a route to the highground area from the bunker in 3rd
- Added a roof flanking route around 3rd building
- Redid 3rd building so there's a lot more space and more highground
- Redid the yard before final so there's more space.
- Raised the ceiling in final
- Made final a lot bigger with more routes
Update history
July 2, 2015 Patch #1 (Gun Mettle Update)
- Added Borneo to the game.
- Fixed an exploit related to the final control point and dropped weapons on Borneo.
- Updated maps have been compressed to save space.
- Fixed an exploit allowing players could get outside the map.
- Fixed an exploit related to the final control point and dropped weapons.
Trivia
- Borneo is an island in Southeast Asia. It's the largest island in Asia, and is the third largest island in the world. It's divided amongst Indonesia, Brunei, and Malaysia. It is home to one of the oldest existing rainforests, hence the map's jungle design.
Gallery
External links
| ||||||||||||||||||||||||||||||||||||||||


