Difference between revisions of "Fastlane"
(added to locations, added accompanying images, standardized some sections) |
m |
||
| (53 intermediate revisions by 31 users not shown) | |||
| Line 1: | Line 1: | ||
{{Map infobox | {{Map infobox | ||
| − | |game-type=Control Point | + | | map-status = community |
| − | |file-name=cp_fastlane | + | | map-game-type = Control Point |
| − | |map-image= | + | | map-file-name = cp_fastlane |
| − | | | + | | map-image = Fastlane1.png |
| + | | map-stamp-link = https://steamcommunity.com/stats/TF2/leaderboards/30381 | ||
| + | | map-released = {{Patch name|6|19|2008}} | ||
| + | | map-released-major = Pyro Update | ||
| + | | map-environment = Desert | ||
| + | | map-setting = Daylight, sunny | ||
| + | | map-pickups-health-small = 11 | ||
| + | | map-pickups-health-medium = 14 | ||
| + | | map-pickups-ammo-medium = 20 | ||
| + | | map-pickups-ammo-large = 2 | ||
| + | | map-stamp-link = https://steamcommunity.com/stats/TF2/leaderboards/30380 | ||
}} | }} | ||
| − | {{Quotation|[ | + | {{Quotation|'''[https://steamgames.com/tf2/pyro/ The Pyro Update]'''|A control point map with five points, in the style of Badlands. Its symmetrical layout provides for high-speed and well-balanced gameplay, while the multiple indoor routes, connected to larger outdoor arenas, provide a wide set of interesting and varied combat spaces. The arena-style control points require solid teamwork to capture and hold.}} |
| − | A control point map with five points, in the style of | ||
| − | '''Fastlane''' is a | + | '''Fastlane''' is a [[Steam Workshop|community-created]] [[Control Point (game mode)#Symmetric|Standard Control Point]] map. It was released with the [[Pyro Update]] as an official map. Along with [[Turbine]], it became one of the first community-created maps to be chosen by [[Valve]] as an official ''Team Fortress 2'' map due to its outstanding quality. |
| − | |||
| − | |||
== Locations == | == Locations == | ||
| − | {{ | + | {{HelpfulOverviewNote}}<br> |
| − | |||
| − | |||
| − | |||
| − | |||
| − | |||
| − | |||
| − | The BLU and RED spawn rooms are at the far end respectively but change as the [[control points]] are captured. The winning team spawns at the control point before the nearest active one but the nearest a team can respawn is at Control Point 3. | + | The BLU and RED spawn rooms are at the far end respectively but change as the [[control point (objective)|control points]] are captured. The winning team spawns at the control point before the nearest active one but the nearest a team can respawn is at Control Point 3. |
| − | |||
=== Control Point 3 === | === Control Point 3 === | ||
| − | |||
This point is situated under a small structure with two levels that can be jumped to. Next to the point are two other buildings containing health and ammo. The middle area is very open and offers little cover from [[Snipers]]. | This point is situated under a small structure with two levels that can be jumped to. Next to the point are two other buildings containing health and ammo. The middle area is very open and offers little cover from [[Snipers]]. | ||
| + | * '''Catwalk (mid)''': The catwalks far from the point above the valley. | ||
| + | * '''Valley''': The valley leading up to the point, the only non-building entrance. | ||
| + | * '''Roof''': The roof of the central building. Contains a small health pack on top of it, making it a popular spot for [[Demoman|Demomen]] and [[Soldier]]s. | ||
| + | * '''Shack''': The shacks across from the central building. Contains a medium health and ammo pack. Behind it is a small alleyway that connects to the valley. | ||
| − | + | <gallery widths=150px heights=90px> | |
| − | + | File:fastlane1.png | Mid | |
| − | + | File:fastlane2.png | Valley/Catwalks | |
| − | + | File:fastlane3.png | Roof above mid | |
| − | + | File:fastlane4.png | Shack | |
| − | <gallery widths=150px heights= | ||
| − | File: | ||
| − | File: | ||
| − | File: | ||
| − | File: | ||
</gallery> | </gallery> | ||
=== Control Points 2 & 4 === | === Control Points 2 & 4 === | ||
| + | These points are very open, while all of their entrances are small chokepoints. These areas contain two houses, one for the first forward respawn, and another for housing health and ammo. | ||
| + | * '''Catwalk''': The catwalk connecting the entrance to the upper hallways, a common place for Snipers. | ||
| + | * '''House''': The side house next to the valley connecting to the mid catwalks. | ||
| + | * '''First forward resupply''': Directly across from the house, this house contains the second spawn for when mid is captured. | ||
| + | * '''Bridge''': The bridge is located above the main entrances to RED/BLU's base and connects the entrance to the final point's upper hallways. | ||
| − | + | <gallery widths=150px heights=90px> | |
| − | + | File:fastlane5.png | Second point | |
| − | + | File:fastlane6.png | House/First forward respawn | |
| − | + | File:fastlane7.png | Bridge | |
| − | + | File:fastlane8.png | Side house/base entrance | |
| − | |||
| − | |||
| − | <gallery widths=150px heights= | ||
| − | File: | ||
| − | File: | ||
| − | File: | ||
| − | File: | ||
</gallery> | </gallery> | ||
=== Control Points 1 & 5 === | === Control Points 1 & 5 === | ||
| − | |||
These points are directly outside of the spawn gates and contain three different entrances. The point itself is on top of a small set of stairs leading from one of the entrances. Two of the entrances can be accessed from ground level while the third entrance leads from the second floor. | These points are directly outside of the spawn gates and contain three different entrances. The point itself is on top of a small set of stairs leading from one of the entrances. Two of the entrances can be accessed from ground level while the third entrance leads from the second floor. | ||
| + | * '''Upper Hallways''': This is one of the three entrances to the point. It can be accessed from the second point catwalks and gives the attackers a height advantage. This area commonly contains Snipers due to it being a long narrow hallway. | ||
| + | * '''Lower Long hallway''': The long hallway accessed from the lower area of the previous point. | ||
| + | * '''Lobby''': The main entrance to the point, connecting to both the short hallway and long hallway entrances. | ||
| − | + | <gallery widths=150px heights=90px> | |
| − | + | File:fastlane9.png | Upper hallways next to Control Point 1/5 | |
| − | + | File:fastlane10.png | Spawn area | |
| + | File:fastlane11.png | Final point | ||
| + | File:fastlane12.png | Main entrance lobby | ||
| + | </gallery> | ||
| − | + | == Helpful overview == | |
| − | File: | + | [[File:Fastlane overview with lines.png|left|655px|Fastlane's locations]] |
| − | + | <big>1.Shacks | |
| − | + | 2.Valley | |
| − | + | 3.House | |
| − | </ | + | 4.Bridge |
| + | 5.Lobby | ||
| + | 6.Upper Hallway</big> | ||
| + | {{clr}} | ||
== Strategy == | == Strategy == | ||
| − | + | {{map strategy link|Fastlane|main=yes|stub=yes}} | |
| − | |||
| − | |||
| − | |||
| − | |||
| − | |||
| − | |||
| − | |||
| − | |||
| − | |||
| − | |||
| − | == Control Point | + | == Control Point timing == |
{{Control Point Timing/Official Map}} | {{Control Point Timing/Official Map}} | ||
== Update history == | == Update history == | ||
| − | '''[[ | + | '''{{Patch name|6|19|2008}}''' ([[Pyro Update]]) |
| − | * Updated Fastlane with Arttu's | + | * Added Fastlane to the game. |
| + | |||
| + | '''{{Patch name|2|24|2009}}''' ([[Scout Update]]) | ||
| + | * Updated Fastlane with Arttu's version. | ||
| + | |||
| + | '''{{Patch name|2|23|2012}}''' | ||
| + | * Fixed a spelling error in a cp_fastlane material. | ||
== Trivia == | == Trivia == | ||
| − | * | + | * If the player looks at the outside area of the map from various points, Fastlane appears to be floating; this is due to the improper construction of the map's skybox. |
== See also == | == See also == | ||
| − | * [ | + | * [https://steamgames.com/tf2/pyro/ The Pyro Update] |
| + | |||
| + | {{Pyro Update Nav}} | ||
| + | {{Maps Nav}} | ||
| − | + | [[Category:Quickplay maps]] | |
| − | |||
Latest revision as of 01:16, 18 January 2024
| Fastlane | |
|---|---|

| |
| Basic Information | |
| Map type: | Control Point |
| File name: | cp_fastlane
|
| Released: | June 19, 2008 Patch (Pyro Update) |
| Developer(s): | Arttu "SK" Mäki |
| Map Info | |
| Environment: | Desert |
| Setting: | Daylight, sunny |
| Map Items | |
| Map Photos | |
| Map Overview | |
| Map Stamp | |
| Supporters Leaderboard | |
| “ | A control point map with five points, in the style of Badlands. Its symmetrical layout provides for high-speed and well-balanced gameplay, while the multiple indoor routes, connected to larger outdoor arenas, provide a wide set of interesting and varied combat spaces. The arena-style control points require solid teamwork to capture and hold.
|
” |
Fastlane is a community-created Standard Control Point map. It was released with the Pyro Update as an official map. Along with Turbine, it became one of the first community-created maps to be chosen by Valve as an official Team Fortress 2 map due to its outstanding quality.
Contents
Locations
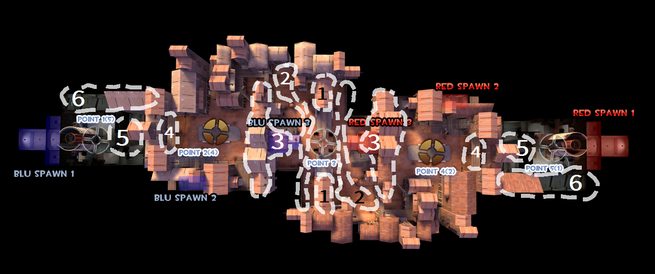
Note: If you are having trouble with finding the locations listed here, see the Helpful overview section to see their exact position marked on the map.
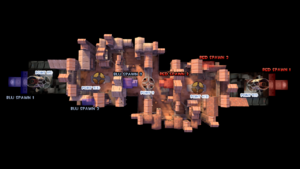
The BLU and RED spawn rooms are at the far end respectively but change as the control points are captured. The winning team spawns at the control point before the nearest active one but the nearest a team can respawn is at Control Point 3.
Control Point 3
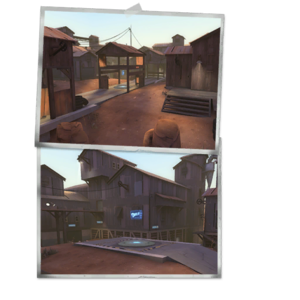
This point is situated under a small structure with two levels that can be jumped to. Next to the point are two other buildings containing health and ammo. The middle area is very open and offers little cover from Snipers.
- Catwalk (mid): The catwalks far from the point above the valley.
- Valley: The valley leading up to the point, the only non-building entrance.
- Roof: The roof of the central building. Contains a small health pack on top of it, making it a popular spot for Demomen and Soldiers.
- Shack: The shacks across from the central building. Contains a medium health and ammo pack. Behind it is a small alleyway that connects to the valley.
Control Points 2 & 4
These points are very open, while all of their entrances are small chokepoints. These areas contain two houses, one for the first forward respawn, and another for housing health and ammo.
- Catwalk: The catwalk connecting the entrance to the upper hallways, a common place for Snipers.
- House: The side house next to the valley connecting to the mid catwalks.
- First forward resupply: Directly across from the house, this house contains the second spawn for when mid is captured.
- Bridge: The bridge is located above the main entrances to RED/BLU's base and connects the entrance to the final point's upper hallways.
Control Points 1 & 5
These points are directly outside of the spawn gates and contain three different entrances. The point itself is on top of a small set of stairs leading from one of the entrances. Two of the entrances can be accessed from ground level while the third entrance leads from the second floor.
- Upper Hallways: This is one of the three entrances to the point. It can be accessed from the second point catwalks and gives the attackers a height advantage. This area commonly contains Snipers due to it being a long narrow hallway.
- Lower Long hallway: The long hallway accessed from the lower area of the previous point.
- Lobby: The main entrance to the point, connecting to both the short hallway and long hallway entrances.
Helpful overview
1.Shacks
2.Valley
3.House
4.Bridge
5.Lobby
6.Upper Hallway
Strategy
 | “Sun Tzu's got nothing on us!” This map's Community strategy page is a stub. As such, it is not complete. You can help the Team Fortress Wiki Community Strategy Project by expanding it. Notes: None added |
Control Point timing
| Control Point | Multiplier | Seconds | ||
|---|---|---|---|---|
| Control Point 1 and 5 | ×1 |
| ||
| ×2 |
| |||
| ×3 |
| |||
| ×4 |
| |||
| Control Point 2 and 4 | ×1 |
| ||
| ×2 |
| |||
| ×3 |
| |||
| ×4 |
| |||
| Control Point 3 | ×1 |
| ||
| ×2 |
| |||
| ×3 |
| |||
| ×4 |
|
Update history
June 19, 2008 Patch (Pyro Update)
- Added Fastlane to the game.
February 24, 2009 Patch (Scout Update)
- Updated Fastlane with Arttu's version.
- Fixed a spelling error in a cp_fastlane material.
Trivia
- If the player looks at the outside area of the map from various points, Fastlane appears to be floating; this is due to the improper construction of the map's skybox.
See also
| ||||||||||||||||||||


