Difference between revisions of "Cauldron"
ShadowMan44 (talk | contribs) m |
BrazilianNut (talk | contribs) m (→Strategy) |
||
| (11 intermediate revisions by 7 users not shown) | |||
| Line 1: | Line 1: | ||
| + | {{Other uses|this=the map|for=the cosmetic item with a similar name|Calamitous Cauldron}} | ||
{{Map infobox | {{Map infobox | ||
| − | | game-type = King of the Hill | + | | map-status = community |
| − | | file-name = koth_bagel_event | + | | map-game-type = King of the Hill |
| − | | map-image = Koth bagel event.png | + | | map-file-name = koth_bagel_event |
| − | | | + | | map-image = Koth bagel event.png |
| − | | | + | | map-released = {{Patch name|10|19|2018}} |
| − | + | | map-released-major = Scream Fortress 2018 | |
| − | | map-environment | + | | map-environment = Industrial / Halloween |
| − | | map-setting | + | | map-setting = Night |
| − | | map-hazards | + | | map-hazards = [[Pumpkin bomb]]s, [[Environmental death#Bubbling Cauldron|Bubbling Cauldron]], <br>[[Environmental_death#Fire_Pit|Fire Pit]], [[Environmental_death#Fireballs|Fireballs]], [[Skeletons]] |
| − | | map-underworld | + | | map-hazards-underworld = [[Environmental_death#Health drain|Health drain]], [[Pitfall]]s,<br/>[[Pumpkin bomb]]s |
| − | | map-stamp-link | + | | map-stamp-link = https://steamcommunity.com/stats/TF2/leaderboards/3036443 |
| − | | map-health | + | | map-pickups-health-small = 3 |
| − | | map-health | + | | map-pickups-health-medium = 8 |
| − | | map-ammo | + | | map-pickups-ammo-medium = 6 |
| − | | map-special | + | | map-pickups-special-pumpkin = yes |
| − | | map-bots = | + | | map-has-bots = yes |
}} | }} | ||
| − | '''Cauldron''' is a community- | + | '''Cauldron''' is a [[Steam Workshop|community-created]] [[King of the Hill]] map released during the [[Scream Fortress 2018]] update. It is a [[Halloween maps|Halloween version]] of the [[custom map]] [[Bagel]]. |
| − | Cauldron was [https://steamcommunity.com/sharedfiles/filedetails/?id=1159639999 contributed] to the | + | Cauldron was [https://steamcommunity.com/sharedfiles/filedetails/?id=1159639999 contributed] to the Steam Workshop. |
== Features == | == Features == | ||
| − | The [[control point (objective)|point]] on this map features a large cauldron. When the point is captured, the cauldron erupts, changes flame color to the controlling team, and triggers a random effect. The active effect is indicated by an icon displayed on the [[HUD]], which flashes when the effect is about to end. These effects include: | + | The [[control point (objective)|point]] on this map features a large cauldron. When the point is captured, the cauldron erupts, changes flame color to the controlling team, and triggers a random effect. The active effect is indicated by an icon displayed on the [[Heads-up display|HUD]], which flashes when the effect is about to end. These effects include: |
| − | + | : [[File:Cauldron Portal.png|30px]] Portals to the [[Underworld]] opening up. | |
| − | + | : [[File:Cauldron Skeletons.png|30px]] A group of [[Skeletons]] spawning. | |
| − | + | : [[File:Cauldron Fireball.png|30px]] [[Environmental_death#Fireballs|Fireballs]] raining out of the cauldron. | |
| − | + | : [[File:Cauldron Crits.png|30px]] Every player being granted [[Critical hits|Crits]]. | |
| − | Like several other Halloween maps, Cauldron has its own Underworld. After escaping it, players are granted temporary [[ÜberCharge|Invulnerability]] and | + | Like several other Halloween maps, Cauldron has its own Underworld. After escaping it, players are granted temporary [[ÜberCharge|Invulnerability]] and full health. |
== Locations == | == Locations == | ||
| − | + | {{HelpfulOverviewNote}}<br> | |
Cauldron is a map with many buildings that lead to the center point. Many areas of the map provide well cover such as the middle cauldron, or the pumpkins placed throughout. | Cauldron is a map with many buildings that lead to the center point. Many areas of the map provide well cover such as the middle cauldron, or the pumpkins placed throughout. | ||
| − | *'''Spawn areas''': The areas outside of both spawns are very wide and open. The spawns lead to three doors which takes the player through the building and to point. Each door | + | *'''Spawn areas''': The areas outside of both spawns are very wide and open. The spawns lead to three doors which takes the player through the building and to point. Each door takes the player to a unique place. |
** '''RED Spawn''': The wide and open area found outside of RED spawn. | ** '''RED Spawn''': The wide and open area found outside of RED spawn. | ||
** '''BLU Spawn''': Similar to RED spawn, this is the wide and open area outside of BLU spawn. | ** '''BLU Spawn''': Similar to RED spawn, this is the wide and open area outside of BLU spawn. | ||
| − | * '''Mid / Point''': In the middle of the center-most area, you can find Cauldron's unique point. The point is located under a cauldron, which | + | * '''Mid / Point''': In the middle of the center-most area, you can find Cauldron's unique point. The point is located under a cauldron, which starts to boil once the point is captured. The cauldron also bursts open giving an effect of a spell to the team who captured. The cauldron can also block fire from enemies providing a good defense when attempting a capture. |
** '''Battlements''': The battlements are the buildings located between the spawns and capture point on both sides. Each building has three doorways towards Spawn and three doorways towards the point. | ** '''Battlements''': The battlements are the buildings located between the spawns and capture point on both sides. Each building has three doorways towards Spawn and three doorways towards the point. | ||
| − | ** '''Side Building''': Opposite to the tracks / ramps, the side building is an area that is considered part of the battlements. Taking this path | + | ** '''Side Building''': Opposite to the tracks / ramps, the side building is an area that is considered part of the battlements. Taking this path leads directly to the High Ground, which players can get a full view of the point and surrounding area. |
*** '''Tracks / Ramp''': The right-hand route out from Spawn through each building passes down a ramp with a pair of tracks to the exit into the bottom of the valley. | *** '''Tracks / Ramp''': The right-hand route out from Spawn through each building passes down a ramp with a pair of tracks to the exit into the bottom of the valley. | ||
| − | *** '''Launch Pad''': The middle route out from Spawn doglegs down to the same exit as the tracks / ramp. On the way it passes the launch pad on the left. This area is met with a smokey fire and | + | *** '''Launch Pad''': The middle route out from Spawn doglegs down to the same exit as the tracks / ramp. On the way it passes the launch pad on the left. This area is met with a smokey fire and boosts the player up when stepped on. Taking the launch pad leads the player to the center area going directly towards point. |
** '''High Ground''': When looking from point, the high ground is seen on the right side. The high ground is on both teams' sides and has direct view of the complete enemy team's side and point. | ** '''High Ground''': When looking from point, the high ground is seen on the right side. The high ground is on both teams' sides and has direct view of the complete enemy team's side and point. | ||
** '''Valley''': The Valley is the low ground between the high rising buildings of the Battlements and the main building leading back to spawn. This area is wide and open which has little cover leads up a pathway to point. There is also a stair pathway which goes up to the Battlements. | ** '''Valley''': The Valley is the low ground between the high rising buildings of the Battlements and the main building leading back to spawn. This area is wide and open which has little cover leads up a pathway to point. There is also a stair pathway which goes up to the Battlements. | ||
| − | * '''Underworld''': The [[Underworld]] is an area only accessible by the cauldron on the point. When the cauldron erupts, the portal opens and | + | * '''Underworld''': The [[Underworld]] is an area only accessible by the cauldron on the point. When the cauldron erupts, the portal opens and teleports the player. Upon going to the Underworld, players are fully healed and have to jump across platforms and moving cauldrons to make it to the portal back before the poisonous gas kills them. The area surrounding the platforms is seen as a swamp of green sludge which kills the player if jumped into. Once players take the other portal back, they receive effect buffs for a short period of time. |
<gallery> | <gallery> | ||
| Line 54: | Line 55: | ||
File:CauldronMainAndBattlements.jpg| The Control point and Battlements | File:CauldronMainAndBattlements.jpg| The Control point and Battlements | ||
File:CauldronTrackRamp.jpg|The [[RED]] Track/Ramp | File:CauldronTrackRamp.jpg|The [[RED]] Track/Ramp | ||
| − | + | File:Cauldron Spooky Deer.jpg|A hallway that uses boosters to lift players up. A deer cutout can be seen in the window. | |
| − | + | File:Cauldron Underworld.jpg|The Underworld of Cauldron. | |
</gallery> | </gallery> | ||
| − | ==Helpful overview== | + | == Helpful overview == |
| − | [[ | + | [[File:Cauldron overview with lines.png|left|500px|Cauldron's locations]] |
<big>1.Spawn Areas | <big>1.Spawn Areas | ||
2.Tracks/Ramp | 2.Tracks/Ramp | ||
| Line 68: | Line 69: | ||
Red diagonal lines: Red Spawnroom | Red diagonal lines: Red Spawnroom | ||
Blue diagonal lines: Blu Spawnroom</big> | Blue diagonal lines: Blu Spawnroom</big> | ||
| + | |||
{{clr}} | {{clr}} | ||
== Strategy == | == Strategy == | ||
| − | + | <!-- Complete Locations first. --> | |
| − | {{ | + | {{map strategy link|Cauldron|main=yes}} |
== Update history == | == Update history == | ||
| Line 87: | Line 89: | ||
== Trivia == | == Trivia == | ||
| − | * Several toy trains are hidden around the map | + | * Several [[:File:Elliphany Electric Trains.png|toy trains]] are hidden around the map. |
* Deer cutouts can be found in mysterious locations, two of which are found in completely sealed off rooms on either side of the map. The only way to access them is through the use of <code>[[noclip]]</code>. | * Deer cutouts can be found in mysterious locations, two of which are found in completely sealed off rooms on either side of the map. The only way to access them is through the use of <code>[[noclip]]</code>. | ||
| Line 99: | Line 101: | ||
File:Cauldron Workshop image.jpg|Steam Workshop thumbnail for Cauldron. | File:Cauldron Workshop image.jpg|Steam Workshop thumbnail for Cauldron. | ||
</gallery> | </gallery> | ||
| + | |||
{{Scream Fortress 2018 Nav}} | {{Scream Fortress 2018 Nav}} | ||
{{Halloween Map Nav}} | {{Halloween Map Nav}} | ||
{{Maps Nav}} | {{Maps Nav}} | ||
Latest revision as of 13:00, 12 November 2024
| Cauldron | |
|---|---|
| |
| Basic Information | |
| Map type: | King of the Hill |
| File name: | koth_bagel_event
|
| Released: | October 19, 2018 Patch (Scream Fortress X) |
| Developer(s): | Lauren "Yrrzy" Godfrey Harlen "UEAKCrash" Linke Zach "Exactol" Matuson Sebastian "Seba" Grus Rebecca "Phi" Ailes Freyja |
| Map Info | |
| Environment: | Industrial / Halloween |
| Setting: | Night |
| Hazards: | Pumpkin bombs, Bubbling Cauldron, Fire Pit, Fireballs, Skeletons |
| Hazards (Underworld): | Health drain, Pitfalls, Pumpkin bombs |
| Bot support: | Yes |
| Map Items | |
| Map Photos | |
| Map Overview | |
| Map Stamp | |
| Supporters Leaderboard | |
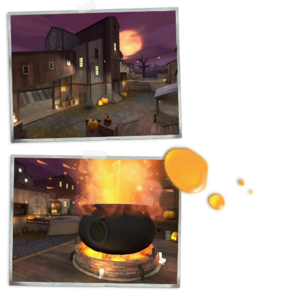
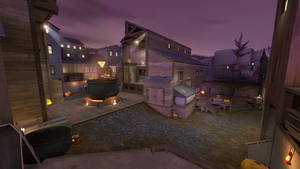
Cauldron is a community-created King of the Hill map released during the Scream Fortress 2018 update. It is a Halloween version of the custom map Bagel.
Cauldron was contributed to the Steam Workshop.
Features
The point on this map features a large cauldron. When the point is captured, the cauldron erupts, changes flame color to the controlling team, and triggers a random effect. The active effect is indicated by an icon displayed on the HUD, which flashes when the effect is about to end. These effects include:
 Portals to the Underworld opening up.
 A group of Skeletons spawning.
 Fireballs raining out of the cauldron.
 Every player being granted Crits.
Like several other Halloween maps, Cauldron has its own Underworld. After escaping it, players are granted temporary Invulnerability and full health.
Locations
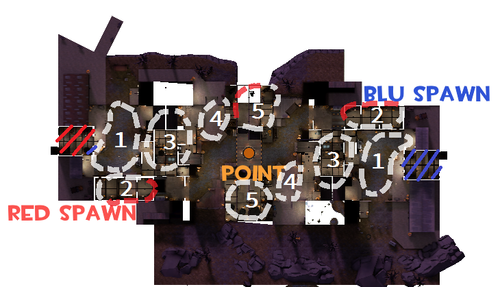
Note: If you are having trouble with finding the locations listed here, see the Helpful overview section to see their exact position marked on the map.
Cauldron is a map with many buildings that lead to the center point. Many areas of the map provide well cover such as the middle cauldron, or the pumpkins placed throughout.
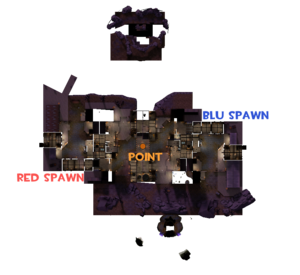
- Spawn areas: The areas outside of both spawns are very wide and open. The spawns lead to three doors which takes the player through the building and to point. Each door takes the player to a unique place.
- RED Spawn: The wide and open area found outside of RED spawn.
- BLU Spawn: Similar to RED spawn, this is the wide and open area outside of BLU spawn.
- Mid / Point: In the middle of the center-most area, you can find Cauldron's unique point. The point is located under a cauldron, which starts to boil once the point is captured. The cauldron also bursts open giving an effect of a spell to the team who captured. The cauldron can also block fire from enemies providing a good defense when attempting a capture.
- Battlements: The battlements are the buildings located between the spawns and capture point on both sides. Each building has three doorways towards Spawn and three doorways towards the point.
- Side Building: Opposite to the tracks / ramps, the side building is an area that is considered part of the battlements. Taking this path leads directly to the High Ground, which players can get a full view of the point and surrounding area.
- Tracks / Ramp: The right-hand route out from Spawn through each building passes down a ramp with a pair of tracks to the exit into the bottom of the valley.
- Launch Pad: The middle route out from Spawn doglegs down to the same exit as the tracks / ramp. On the way it passes the launch pad on the left. This area is met with a smokey fire and boosts the player up when stepped on. Taking the launch pad leads the player to the center area going directly towards point.
- High Ground: When looking from point, the high ground is seen on the right side. The high ground is on both teams' sides and has direct view of the complete enemy team's side and point.
- Valley: The Valley is the low ground between the high rising buildings of the Battlements and the main building leading back to spawn. This area is wide and open which has little cover leads up a pathway to point. There is also a stair pathway which goes up to the Battlements.
- Underworld: The Underworld is an area only accessible by the cauldron on the point. When the cauldron erupts, the portal opens and teleports the player. Upon going to the Underworld, players are fully healed and have to jump across platforms and moving cauldrons to make it to the portal back before the poisonous gas kills them. The area surrounding the platforms is seen as a swamp of green sludge which kills the player if jumped into. Once players take the other portal back, they receive effect buffs for a short period of time.
Helpful overview
1.Spawn Areas
2.Tracks/Ramp
3.Battlements
4.High Ground
5.Side Buildings
Red diagonal lines: Red Spawnroom
Blue diagonal lines: Blu Spawnroom
Strategy
Update history
October 19, 2018 Patch (Scream Fortress 2018)
- Added Cauldron to the game.
- Entering the underworld now puts players back to full health.
- Players will no longer fall off the platform if they enter the underworld while moving backwards or sideways.
- Added a couple pumpkin spawn locations in the underworld.
- Minor visual update to underworld exit.
- Fixed an instance where a player with incredibly unlucky timing could become trapped inside the underworld exit room.
Trivia
- Several toy trains are hidden around the map.
- Deer cutouts can be found in mysterious locations, two of which are found in completely sealed off rooms on either side of the map. The only way to access them is through the use of
noclip.
Gallery
| ||||||||||||||||||||||
| ||||||||||||||||||||||||||||||||||||||||||||||
