Difference between revisions of "Atom Smash"
BrazilianNut (talk | contribs) m (Added "Strategy" section.) |
(→Trivia) |
||
| (27 intermediate revisions by 10 users not shown) | |||
| Line 1: | Line 1: | ||
| − | |||
| − | |||
| − | |||
{{Map infobox | {{Map infobox | ||
| map-status = community | | map-status = community | ||
| Line 9: | Line 6: | ||
| map-game-type = Player Destruction | | map-game-type = Player Destruction | ||
| map-file-name = pd_atom_smash | | map-file-name = pd_atom_smash | ||
| − | |||
| map-released = {{Patch name|7|18|2024}} | | map-released = {{Patch name|7|18|2024}} | ||
| map-released-major = Summer 2024 Update | | map-released-major = Summer 2024 Update | ||
| − | + | | map-environment = Science facility | |
| − | + | | map-setting = Indoor | |
| − | + | | map-has-deep-water = yes | |
| − | | map-environment = | + | | map-has-bots = no |
| − | | map-setting = | + | | map-hazards = [[Environmental hazards#Pitfall|Pitfalls]] |
| − | | map-has-deep-water = | + | | map-pickups-health-small = 2 |
| − | | map-has-bots = | + | | map-pickups-health-medium = 9 |
| − | + | | map-pickups-health-large = 1 | |
| − | | map-hazards = | + | | map-pickups-ammo-small = 6 |
| − | | | + | | map-pickups-ammo-medium = 2 |
| − | | map-pickups-health-small = | + | | map-pickups-ammo-large = 0 |
| − | | map-pickups-health-medium = | ||
| − | | map-pickups-health-large = | ||
| − | | map-pickups-ammo-small = | ||
| − | | map-pickups-ammo-medium = | ||
| − | | map-pickups-ammo-large = | ||
}} | }} | ||
| − | '''Atom Smash''' is a [[Steam Workshop|community-made]] [[Player Destruction]] map added in the [[Summer 2024 Update]]. | + | {{Quotation| '''Atom Smash''' publicity blurb |Up and atom!}} |
| + | |||
| + | '''Atom Smash''' is a [[Steam Workshop|community-made]] [[Player Destruction]] map added in the [[Summer 2024 Update]]. It is set in a science facility built in an underground cave. | ||
The delivery point is surrounded by a shield for a set period of time. After a set amount of time, the shield disappears, and it is possible to step onto the point and Irradiated [[Australium]] may be delivered by the team controlling the Delivery Zone. Once the delivery period is over, players are forced off the point and the forcefield goes back up. | The delivery point is surrounded by a shield for a set period of time. After a set amount of time, the shield disappears, and it is possible to step onto the point and Irradiated [[Australium]] may be delivered by the team controlling the Delivery Zone. Once the delivery period is over, players are forced off the point and the forcefield goes back up. | ||
| Line 37: | Line 30: | ||
== Locations == | == Locations == | ||
| − | + | * '''Spawn room''': The spawn room consists of a single large room with three exits, one to the top left, one to the top right, and one in the bottom middle. The exit on the {{font colour|blue|left}}/{{font colour|red|right}} leads to a spiral staircase with another exit. | |
| − | * | + | * '''Spiral Staircase''': The spiral staircase exit leads to {{font colour|blue|an open area in a cave}}/{{font colour|red|a records room}}, with an exit leading to the Lower Battlements and stairs up to the Upper Battlements. |
| − | * | + | * '''Connector''': Right outside the bottom spawn exit is an area which connects to several other areas, with two staircases leading to the Upper Battlements and one exit leading to the Lower Battlements. |
| − | * | + | * '''Vat Room''': The right exit from BLU spawn leads to a room with 2 large vats, a catwalk on top leads to the Map Room, and a set of stairs leads down to the Lower Battlements. |
| − | * | + | * '''Storage Cave''': The left exit from the RED spawn leads to an open area in a cave with a small catwalk leading to Map Room, as well as a downwards slope to the Lower Battlements. |
| + | * '''Map Room''': A room with a single large health pack and 2 stairs leading up to the Upper Battlements. There are 2 platforms on either side of the room that lead to Vat Room and Storage Cave respectively. | ||
<gallery> | <gallery> | ||
| − | File:Atom Smash RED spawn.png|RED spawn. | + | File:Atom Smash BLU spawn.png|[[BLU]] spawn. |
| + | File:Atom Smash RED spawn.png|[[RED]] spawn. | ||
File:Atom Smash RED low exit.png|Low exit from RED spawn. | File:Atom Smash RED low exit.png|Low exit from RED spawn. | ||
| − | |||
| − | |||
| − | |||
| − | |||
| − | |||
| − | |||
| − | |||
| − | |||
| − | |||
| − | |||
| − | |||
| − | |||
File:Atom Smash BLU low exit.png|Low exit from BLU spawn. | File:Atom Smash BLU low exit.png|Low exit from BLU spawn. | ||
| + | File:Atom Smash RED High left exit.png|High left exit from RED spawn. | ||
| + | File:Atom Smash BLU high right exit.png|High right exit from BLU spawn. | ||
| + | File:Atom Smash RED right exit.png|Right exit from RED spawn. | ||
File:Atom Smash BLU left exit.png|Left exit from BLU spawn. | File:Atom Smash BLU left exit.png|Left exit from BLU spawn. | ||
| − | |||
</gallery> | </gallery> | ||
| − | + | * '''Upper Battlements''': The Upper Battlements consist of a series of rooms that form a circle around the Delivery Zone. Where the RED and BLU sides meet are the Map Room on the B side, and the Dropdown Room on the A side. | |
| − | * | + | * '''Dropdown Room''': Behind the large pillar with an "A" sign on it is a room with a hole in it, leading to a small room of water in the Lower Battlements. At the back of the Dropdown Room is a platform with a medium health pack and a view of a large open cave. There is a staircase leading up to a small catwalk above the Upper Battlements. |
| − | * | + | * '''Lower Battlements''': The Lower Battlements consists of a ring around the Delivery Zone below the Upper Battlements. It leads to several small areas connecting to other locations, like the Map Room, Connector, and Spiral Staircase areas. |
| − | * | ||
<gallery> | <gallery> | ||
| Line 79: | Line 63: | ||
== Update history == | == Update history == | ||
| − | '''{{Patch name|7|18|2024}} #1''' ( | + | '''{{Patch name|7|18|2024}} #1''' ({{update link|Summer 2024 Update}}) |
* Added Atom Smash to the game. | * Added Atom Smash to the game. | ||
| Line 85: | Line 69: | ||
* Fixed missing UI elements for the capture zone. | * Fixed missing UI elements for the capture zone. | ||
* Increased rarity of The Scientist's idle chatter between capture zone availability. | * Increased rarity of The Scientist's idle chatter between capture zone availability. | ||
| + | |||
| + | '''{{Patch name|8|2|2024}}''' | ||
| + | * Fixed the Casual Administrator overriding the Scientist | ||
| + | * Fixed some floating lights | ||
| + | |||
| + | == Bugs == | ||
| + | * The Administrator's start of round voice lines in Casual mode can be cut off by the Scientist's voice lines.<ref>[https://www.youtube.com/watch?v=0HeoABCPQ1o YouTube recording of the bug after the August 2, 2024 patch]</ref> | ||
| + | * The open supply closet near the right exit in the BLU spawn room is not properly closed off and [[vdc:Leak|leaks]] as a result.<ref>[https://youtu.be/463UYnAww3s supply closet] leak.</ref> | ||
| + | |||
| + | == Trivia == | ||
| + | * The map is inspired directly by ''[[w:Quake|Quake]]'' and ''[[w:Half-Life (video game)|Half-Life]]''.<ref>[https://web.archive.org/web/20240809013935/https://steamcommunity.com/sharedfiles/filedetails/?id=2890208830 Workshop page] description.</ref> | ||
| + | * Several references to ''Half-Life'' can be seen around the map. | ||
| + | ** A [[Breadcrab]] and [[hl2:Crowbar|crowbar]] can be seen in a vent behind a grate above the small waterpool. | ||
| + | ** The announcer is inspired by the [[hl2:Scientist|scientists]] from ''Half-Life 1''.<ref name=multi_ref>[https://ia903405.us.archive.org/23/items/freemann/Atom%20Smash%20references.png Creator] confirming the reference.</ref> | ||
| + | ** A display near the ceiling of BLU spawn shows '[[hl2:Black Mesa Research Facility|Black Mesa]]' as a destination for arrivals, where most of ''Half-Life 1'' takes place. | ||
| + | ** The monorail outside of Connector is a reference to the intro of ''Half-Life 1'', which opens on the [[hl2:Black Mesa Transit System|Black Mesa Transit System]].<ref name=multi_ref/> | ||
| + | ** The [[Shortness Of Breath]] found outside of BLU's spawn is a reference to [[hl2:Adrian Shephard|Adrian Shephard]], from ''[[w:Half-Life: Opposing Force|Half-Life: Opposing Force]]''.<ref>[https://ia903405.us.archive.org/23/items/freemann/Atom%20Smash%20references%202.png Creator] confirming the Adrian Shephard reference.</ref> | ||
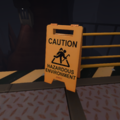
| + | ** The "wet floor" sign at the back of Dropdown Room has "Hazardous environment" written on it, a reference to the [[hl2:Hazardous Environment Suit|Hazardous Environment Suit]] and the [https://www.youtube.com/watch?v=djimD6J4x5g ''Hazardous Environments'' song] (also known as the ''Valve Theme'').<ref name=multi_ref/> | ||
| + | *** The figure on the sign is also depicted holding a crowbar. | ||
| + | ** A crowbar can be found inside of a red box reading "IN CASE OF EMERGENCY — BREAK GLASS" at RED spawn. | ||
| + | * Several of the items in the RED spawn reference the series [https://www.youtube.com/playlist?list=PLglTodSj6fQGbLTtPF_YXVJ6TKSaC3O02 ''Half-Life VR but the AI is Self-Aware''] by [https://www.youtube.com/@wayneradiotv wayneradiotv].<ref name=multi_ref/> | ||
| + | ** Inside of the lockers; the [[Manndatory Attire]] and [[Graybanns]] represent Bubby, the pile of rope represents Coomer and the recurring rope jokes, the helmet represents Benrey, and the [[Pyro's Beanie]] with the [[Bonk! Atomic Punch]] represents Tommy and the recurring soda jokes.<ref name=multi_ref/> | ||
| + | ** A notice on a cork board has a notice that says "Don't ████ with the Science Team!"<ref name=multi_ref/> | ||
| + | * The cork board in RED spawn contains multiple references. | ||
| + | ** A notice mentions about revoked microwave privileges, referencing [[hl2:Arne Magnusson|Dr. Magnusson]]'s meal that can be exploded by interacting with the microwave multiple times in the first chapter of ''Half-Life 1''.<ref name=multi_ref/> | ||
| + | ** The card from "Vinny's Pizza & Pasta" is a reference to online content creator group [[w:Vinesauce|Vinesauce]].<ref name=multi_ref/> | ||
| + | ** The poster for the missing cat mentions the cat responds to the name "Schrödinger", a reference to the thought experiment [[w:Schrödinger's cat|Schrödinger's cat]]. | ||
| + | *** Multiple modal adverbs — words that convey possibility — are used on the poster, further referencing the uncertainty the thought experiment demonstrates. | ||
| + | * In the observation room at the top of the map there are 3 wooden targets behind the console, 2 RED [[Engineer]]s and a RED [[Spy]] in the middle wearing [[Graybanns]]. | ||
| + | * The pattern on the spawn room floors is the [[:File:Australium electron-configuration.png|Australium electron configuration]], with a man instead of a second kangaroo. | ||
| + | ** The depiction of a man boxing a kangaroo is present on the [[:File:Australium Bar Model.png|actual bars of Australium]], including the pickups on this map. | ||
| + | * The core emits a clicking noise when close to it, the same sound emitted by [[w:Geiger counter|Geiger counters]] when they detect ionizing radiation. | ||
== Gallery == | == Gallery == | ||
| Line 90: | Line 106: | ||
File:Pickup Atom Smash.png|The Australium pickup. | File:Pickup Atom Smash.png|The Australium pickup. | ||
File:Steamworkshop tf2 Atom Smash thumb.jpg|Steam Workshop thumbnail for Atom Smash. | File:Steamworkshop tf2 Atom Smash thumb.jpg|Steam Workshop thumbnail for Atom Smash. | ||
| + | File:Atom Smash Breadcrab.png|The Breadcrab and Crowbar hidden in a vent. | ||
| + | File:Atom Smash Arrivals.png|The "Arrivals" display at the ceiling of BLU spawn. | ||
| + | File:Atom Smash Shortness Of Breath.png|The Shortness Of Breath on a box outside of BLU spawn. | ||
| + | File:Atom Smash WetFloor.png|The wet floor sign depicting a figure with a crowbar. | ||
| + | File:Atom Smash Corkboard.png|The cork board in RED spawn. | ||
</gallery> | </gallery> | ||
| + | |||
| + | == References == | ||
| + | <references/> | ||
{{Summer 2024 Nav}} | {{Summer 2024 Nav}} | ||
{{Maps Nav}} | {{Maps Nav}} | ||
Latest revision as of 05:22, 5 October 2024
| Atom Smash | |
|---|---|
| |
| Basic Information | |
| Map type: | Player Destruction |
| File name: | pd_atom_smash
|
| Released: | July 18, 2024 Patch (Summer 2024 Update) |
| Variants: | Monster Bash |
| Developer(s): | Aeon "Void" Bollig Juniper Mike "CornetTheory" Hillard Liam "Diva Dan" Moffitt Sky Freyja Zoey Benjamin "blaholtzen" Blåholtz PearForceOne Tim "SediSocks" BL |
| Map Info | |
| Environment: | Science facility |
| Setting: | Indoor |
| Hazards: | Pitfalls |
| Deep Water: | Yes |
| Bot support: | No |
| Map Items | |
| Map Photos | |
| Map Overview | |
| Map Stamp | |
| Supporters Leaderboard | |
| “ | Up and atom!
— Atom Smash publicity blurb
|
” |
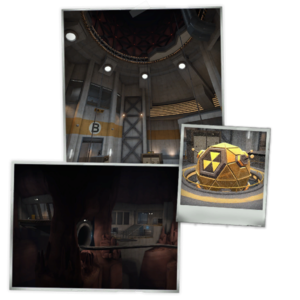
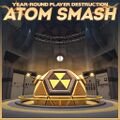
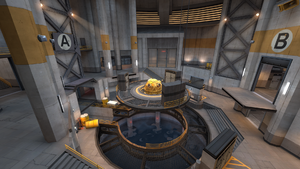
Atom Smash is a community-made Player Destruction map added in the Summer 2024 Update. It is set in a science facility built in an underground cave.
The delivery point is surrounded by a shield for a set period of time. After a set amount of time, the shield disappears, and it is possible to step onto the point and Irradiated Australium may be delivered by the team controlling the Delivery Zone. Once the delivery period is over, players are forced off the point and the forcefield goes back up.
Atom Smash was contributed to the Steam Workshop.
Locations
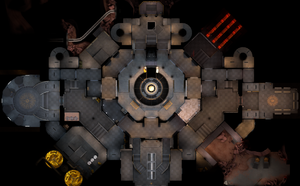
- Spawn room: The spawn room consists of a single large room with three exits, one to the top left, one to the top right, and one in the bottom middle. The exit on the left/right leads to a spiral staircase with another exit.
- Spiral Staircase: The spiral staircase exit leads to an open area in a cave/a records room, with an exit leading to the Lower Battlements and stairs up to the Upper Battlements.
- Connector: Right outside the bottom spawn exit is an area which connects to several other areas, with two staircases leading to the Upper Battlements and one exit leading to the Lower Battlements.
- Vat Room: The right exit from BLU spawn leads to a room with 2 large vats, a catwalk on top leads to the Map Room, and a set of stairs leads down to the Lower Battlements.
- Storage Cave: The left exit from the RED spawn leads to an open area in a cave with a small catwalk leading to Map Room, as well as a downwards slope to the Lower Battlements.
- Map Room: A room with a single large health pack and 2 stairs leading up to the Upper Battlements. There are 2 platforms on either side of the room that lead to Vat Room and Storage Cave respectively.
- Upper Battlements: The Upper Battlements consist of a series of rooms that form a circle around the Delivery Zone. Where the RED and BLU sides meet are the Map Room on the B side, and the Dropdown Room on the A side.
- Dropdown Room: Behind the large pillar with an "A" sign on it is a room with a hole in it, leading to a small room of water in the Lower Battlements. At the back of the Dropdown Room is a platform with a medium health pack and a view of a large open cave. There is a staircase leading up to a small catwalk above the Upper Battlements.
- Lower Battlements: The Lower Battlements consists of a ring around the Delivery Zone below the Upper Battlements. It leads to several small areas connecting to other locations, like the Map Room, Connector, and Spiral Staircase areas.
Strategy
Main article: Community Atom Smash strategy
 | “Sun Tzu's got nothing on us!” This map's Community strategy page is a stub. As such, it is not complete. You can help the Team Fortress Wiki Community Strategy Project by expanding it. Notes: None added |
Update history
July 18, 2024 Patch #1 (Summer 2024 Update)
- Added Atom Smash to the game.
July 18, 2024 Patch #2
- Fixed missing UI elements for the capture zone.
- Increased rarity of The Scientist's idle chatter between capture zone availability.
- Fixed the Casual Administrator overriding the Scientist
- Fixed some floating lights
Bugs
- The Administrator's start of round voice lines in Casual mode can be cut off by the Scientist's voice lines.[1]
- The open supply closet near the right exit in the BLU spawn room is not properly closed off and leaks as a result.[2]
Trivia
- The map is inspired directly by Quake and Half-Life.[3]
- Several references to Half-Life can be seen around the map.
- A Breadcrab and crowbar can be seen in a vent behind a grate above the small waterpool.
- The announcer is inspired by the scientists from Half-Life 1.[4]
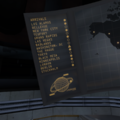
- A display near the ceiling of BLU spawn shows 'Black Mesa' as a destination for arrivals, where most of Half-Life 1 takes place.
- The monorail outside of Connector is a reference to the intro of Half-Life 1, which opens on the Black Mesa Transit System.[4]
- The Shortness Of Breath found outside of BLU's spawn is a reference to Adrian Shephard, from Half-Life: Opposing Force.[5]
- The "wet floor" sign at the back of Dropdown Room has "Hazardous environment" written on it, a reference to the Hazardous Environment Suit and the Hazardous Environments song (also known as the Valve Theme).[4]
- The figure on the sign is also depicted holding a crowbar.
- A crowbar can be found inside of a red box reading "IN CASE OF EMERGENCY — BREAK GLASS" at RED spawn.
- Several of the items in the RED spawn reference the series Half-Life VR but the AI is Self-Aware by wayneradiotv.[4]
- Inside of the lockers; the Manndatory Attire and Graybanns represent Bubby, the pile of rope represents Coomer and the recurring rope jokes, the helmet represents Benrey, and the Pyro's Beanie with the Bonk! Atomic Punch represents Tommy and the recurring soda jokes.[4]
- A notice on a cork board has a notice that says "Don't ████ with the Science Team!"[4]
- The cork board in RED spawn contains multiple references.
- A notice mentions about revoked microwave privileges, referencing Dr. Magnusson's meal that can be exploded by interacting with the microwave multiple times in the first chapter of Half-Life 1.[4]
- The card from "Vinny's Pizza & Pasta" is a reference to online content creator group Vinesauce.[4]
- The poster for the missing cat mentions the cat responds to the name "Schrödinger", a reference to the thought experiment Schrödinger's cat.
- Multiple modal adverbs — words that convey possibility — are used on the poster, further referencing the uncertainty the thought experiment demonstrates.
- In the observation room at the top of the map there are 3 wooden targets behind the console, 2 RED Engineers and a RED Spy in the middle wearing Graybanns.
- The pattern on the spawn room floors is the Australium electron configuration, with a man instead of a second kangaroo.
- The depiction of a man boxing a kangaroo is present on the actual bars of Australium, including the pickups on this map.
- The core emits a clicking noise when close to it, the same sound emitted by Geiger counters when they detect ionizing radiation.
Gallery
References
| |||||||||||||||||||||||||||||||||||||||||||||||||||||||||||||||||||
