Difference between revisions of "Snakewater"
BrazilianNut (talk | contribs) m |
m (Minor fix) |
||
| Line 4: | Line 4: | ||
| map-image = Snakewater mid.jpg | | map-image = Snakewater mid.jpg | ||
| release-date = November 21, 2013 | | release-date = November 21, 2013 | ||
| + | | last-updated = December 5, 2022 | ||
| developer = [https://tf2maps.net/members/tovilovan.1958/ (TF2Maps) Toivo Sawen] / {{Steamid|76561197998577229}} | | developer = [https://tf2maps.net/members/tovilovan.1958/ (TF2Maps) Toivo Sawen] / {{Steamid|76561197998577229}} | ||
| map-environment = Alpine | | map-environment = Alpine | ||
Revision as of 11:33, 7 December 2022
| Snakewater | |
|---|---|

| |
| Basic Information | |
| Developer(s): | Unknown |
| Map Info | |
| Environment: | Alpine |
| Setting: | Daylight, cloudy |
| Map Photos | |
| Map Overview | |
| “ | What is Snakewater? Well, it's an action-packed control point map. It was created by community author Toivo Sawen. It's been battle-tested in competitive matches around the world. And it's now an official part of TF2. But one thing it is not is a city because this is the Two Cities Update and we're announcing a second city tomorrow. So for the record, Snakewater is more of a mill town than a city. To summarize: Action-packed. Toivo Sawen. Official part. Not a city.
— Two Cities Update
|
” |
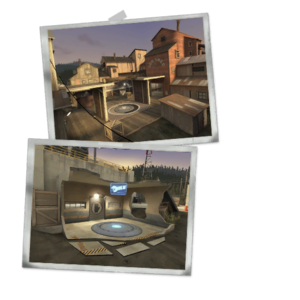
Snakewater is an official Standard Control Point map released in the Two Cities Update. It is set in the middle of a logging facility and consists of a base for each team, an open second point for each team, and a center point. Inside of RED's and BLU's last spawnrooms, the exterior backside of an ambulance truck is visible, functioning as both teams' respective resupply cabinet.
Snakewater has been often used in 6v6 competitive play.
Contents
Locations
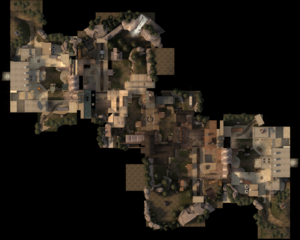
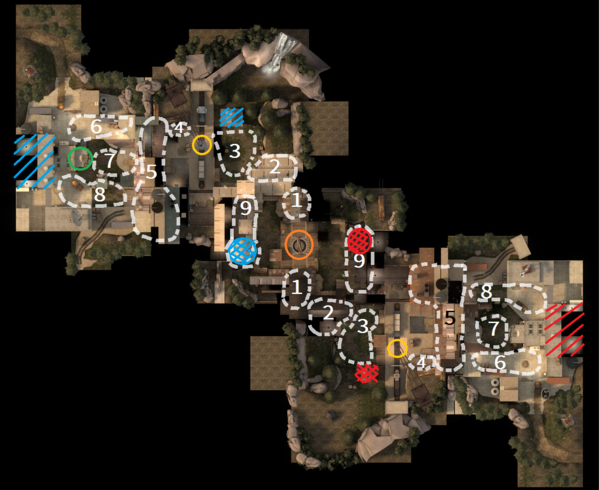
Note: If you are having trouble with finding the locations listed here, you can scroll down to the Helpful overview section to see their exact position marked on the map.
All directions and names are given from the perspective of defense as their primary name, excluding the middle point.
Control Points 1/5
- Left: One of two main paths that the team can move through, the other being right. There is a raised plank allowing for cover from support classes as well as a fence located further up.
- Lower/Main: This area is lower down and has a large path to the point. This makes it difficult if there are players on the control point. There is a staircase that leads up to the right area for a quick getaway as well.
- Right: This is the other main path that the team can push from. There is a large rock and an elevated house, which is useful for the defending team to watch any area that the offending team may push from.
- Drop Down: This area is to the far left, and is a small, one-man door on top of a long crate with stairs made of boxes. This area is mostly only useful for the defending team to move through, or for a Spy to come in.
- Lobby: This is the main area where the attacking team stands and it has access to all of the paths for attacking.
Control Points 2/4
Some people refer to this control point as "Yard" because of its open area.
- Ramp: One main area that allows access into the lobby, it's located in the middle area of the yard.
- Cliff/Drop Down: This area is covered behind a fence, as well as having access to the lobby. This area is called drop down because a player can go through the lobby and go through the pit at the top, getting easy access behind the opposing team.
- Control Point: The control point itself is located more to the left of the whole area. The cliff is located above it, so the team can drop down to defend it. A train cart is located to the right of the point. A fence and a house protect the team from direct fire, however, they can both be jumped over.
- Main: This is the main area where most players will tend to move onto the point. It is located right in front of the team and acts as an opening area.
- House: This area is mostly used as a sniping area for attacking Snipers. It is located above the main area. Players can drop down from it, but it is generally more difficult to get back up.
Control Point 3
Because of the symmetrical style of Snakewater (and almost all 5 Point Control Point maps), each team shares a similar landmark/location on their respective sides of the middle point. A popular method to counteract this is to add the prefix "our" or "their", e.g. "their Choke". Some players may also refer to the middle point as "Mid".
- Control Point: The middle point is comprised of two sheds with outstretched planks, containing a log that connects the two. This log hangs directly over the middle point.
- Kitchen/Shed: These buildings are located to the left and right of the point. Inside both of the buildings are areas that lead to either team's respective right area.
- Choke: This is the area where the team can emerge from. It is straight behind the little house vertical to the point.
- Right: The area that is directly to the right of the choke. Players can go through the sheds to get to this area for each respective team. Teams can push through right instead of through choke because of its advantages.
- Houses: These areas are located somewhat behind the planks on top of the shed and are often used to fire down on the control point and sheds. Within these buildings are two rooms; the lower room is "Saw Room" and the upper room is "Window Room".
Helpful overview
1.Kitchen/Shed
2.House
3.Main
4.Cliff
5.Lobby
6.Right flank
7.Lower/Main
8.Left flank
9.Houses
Red/blue diagonal lines: Red/Blu first spawn
Red/blue double diagonal lines: Red/Blu second spawn
Red/blue double diagonal lines w/ a circle: Red/Blu third spawn
Orange circle: Middle/third point
Yellow circles: Second/fourth points
Green circles: First/fifth points
Strategy
 | “Sun Tzu's got nothing on us!” This map's Community strategy page is a stub. As such, it is not complete. You can help the Team Fortress Wiki Community Strategy Project by expanding it. Notes: None added |
Control Point timing
| Control Point | Multiplier | Seconds | ||
|---|---|---|---|---|
| Control Point 1 and 5 | ×1 |
| ||
| ×2 |
| |||
| ×3 |
| |||
| ×4 |
| |||
| Control Point 2 and 4 | ×1 |
| ||
| ×2 |
| |||
| ×3 |
| |||
| ×4 |
| |||
| Control Point 3 | ×1 |
| ||
| ×2 |
| |||
| ×3 |
| |||
| ×4 |
|
Related achievements
Snakewater has 5 map-specific achievements.
|
|
Update history
- Updated several maps to support Competitive Mode.
- Changes based on community feedback.
December 19, 2018 Patch (Smissmas 2018)
- Fixed "splash bug" issues throughout the map.
- Fixed a lot of visual issues.
- Improved clipping and made movement smoother.
- Made fence near yard closed to projectiles.
- Fixed missing clip brush in RED kitchen.
- Fixed minor clipping issues.
- Updated
cp_snakewater_final1to fix missing player clips.
- Fixed clipping throughout map.
- Fixed explosion splash being caught by objects throughout map.
- Made movement smoother throughout map.
- Reworked some problematic areas like the kitchen.
- Minor visual enhancements throughout the map.
- Minor visual fixes.
- Minor clipping fixes.
- Slightly increased spawn time when attacking last.
- Fixed some jumps being made impossible in previous update.
- Made some areas like respawn doors smoother to walk past.
- Nature & Wildlife preservation measures.
- Minor visual, clipping/blockbullet, and detailing fixes.
- Fixed alignment issues.
- Fixed some mirroring issues.
- Updated mid slightly to make it more mirrored.
- Increased wall heights on mid to allow more jumps.
- Updated last spawn room to reduce the randomness of spawnpoints.
- Slightly increased cap time on last to account for longer travel time to the point.
- Speculative changes to fix some "wallbug" issues.
- Added Competitive mode stage.
October 5, 2022 Patch (Scream Fortress 2022)
- Fixed walkable ledge near mid.
- Fixed match summary screen for competitive mode.
- Created some space between spawn points and door trigger in first forward spawn.
- Minor visual fixes.
- Fixed missing cubemaps.
- Improved blockbullets.
- Visual fixes.
| ||||||||||||||||||||||||||||||||||||


