Difference between revisions of "Ghost Fort"
BrazilianNut (talk | contribs) m |
m (→Strategy) |
||
| Line 69: | Line 69: | ||
{{clr}} | {{clr}} | ||
== Strategy == | == Strategy == | ||
| − | {{ | + | {{map strategy link|Ghost Fort|main=yes|stub=yes}} |
== Control Point timing == | == Control Point timing == | ||
Revision as of 15:30, 6 June 2024
| Ghost Fort | |
|---|---|

| |
| Basic Information | |
| Map type: | King of the Hill |
| File name: | koth_lakeside_event
|
| Released: | October 26, 2012 Patch (Spectral Halloween Special) |
| Variants: | Lakeside |
| Developer(s): | Valve |
| Map Info | |
| Environment: | Halloween |
| Setting: | Nighttime, overcast |
| Hazards: | Pumpkin bombs, Bottomless pit, Merasmus, Bomb Head, Ghosts |
| Hazards (Underworld): | Stygian waters, Area Explosion |
| Bot support: | Yes |
| Map Items | |
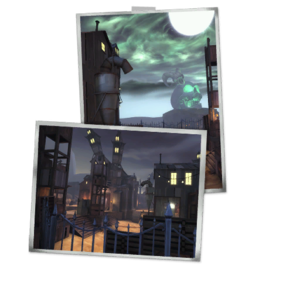
| Map Photos | |
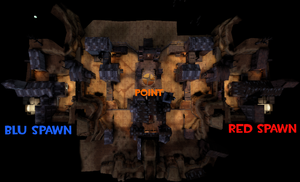
| Map Overview | |
| “ | Enter a haunted King of the Hill map to battle a bomb-spewing, fate-spinning spectral magician! And if that isn't scary enough for you, how about he's also a good damn cop pushed too damn far! What's that? It was scary enough? Okay, we'll save that last part for next year. AWOOOOOOOOOO!
— Ghost Fort publicity blurb
|
” |
Ghost Fort is an official King of the Hill map, released as part of the Spectral Halloween Special on October 26, 2012. One key deviation from all other King of the Hill maps is the round length. To win Ghost Fort, a team must have controlled the point for at least seven minutes, versus the usual three.
Similar to Eyeaduct, Mann Manor, and other Halloween maps, Ghost Fort has spawning Soul Gargoyles, pumpkin bombs, and a boss.
Contents
Features
At the center of the map is a giant wheel, known as the Wheel of Fate. Whenever the control point is captured, the Wheel of Fate will spin, and one of nine cards will be randomly chosen. Its effect is bestowed upon all players for a short time.
Another feature is a bottomless, "toothed" pit located where the water pool would be in Lakeside. It kills all players who are unfortunate enough to fall in and catapults their ragdoll onto the Control Point.
During certain intervals, Merasmus will appear near the Control Point and roam around the map, teleporting around and attacking players. When Merasmus is on the field, the Bombinomicon will choose two players to turn into a bomb, and tells those players to run the bomb back to Merasmus to stun him. The Control Point cannot be captured until Merasmus leaves or is defeated.
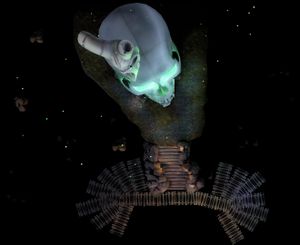
Ghost Fort features a second location, called Skull Island. When Merasmus is killed, he is replaced by a swirling Bombinomicon portal, which players can use to transport to the island. Players can fight their way up to the skull on the top of the hill, where survivors are greeted by a chatty Bombinomicon, congratulating them on defeating Merasmus and inviting them to poke around and take his skull hat (see Bombinomicon's responses). The Skull Island Topper floats in a cage that eventually opens. Players can enter the opened cage and obtain the achievement A Lovely Vacation Spot, and the Skull Island Topper, if they haven't already received it. The opened cage also teleports players back into the main field, with invulnerability, 200% overheal, a speed boost, and a crit boost for a limited time. After the cage has been opened for a time, the cage closes and demonic laughter is heard before an explosion kills all players still on Skull Island.
Soul Gargoyles spawn on the map for each player individually during Halloween events. The first notification of the Soul Gargoyle is vocally announced to the player by Merasmus, and repeated notifications may appear until the player grabs the Pickup or it disappears. Only the player for which the Soul Gargoyle has spawned sees the notifications or the Pickup.
Locations
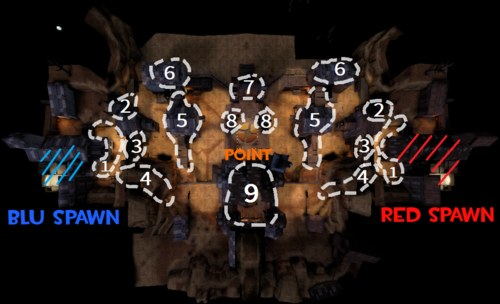
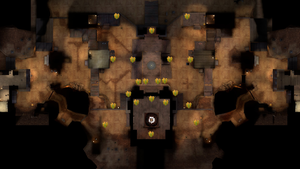
Note: If you are having trouble with finding the locations listed here, see the Helpful overview section to see their exact position marked on the map.
- Also Note: Left/right or right/left options show the positions from both sides. The first options apply when on the RED Team, and the second options apply when on the BLU Team.
- Spawn Rooms: The area where each team spawns has one Resupply Locker, located inside a fairly large room. At the front of the room, two doors, leading left and right, lead to the Team Courtyard.
- Team Courtyards: Each team has an area immediately outside of their Spawn Room, that is blocked off into three Chokepoints, an entrance through a small wooden structure (left/right), an entrance under an overhanging catwalk (middle), and a long, winding tunnel through a natural rocky formation (right/left). Each team's tunnel Chokepoint has two Small Health Pickups in it.
- Forts: Outside the wooden and catlwalk Chokepoints, each team has a large area that again, leads to more Chokepoints, but only two. On the right/left, there is another Chokepoint running through a wooden structure, which leads to the Towers. Meanwhile, on the left/right, there is a small wooden ramp that leads to an elevated area, which contains a small wooden deck, and a room to the right/left, both of which are partially shielded from the Tower. On the deck, there are two Small Ammo Pickups and a Small Health Pickup. Underneath the Fort is a small ground-level exit, which forms the second Chokepoint. This area leads to the Health Room, which is shielded from the Tower by a wall. From the room at the top of the forts, a bridge runs along the top of the second wooden Chokepoint, which leads to the Ammunition Room.
- Ammunition Rooms: Each Ammunition room is accessible directly from each Fort and from each tunnel Chokepoint leading from the Team Courtyard. It is a small tower to the right/left, with a Medium Ammo Pickup. To its left/right, there is a large, flat, elevated area made out of sandstone that connects seamlessly with the Fort and the tunnel, and leads into the Pit Temple.
- Health Rooms: The Health Room is a small tower located to the far left/right, just below and to the left/right of the deck, which contains a Medium Health Pickup. There is one for both teams.
- Pit Temple:The Pit Temple, which can be accessed immediately from both Ammunition Rooms, is a large temple with a small pit in the middle of the room. The pit is situated below floor level, and there is a small podium in the middle with a Large Health Pack on top of it. There is only one Pit Temple, which is used by both teams. The Pit Temple leads directly to the left/right, to the Towers.
- Tower (Control Point): This is another large, elevated, flat area made out of wood, with a Control Point in the middle and two large Towers pointing towards the sky, one for each team. The two Towers shield the Control Point from the Forts, with the Towers being situated towards each respective Fort. Being elevated, any direction of attack towards the Towers tends to be from below, with the lengths of ground between each lower level of the Forts acting like a ditch. The Pit Temple faces the Towers, from the same elevation, and the whole stretch leading between the Towers and the Pit Temples effectively creates another Chokepoint. As such, there is a small barricade within the the Pit Temple that faces the Towers directly, which serves purely as a Sniper spot.
- Ammunition Archway': This is a very small area that directly faces the Pit Temple, but lies on the other side of the Towers. It doesn't lead anywhere, as the rest of the area is blocked off by a fence. However, under the Ammunition Archway there lies a Large Ammo Pickup. There is only one Ammunition Archway.
Helpful overview
1.Team Curtyards
2.Small Wooden Structure chokepoint
3.Catwalks chokepoint
4.Winding Tunnel chokepoint
5.Forts
6.Health Room
7.Ammunition Archway
8.Tower
9.Pit Temple
Red diagonal lines: Red spawnroom
Blue diagonal lines: Blu spawnroom
Strategy
 | “Sun Tzu's got nothing on us!” This map's Community strategy page is a stub. As such, it is not complete. You can help the Team Fortress Wiki Community Strategy Project by expanding it. Notes: None added |
Control Point timing
| Control Point | Multiplier | Seconds | ||
|---|---|---|---|---|
| Control Point | ×1 |
| ||
| ×2 |
| |||
| ×3 |
| |||
| ×4 |
|
Wheel of Fate
Since Merasmus booby-trapped the Control Point, a "Wheel of Fate" is spun whenever the Control Point is captured. Its effect will be bestowed upon all players of both teams and will be displayed on each player's HUD next to their health, as well as announced by Merasmus. The effect will expire after a short period of time or when a rapid changeover of the Control Point occurs and causes the new effect to replace it. The list of possible effects are as follows:
| Card | Description |
|---|---|
| Super Jump makes every player jump much higher. In compensation, players do not receive fall damage. | |
| Small Head will shrink the players' heads. This increases their vocal pitching. This does not affect the hitbox of the head. | |
| Super Speed makes every player run faster. | |
| Zero Gravity lowers the map gravity, making higher areas accessible. Also allows the players to jump farther. | |
| Big Head will cause the players' heads to grow larger. This lowers their vocal pitching. This does not affect the hitbox of the head. | |
| ÜberCharge makes every player invulnerable. Because of this, the point cannot be captured for a short time. Merasmus will question why he has such an option on the Wheel of Fate. This effect is far shorter in length than others. If Merasmus appears while players have been bestowed with this fate, it will immediately end. | |
| Critical Hits grants 100% critical chance on each player. This effect is shorter in length than others. | |
| Dance Off teleports every player to the non-Wheel side of the control point and aligns them into two parallel rows, the RED team in one line and BLU in the other, while they all stop and do the Thriller taunt with Merasmus, who teleports to either end of the rows. After two rounds of taunts, players regain control and will be able to attack the enemies now directly in front of them. | |
| Whammy has negative effects and will either ignite every player, bestow bleeding effects on every player, rain Jarate on players, or spawn Ghosts that encircle the area around the Control Point. |
Other Cards
These cards also appear on the Wheel of Fate while it is spinning, but they do not have any effects and cannot be picked.
| Card | Name |
|---|---|
| Fish Troll | |
| Decapitated | |
| Hells Bells | |
| Cherry Bomb | |
| Lucky You |
Related achievements
 Scarechievements
|
|
 Ghostchievements
|
 Necromannchievements
|
|
Update history
October 26, 2012 Patch (Spectral Halloween Special)
- Added Ghost Fort to the game.
- Updated koth_lakeside_event
- Fixed missing collision on a barrel near the capture point.
- Updated the Merasmus battle on Ghost Fort to call a temporary truce between the teams while fighting the boss.
Bugs
- If the Wheel of Fate is spun and a card chosen while the player is respawning, the effect will be bestowed upon the player, though the icon will be missing from the bottom left side of the HUD.
- If the "Whammy" fate is selected and players are set on fire, the Pyro will take damage from the initial attack, but remain visually on fire for the duration of the afterburn. The afterburn deals no damage, however the Pyro is susceptible to damage increases from the Flare Gun and Axtingusher.
- Rolling the "Big Head" or "Small Head" fate can cause some cosmetic items, such as the MONOCULUS! or various pocket buddies, to flicker very quickly between the scaled size and their normal size.
- Bots do not react to the "Dance Off" effect properly. They are unable to fire their weapons and still play the taunt animation, but they can still move around during the effect.
- If several players fall through the bottomless pit at the same time, players may get stuck.
- The player can avoid being killed in Skull Island by deploying an ÜberCharge or being the recipient of one as the time-limited explosion occurs. The same can be done by drinking Bonk! Atomic Punch or having a deployed Dead Ringer.
- Backing far enough into the RED spawn will cause one of the Resupply cabinets to disappear until you move forward again.
- During a Truce, Spies can sap buildings but Engineers cannot remove them.
Trivia
- When Merasmus spins the Wheel of Fate and forces the players to dance, his narration references Michael Jackson's Thriller.
- Merasmus' narration when bestowing a crit boost, "It is the crit boostening!" is a reference to the Quickening from Highlander.
- When Merasmus flies in the air and throws bombs, sometimes he will say "Everything's coming up Merasmus!' This is a reference to the play Gypsy: A Musical Fable.
- The bottomless pit that replaces the water in Lakeside resembles the mouth and teeth on the cover of the Bombinomicon.
- The bottomless pit doesn't actually kill the player by itself. It actually teleports the player to a window on the mansion which deals lethal damage to anybody inside it, even if you noclip into it.
- Seven Ghosts, including one wearing a Ghastly Gibus, reside in the bottomless pit.
Gallery
Overviews
BLU side
RED side
Middle
Skull Island
The Skull Island Topper on Skull Island
The Bombinomicon on Skull Island
| ||||||||||||||||||||||||||||||||||||||||||||||
| |||||||||||||||||||||||||||||||||||||||||||||||||||||||||||||||||||
