Difference between revisions of "Phoenix"
m |
ShadowMan44 (talk | contribs) (Added more location images) |
||
| Line 56: | Line 56: | ||
File:Phoenix BLU Spawn1.png|[[BLU]] Spawn room. | File:Phoenix BLU Spawn1.png|[[BLU]] Spawn room. | ||
File:Phoenix BLU Spawn1 Outside.png|BLU Building outside. | File:Phoenix BLU Spawn1 Outside.png|BLU Building outside. | ||
| − | File:Phoenix BLU Spawn2.png|BLU Second | + | File:Phoenix BLU Spawn1 Outside 2.png|Starting point of the Payload. |
| − | File:Phoenix BLU Spawn3.png|BLU Third | + | File:Phoenix BLU Spawn2.png|BLU Second Spawn room. |
| + | File:Phoenix BLU Spawn3.png|BLU Third Spawn room. | ||
File:Phoenix RED Spawn1.png|[[RED]] Spawn room. | File:Phoenix RED Spawn1.png|[[RED]] Spawn room. | ||
File:Phoenix RED Spawn1_Outside.png|RED Building outside. | File:Phoenix RED Spawn1_Outside.png|RED Building outside. | ||
| − | File:Phoenix RED Spawn2.png|RED Second | + | File:Phoenix RED Spawn2.png|RED Second Spawn room. |
File:Reststop point A phoenix.png|The first point. | File:Reststop point A phoenix.png|The first point. | ||
| + | File:Reststop point A phoenix flank.png|Flank route within the first point. | ||
| + | File:Phoenix bridge area.png|The bridge between point A and point B. | ||
File:Phoenix warehouse point B.png|The second point. | File:Phoenix warehouse point B.png|The second point. | ||
| + | File:Phoenix warehouse point B flank entrance.png|Entrance to the warehouse. | ||
File:Phoenix point C.png|The third point. | File:Phoenix point C.png|The third point. | ||
| + | File:Phoenix point C.png|Flankroute within the third point. | ||
File:Final point phoenix.png|The final point, the Hydrodam. | File:Final point phoenix.png|The final point, the Hydrodam. | ||
| + | File:Final point Phoenix Outside.png|Outside of RED's Spawn room. | ||
| + | File:Final point Phoenix spawn back exit.png|Exit furthest back from Red's Spawn room. | ||
| + | File:Final point Phoenix flank.png|Flank route towards the final point. | ||
</gallery> | </gallery> | ||
Revision as of 05:52, 12 July 2024
| “Gotta move that gear up!” This article may contain content that is out of date. You can help improve this article by updating the content as necessary. See the wiki style guide. Notes: Some info outdated since the December 8, 2023 Patch. |
| “You are so small! Is funny to me!” This article is a stub. As such, it is not complete. You can help Team Fortress Wiki by expanding it. Notes: Locations |
This article is about Payload map. For the cosmetic item, see Fiery Phoenix.
| Phoenix | |
|---|---|

| |
| Basic Information | |
| Map type: | Payload |
| File name: | pl_phoenix
|
| Released: | July 12, 2023 Patch (Summer 2023 Update) |
| Developer(s): | Evan "Defcon" LeBlanc Liam "Diva Dan" Moffitt Nickolas "KrazyZark" Fenech Neal "Blade x64" Smart Stuffy360 |
| Map Info | |
| Environment: | Desert |
| Setting: | Daylight, Sunny |
| Hazards: | Pitfall, Payload Cart explosion, Drowning |
| Pyrovision Support: | No |
| Map Items | |
| Map Photos | |
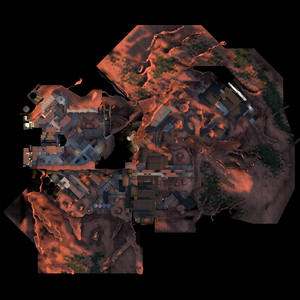
| Map Overview | |
| Map Stamp | |
| Supporters Leaderboard | |
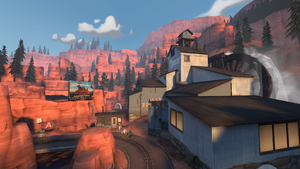
Phoenix is a community-created single-stage Payload map added in the Summer 2023 Update. Drenched in brilliant sunlight that highlights reddish canyon landscapes, it is set in a national forest and reservoir area within the Badlands of the southwestern United States. BLU team has unloaded their Payload from a disguised van and plan on pushing it to blow up RED team's nearly completed hydroelectric dam. RED must stop them.
Phoenix was contributed to the Steam Workshop.
Contents
Locations
Watermill
- BLU team's first spawn, having four exits out onto an area with three water features:
- Stream: BLU's left exit into shallow water towards a path up to a flank.
- Gate House: Near BLU's middle exits, the Gate House's bridge crosses fire-extinguishing water.
- Pond: A flank close upon Checkpoint A. BLU's right gate onto the Pond unlocks only when Checkpoint A is captured.
- Arch: A natural arch forms the first choke.
First Capture (A) The Rest Stop
- Restrooms: A deeper sheltered area behind the Car and Camper under a large jumpable Awning.
- Tunnel Gate: Opposite the Restrooms is a shortcut tunnel between Checkpoints A and B that opens when Checkpoint A is captured.
- Trestle: The wooden trestle is the choke between Checkpoints A and B.
- Jump Gate: A flank building beyond the Trestle, same side as the Tunnel Gate. This gate also opens when Checkpoint A is captured.
Second Capture (B) RED Warehouse
The building enclosing RED's First spawn and Checkpoint B.
- Loading Zone B Gate: A gate opening when Checkpoint A is captured, leading to the Loading Zone battlements overwatching the point.
- ABC's Gate: A BLU flank to an overlook over the Rollback, opening when Checkpoint B is captured, noted for directions to the first three points.
- Cliffside: A flank from Checkpoint B to Checkpoint C.
- Rollback: A choke around a rollback ramp.
Third Capture (C) Power building
- The location of Checkpoint C. The upper levels have flanks to Checkpoint D.
Final Capture (D) The Hydrodam
- The final point is located at the base of RED team's hydroelectric dam. To capture the last checkpoint, BLU must lift the cart on an inclined elevator. After reaching the top, the lift plummets to the bottom and explodes, destroying the dam.
Strategy
Main article: Community Phoenix strategy
 | “Sun Tzu's got nothing on us!” This map's Community strategy page is a stub. As such, it is not complete. You can help the Team Fortress Wiki Community Strategy Project by expanding it. Notes: None added |
Update history
July 12, 2023 Patch #1 (Summer 2023 Update)
- Added Phoenix to the game.
- Fixed missing materials.
- Fixed various physics props obstructing the Payload cart.
- Increased Red respawn wave time on D from 8 to 9.
- Fixed projectile collision bug around the Payload elevator track.
- Fixed a case where the Payload cart could get stuck at the base of the elevator.
- Various clipping fixes.
- Various visual fixes.
- Reduced Blu respawn wave time on A and C from 5 to 4.
- Increased Red respawn wave time on A and C from 6 to 7.
- Rollback zone on C now reduces the Payload push speed by 50%.
- Locked door connecting B and C now opens when A is captured instead of B.
- Added a failsafe to prevent a case where the Payload cart could get stuck at the base of the elevator finale.
- Various visual fixes and adjustments.
- Various pickup size adjustments.
- Various clipping adjustments.
- Performance improvements.
- Updated checkpoint names.
Gallery
Sign with the hotline number of 666 and a hanging corpse, similar to the one featured in Meet the Sniper.
| ||||||||||||||||||||||


