Difference between revisions of "Hoodoo"
m (Added a stub) |
m (Added more location information, please feel free to edit to add/remove areas!) |
||
| Line 27: | Line 27: | ||
[[File:Hoodoo_stage_three.png|thumb|right|Details of stage 3.(Large file)]] | [[File:Hoodoo_stage_three.png|thumb|right|Details of stage 3.(Large file)]] | ||
| − | * ''' | + | == Stage One == |
| + | * '''BLU Spawn''': A large building with 3 exits, with a staircase leading to higher ground. | ||
| + | * '''First point battlements''': A wide open area with several routes to get to the first checkpoint, the left side when leaving BLU spawn is a rocky highground which gives good vantage over the cart's path. | ||
| + | ** '''Lower path''': A pathway underneath the cart's tracks which leads to a medium healthkit. | ||
| + | ** '''Mining buildings''': Two buildings which house the lower path. | ||
| + | * '''Second point battlements''': The second point battlements contains several flank routes to get the the point, left of the first point is a balcony containing a small healthkit and medium ammo box. | ||
| + | ** '''The tunnels''': Tunnels can be found which have entrances by the mining buildings and near the second main chokepoint, these tunnels lead to a balcony with a one way door. | ||
| + | ** '''Upper flank''': An upper flank route with a drop down that leads to the left side of point A, a building with several opened windows can be used as cover. | ||
| + | ** '''Ravine''': Under the cart's track is a small ravine which houses a medium health and ammo kit. | ||
| + | <gallery> | ||
| + | File:Hoodoo BLU Spawn - Stage 1.png|BLU team first spawn in stage 1. | ||
| + | File:Hoodoo blu spawn.png|Area outside BLU's initial spawn. | ||
| + | File:Hoodoo lower path.png|The lower path. | ||
| + | File:Hoodoo mining buildings.png|The mining buildings. | ||
| + | File:Hoodoo mid A.png|First capture point. | ||
| + | File:Hoodoo tunnels.png|The tunnels. | ||
| + | File:Hoodoo drop flank.png|Left side flank. | ||
| + | File:Hoodoo ravine.png|The ravine. | ||
| + | File:Hoodoo point A.png|Capture point A. | ||
| + | </gallery> | ||
| − | + | == Stage Two == | |
| + | * '''BLU Spawn''': RED's spawn from the first stage is repurposed for BLU. | ||
| + | * '''Main battlements''': The track leads out into an open area, following the side of a long mining building. The first capture point brings the cart inside of the mining building, on the right side of the capture point is a tunnel. | ||
| + | ** '''Mining building''': The building which the cart follows on the edges, a ramp can be used from the BLU side to enter it, following the building will take you through several rooms which contain medium and small health kits. | ||
| + | ** '''Tunnel''': This tunnel has a door that can only be opened from the inside. | ||
| + | ** '''The capture point''': The building that houses the first point contains a balcony with two doorways, the left door with the ramp leads to a staircase which takes you just outside of Point B, the right doorway leads through to more tunnels. | ||
| + | *** '''Upper tunnels''': These tunnels from the first capture point have to exits, the first left exit will drop you down into the secondary battlements, whereas the second path will lead you to a small corridor with minecarts and a one way door. | ||
| + | * '''Capture point B''': A wide open area with little cover. | ||
| + | ** '''High ground''': A vantage point which has a good view over the battlements, behind it is the one way door that can only be opened from the mining tunnels. | ||
| + | <gallery> | ||
| + | File:Hoodoo BLU Spawn for Stage 2 and RED Spawn for Stage 1.png|RED Spawn for Stage 1 and BLU Spawn for Stage 2. | ||
| + | File:Hoodoo mid B.png|Area outside BLU's second spawn. | ||
| + | File:Hoodoo mining building stage 2.png|The mining building. | ||
| + | File:Hoodoo stage 2 first point.png|The first capture point. | ||
| + | File:Hoodoo upper tunnels.png|The upper tunnels | ||
| + | File:Hoodoo high ground.png|The high ground. | ||
| + | File:Hoodoo point B.png|Point B. | ||
| + | </gallery> | ||
| − | + | == Stage Three == | |
| − | + | * '''BLU Spawn''': RED's spawn in stage 2, BLU must leave down some stairs into the main area which has 3 exits. | |
| − | * ''' | + | * '''Main battlements''': The cart must follow along a winding path around through a mining camp, with the multi-level buildings providing plenty of routes for both BLU and RED to attack. |
| − | + | ** '''Buildings''': These buildings connect through from the final point to where BLU spawn is, they are cramped with very little room for movement, when the first point is captured a garage door will open for BLU to use to get to the final point quicker. | |
| − | + | ** '''First point''': The capture point which has very little defensibility once BLU pushes through the main buildings. | |
| − | + | * '''Final point''': The track winds down into an industrial building, where BLU has to push the cart out on a catwalk surrounded by a large concrete pit. | |
| − | + | ** '''Explosives shack''': left of the main track is a building filled with dynamite, BLU can use this building to flank into the left entrance of the main point. | |
| − | + | <gallery> | |
| − | * ''' | + | File:Hoodoo Blu Spawn for Stage 3 and RED Spawn for Stage 2.png|RED Spawn for Stage 2 and BLU Spawn for Stage 3. |
| − | + | File:Forward Area for BLU Spawn in Stage 3.png|Forward Area for BLU Spawn in Stage 3. | |
| − | + | File:Hoodoo mid C.png|Area outside BLU's third spawn. | |
| + | File:Hoodoo mid C2.png|Halfway point to C. | ||
| + | File:Hoodoo point C.png|Point C. | ||
| + | File:RED Spawn in Hoodoo Stage 3.png|RED Spawn in Hoodoo Stage 3. | ||
| + | </gallery> | ||
== Strategy == | == Strategy == | ||
| Line 78: | Line 118: | ||
File:Hoodoo stage2.png|Overview of stage 2. | File:Hoodoo stage2.png|Overview of stage 2. | ||
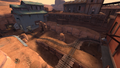
File:Hoodoo stage3.png|Overview of stage 3. | File:Hoodoo stage3.png|Overview of stage 3. | ||
| − | |||
| − | |||
| − | |||
| − | |||
| − | |||
| − | |||
| − | |||
| − | |||
| − | |||
| − | |||
| − | |||
| − | |||
| − | |||
</gallery> | </gallery> | ||
Revision as of 13:36, 26 July 2024
| Hoodoo | |
|---|---|

| |
| Basic Information | |
| Map type: | Payload |
| File name: | pl_hoodoo_final
|
| Released: | May 21, 2009 Patch (Sniper vs. Spy Update) |
| Developer(s): | Tim "YM" Johnson Jeroen "Snipergen" Dessaux Fay L. "nineaxis" Fabry Drew "Oxy" Fletcher |
| Map Info | |
| No. of Stages: | 3 |
| Environment: | Desert |
| Setting: | Daylight, sunny |
| Bot support: | Yes |
| Map Items | |
| Map Photos | |
 | |
| Map Overview | |
 | |
| Map Stamp | |
| Supporters Leaderboard | |
| “You are so small! Is funny to me!” This article is a stub. As such, it is not complete. You can help Team Fortress Wiki by expanding it. Notes: Add more locations |
Hoodoo is a community-created Payload map. It was included with the Sniper vs. Spy Update as an official community-developed map due to its outstanding quality. In a similar design and layout to Gold Rush, Hoodoo focuses on fast-paced, intense action due to the map's sometimes tight and confined areas. The setup timer is 1 minute and 10 seconds.
Contents
Locations


Stage One
- BLU Spawn: A large building with 3 exits, with a staircase leading to higher ground.
- First point battlements: A wide open area with several routes to get to the first checkpoint, the left side when leaving BLU spawn is a rocky highground which gives good vantage over the cart's path.
- Lower path: A pathway underneath the cart's tracks which leads to a medium healthkit.
- Mining buildings: Two buildings which house the lower path.
- Second point battlements: The second point battlements contains several flank routes to get the the point, left of the first point is a balcony containing a small healthkit and medium ammo box.
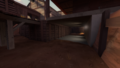
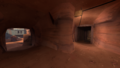
- The tunnels: Tunnels can be found which have entrances by the mining buildings and near the second main chokepoint, these tunnels lead to a balcony with a one way door.
- Upper flank: An upper flank route with a drop down that leads to the left side of point A, a building with several opened windows can be used as cover.
- Ravine: Under the cart's track is a small ravine which houses a medium health and ammo kit.
BLU team first spawn in stage 1.
Area outside BLU's initial spawn.
The lower path.
The mining buildings.
First capture point.
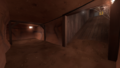
The tunnels.
Left side flank.
The ravine.
Capture point A.


Stage Two
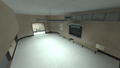
- BLU Spawn: RED's spawn from the first stage is repurposed for BLU.
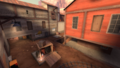
- Main battlements: The track leads out into an open area, following the side of a long mining building. The first capture point brings the cart inside of the mining building, on the right side of the capture point is a tunnel.
- Mining building: The building which the cart follows on the edges, a ramp can be used from the BLU side to enter it, following the building will take you through several rooms which contain medium and small health kits.
- Tunnel: This tunnel has a door that can only be opened from the inside.
- The capture point: The building that houses the first point contains a balcony with two doorways, the left door with the ramp leads to a staircase which takes you just outside of Point B, the right doorway leads through to more tunnels.
- Upper tunnels: These tunnels from the first capture point have to exits, the first left exit will drop you down into the secondary battlements, whereas the second path will lead you to a small corridor with minecarts and a one way door.
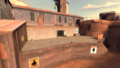
- Capture point B: A wide open area with little cover.
- High ground: A vantage point which has a good view over the battlements, behind it is the one way door that can only be opened from the mining tunnels.
RED Spawn for Stage 1 and BLU Spawn for Stage 2.
Area outside BLU's second spawn.
The mining building.
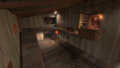
The first capture point.
The upper tunnels
The high ground.
Point B.


Stage Three
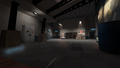
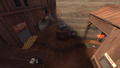
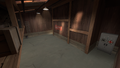
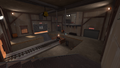
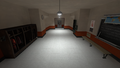
- BLU Spawn: RED's spawn in stage 2, BLU must leave down some stairs into the main area which has 3 exits.
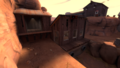
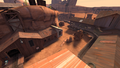
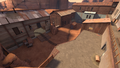
- Main battlements: The cart must follow along a winding path around through a mining camp, with the multi-level buildings providing plenty of routes for both BLU and RED to attack.
- Buildings: These buildings connect through from the final point to where BLU spawn is, they are cramped with very little room for movement, when the first point is captured a garage door will open for BLU to use to get to the final point quicker.
- First point: The capture point which has very little defensibility once BLU pushes through the main buildings.
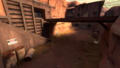
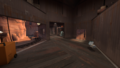
- Final point: The track winds down into an industrial building, where BLU has to push the cart out on a catwalk surrounded by a large concrete pit.
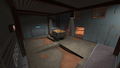
- Explosives shack: left of the main track is a building filled with dynamite, BLU can use this building to flank into the left entrance of the main point.
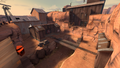
RED Spawn for Stage 2 and BLU Spawn for Stage 3.
Forward Area for BLU Spawn in Stage 3.
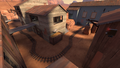
Area outside BLU's third spawn.
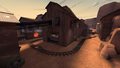
Halfway point to C.
Point C.
RED Spawn in Hoodoo Stage 3.


Strategy
 | “Sun Tzu's got nothing on us!” This map's Community strategy page is a stub. As such, it is not complete. You can help the Team Fortress Wiki Community Strategy Project by expanding it. Notes: None added |
Update history
- Added Hoodoo to the game.
- Changes from community mapmaker Tim Johnson:
- "Added a balcony at 2-1 that I've rotated and cleaned up so it's a much better point, it attracts less sentry spam but is still holdable. 2-2 has a bit more breathing room and the one-way route between BLU/RED spawn in stage 3 has gone and in its place some stairs up to the second level accessible from BLU's side."
- Removed door frame collision to resolve bots getting stuck in the cave during stage 2.
July 18, 2024 Patch #1 (Summer 2024 Update)
- Added
func_noclipto BLU spawn in the third stage.
Bugs
- Rarely, the cart may begin to move on its own during set-up[1] and can only be stopped if a player from the BLU team goes near enough to push the cart himself, only possible if a team member uses
noclip. - Bots will get stuck on the door leading to the second area on Stage 2; they can only get unstuck if the first checkpoint is captured, allowing the door to open.
- On Stage 3, RED Spies can get into BLU's spawn with the help of a BLU Engineer's teleporter, and even walk through the previous door to Stage 2. RED Spies can also use BLU's (previously RED's) resupply cabinets.
- In the area outside BLU's second spawn, RED players can get in a corner with the wooden planks that have been placed close to the cart, causing it to be defended through the walls.
Trivia
- Hoodoo's cart is accompanied by unique sound files: The cart 'ticks' while in play. It also emits a high-pitched ringing just before the cart detonates after BLU's victory on the Third Sector. Both of these sounds reflect the cart's improvised alarm clock "timed fuse."
- In the first stage, the ambulance found in the BLU respawn acts as a fully functional resupply cabinet.
- A Hoodoo is a tall, thin rock spire found in arid drainage basins and badlands.
Gallery

Hoodoo's unique "dirty bomb" cart.

Overview of stage 1.

Overview of stage 2.
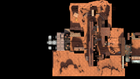
Overview of stage 3.


External links
References
| ||||||||||||||||||||||||||||||||