Difference between revisions of "Lumberyard"
m |
m (→Locations: Ambassador Redirect, replaced: File:AREA Lumberyard Central building.PNG → File:ARENA Lumberyard Central building.PNG) |
||
| Line 26: | Line 26: | ||
<gallery gallery widths=120px heights=90px perrow=5> | <gallery gallery widths=120px heights=90px perrow=5> | ||
| − | File: | + | File:ARENA Lumberyard Central building.PNG|The Central Building |
File:AREA Lumberyard Control point.PNG| The control point when not available for capture | File:AREA Lumberyard Control point.PNG| The control point when not available for capture | ||
File:AREA Lumberyard Red Spawn.PNG|RED spawn | File:AREA Lumberyard Red Spawn.PNG|RED spawn | ||
Revision as of 14:55, 15 June 2011
| Lumberyard | |
|---|---|

| |
| Basic Information | |
| Variants: | Graveyard |
| Developer(s): | Unknown |
| Map Info | |
| Environment: | Alpine |
| Setting: | Daylight, sunny |
| Map Photos | |
| Map Overview | |
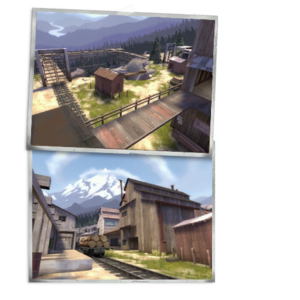
| “ | Lumberyard has an unbalanced structure, with one half of the map climbing up towards a large mountain peak, while the other dips down into a valley. A series of rooftops at the map’s center serves as the key battleground area, with lateral flanking being the key maneuver at ground level. When the capture point becomes active after 60 seconds, multiple entrances open up into the central control point, which becomes the focus of the fighting as the match nears its end. Lumberyard is one of the few Arena maps without water, and contains only a single health kit. The kit sits on a log above a deadly pit, making it a great ambush spot for Pyros, Demomen, and Soldiers to send unwary enemies to their deaths.
|
” |
Lumberyard is an Arena map released along with Ravine, Well (Arena), Badlands (Arena), and Granary (Arena) as part of the Heavy Update, marking the introduction of the Arena game mode. Lumberyard was the first official map to drop the usual desert-industrial style for a greener, alpine style environment.
To win, one team must eliminate the entire opposite team or capture the central control point when it becomes available.
Contents
Introduction Video
Locations
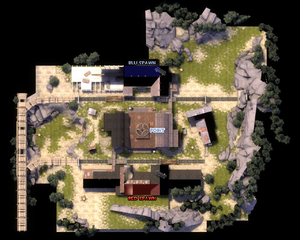
- Central Building – The central building houses the control point, and is mostly symmetrical. It is a two floor building containing multiple entrances. Its main entrances are the garage doors which open when the point is available for capture. There are two other ground entrances on both sides which enter to the side of the capture point. On the second floor on each side are two entrances, one from the roof, and one from a bridge which connects to the spawn houses.
- Spawn Rooms – Either side of the spawn room have two exits, one that goes straight ahead towards the central building, and the other door heads to a smaller tower shaped building, which has a stairway leading towards the roof of the central building, where they can enter the building through the upper floor.
- Mountain Side – The area to the left of BLU spawn (right of RED spawn) which curves around the Central Building.
- Cliff Side – Opposite to the mountain side (and the opposite direction from team spawn). Contains the only health pickup which is found on the log that bridges over the pit. Two small sheds are also found near the cliff. These are dangerous to fight around as falling off the cliff means death.
- ARENA Lumberyard Central building.PNG
The Central Building
Strategy
Control Point Timing
| Control Point | Multiplier | Seconds | ||
|---|---|---|---|---|
| Capture point | ×1 |
| ||
| ×2 |
| |||
| ×3 |
| |||
| ×4 |
|
Update history
August 19, 2008 Patch (A Heavy Update)
- Added this map to the game
External links
| |||||||||||||||||||||||


