| Fastlane
|

|
| Basic Information
|
| Developer(s): |
Unknown
|
| Map Photos
|
|
|
| Map Overview
|
|
|
| “ |
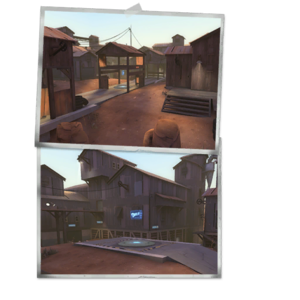
A control point map with five points, in the style of Badlands. Its symmetrical layout provides for high-speed and well balanced gameplay, while the multiple indoor routes, connected to larger outdoor arenas, provide a wide set of interesting and varied combat spaces. The arena-style control points require solid teamwork to capture and hold.
|
” |
Fastlane is a standard five point control point map and was released with The Pyro Update as an official map. Along with Turbine, it became one of the first community created maps to be chosen by Valve as an official TF2 map due to its outstanding quality.
Template:Map items
Goal
Your team must capture all five control points.
Locations
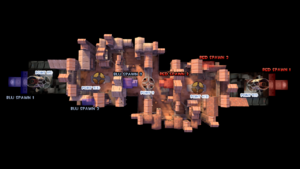
The BLU and RED spawn rooms are at the far end respectively but change as the control points are captured. The winning team spawns at the control point before the nearest active one but the nearest a team can respawn is at Control Point 3.
Control Point 3
This point is situated under a small structure with two levels that can be jumped to. Next to the point are two other buildings containing health and ammo. The middle area is very open and offers little cover from Snipers.
- Catwalk (mid): The catwalks far from the point above the valley.
- Valley: The valley leading up to the point, the only non-building entrance.
- Roof: The roof of the central building. Contains a small health pack on top of it, making it a popular spot for Demomen and Soldiers.
Control Points 2 & 4
These points are very open, while all of their entrances are small chokepoints. These areas contains two houses, one for the first forward respawn, and another housing health and ammo.
- Catwalk: The catwalk connecting the entrance to the upper hallways, a common place for Snipers.
- House: The side house next to the valley connecting to the mid catwalks.
- First forward resupply: Directly across from the house, this house contains the second spawn for when mid is captured.
Control Points 1 & 5
These points are directly outside of the spawn gates and contain three different entrances. The point itself is on top of a small set of stairs leading from one of the entrances. Two of the entrances can be accessed from ground level while the third entrance leads from the second floor.
- Upper Hallways: This is one the three entrances to the point. It can be accessed from the second point catwalks and gives the attackers a height advantage. This area commonly contains Snipers due to it being a long narrow hallway.
- Lower long hallway: The long hallway accessed from the lower area of the previous point.
- Lobby: The main entrance to the point, connecting to both the short hallway and long hallway entrances.
Fastlane valley.jpg
The valley between Control Point 2/4 and 3
Fastlane second house.jpg
The house for the first forward respawn
Fastlane final hallways.jpg
Upper hallways next to Control Point 1/5
Team fortress 2 map overview fastlane.jpg
Strategy
The map follows an ABCBA point format like Well, Granary and Badlands do.
- There are very few good spots for Engineers to set up here. It may be better to set up early at your base's entrance if your team is losing the midpoint, to prepare for the enemies to come through. A decent spot to set up for defending your B point, is on the catwalk connecting the side area to the main base if the second point still needs defending, but its has low range from up here and is susceptible to Spies. Another common placement is at the bottom of the stairs leading through to the central point, as this usually isn't noticed until it's too late but if attacked from the gully, Demomen will be able to destroy it.
- When you are defending the last point, a good spot for a sentry would be at the doorway into your base that is accessed from the catwalk, or down the end of the hallway the doorway at the catwalk leads to.
- For defending nearer to the final point's room than the aforementioned examples, a good spot to set up a sentry is on the catwalk shortly up the ramp to the left from the spawn room. Putting up a Dispenser in the the doorway closer to the second floor exit might seem useless and a waste of time due to the nearby metal, but is a good idea to block out Soldiers from attacking from the distance, and keeping enemies (namely, Spies) from coming in from behind (as they cannot pass through Dispensers).
- The buildings and areas between the midpoint and a team's base are good territory for Pyros, as those areas are rather tight to get through and have a lot of corners. Demomen and Soldiers also do well inside the buildings.
- Conversely, the midpoint and the B point both have very open spaces that good Snipers will thrive off of.
- Spies do wonders in the open areas, but the problem is getting to them. Most people go through either of the buildings rather than around, so you are less likely to bump into people and blow your cover.
- Heavies shine as a defensive class here, especially on the final two points. It is very easy to rack up kills in either area of the base.
- You can rocket jump and sticky jump on the structure at C. Thus, having high ground advantage and surprising people who are capping the point.
- The Scout has great potential on this map. There are a lot of crates and obstacles lying around both indoors and outdoors. Make this map your playground and you will harass a mass of opponents and help your team to win the round.
- Spies using the Cloak and Dagger camp below staircases to recharge their Cloak without being seen.
Update history
February 24, 2009 Patch
- Updated Fastlane with Arttu's new version.
Control Point Timing
| Control Point 1 and 5
|
×1
|
|
| ×2
|
|
| ×3
|
|
| ×4
|
|
| Control Point 2 and 4
|
×1
|
|
| ×2
|
|
| ×3
|
|
| ×4
|
|
| Control Point 3
|
×1
|
|
| ×2
|
|
| ×3
|
|
| ×4
|
|
Trivia
- Due to the nature of the map's 3D skybox, many parts of Fastlane appear to be floating.
See also


