Emerge
| Emerge | |
|---|---|

| |
| Basic Information | |
| Map type: | Payload |
| File name: | pl_emerge
|
| Released: | December 7, 2023 Patch (Smissmas 2023) |
| Developer(s): | Jess "Muddy" Dabbs Joe "FruitySnacks" Radak Freyja Minty "Katsu! :3" Aulenrose |
| Map Info | |
| Environment: | Alaska |
| Setting: | Daytime, sunny |
| Hazards: | Pitfalls, Payload Cart explosion |
| Map Photos | |
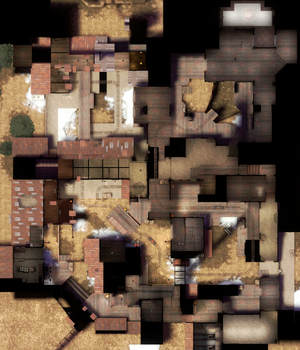
| Map Overview | |
| Map Stamp | |
| Supporters Leaderboard | |
| “ | Take the fight to the Alaskan wilderness in this compact three-point Payload map!
— Emerge publicity blurb
|
” |
Emerge is a community-created Payload map. It takes place in an industrial complex in Alaska, USA.
Emerge was contributed to the Steam Workshop.
Contents
[hide]Locations
Checkpoint A
- BLU's First Spawn: BLU's initial spawn has three doors; one behind the cart, one on the bridge directly above the cart, and one on a drop in front of the cart. It also has two resupply cabinets; one near the door behind the cart and one near the drop door.
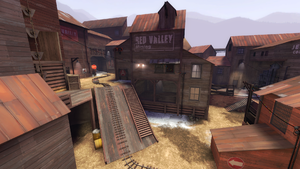
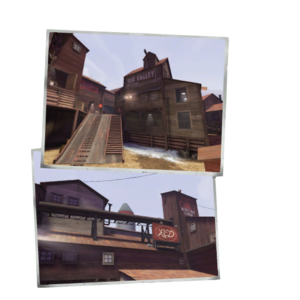
- First Yard: the initial open area of the map. A structure on its center serves as support for a simplistic wooden bridge that connects the BLU spawn and the Choke Building.
- Choke Building: a two-story building that the cart must go through. On the BLU side, it can be entered through the cart's entrance (and its adjacent door), through the bridge, and through a door on the far left. On the RED side, it can be entered through the cart's exit, through an open window on the second floor to the far left, and through a side door with some tracks leading to a dead end on the right.
- Second Floor: while the second floor in the area the cart goes through it simply a catwalk, it extends toward another building and goes on, passing by one door of BLU's second spawn and a drop, leading to the other door of BLU's second spawn and to a flank route that leads to just past point A.
- Second Yard: the second large open area of the map, where the cart must go up a ramp to reach point A. The ramp is not steep, so the cart does not roll back immediately if left unattended, and has a small health kit under it.
- Flank 1: a flank route behind the building facing the Choke Building. While the first exit takes players to just past point A, the route keeps going, eventually meeting BLU's third spawn.
- BLU's Second Spawn: A big room that becomes active if BLU manages to capture A. It has two doors, one inside and one outside the Choke Building (left and right when viewed from within the room, respectively), with a nearby resupply cabinet each.
Checkpoint B
- Stairs Room: the interior of the building to the left of point A. It is the shortest route between A and B.
- Arch: a narrow passage under a building's arch that the cart must go through.
- Third Yard: the third large open area of the map.
- Tracks Building: a building sheltering part of the tracks in a short corridor.
- Observation Deck: the most elevated part of the area, it is a room with a big opening overseeing the Third Yard.
- Flank 2: going up the stairs in the Tracks Building and passing by the Observation Deck is the Flank 2, which connects with the Warehouse's interior and, eventually, to the RED spawn.
- BLU's Third Spawn: BLU's third spawn becomes active if they manage to capture B. It has two doors and two resupply cabinets.
Checkpoint C
- RED's Spawn: RED's only spawn has three doors, two facing one another, and one with a resupply cabinet near it.
- RED's Room: the sheltered area immediately outside of RED's spawn.
- Entry Yard: the small open space in front of point B before the cart enters the Warehouse. A door on the right leads to the Warehouse's catwalk where the Flank 2 is connected.
- Warehouse: the big and last building the cart must enter. It has one large room containing a large ammo pack and a small health kit, as well as the Cart's Corridor.
- Cart's Corridor: a long and narrow passage that the cart must go through, with a few crates providing some cover for the players entering with the cart.
- Final Yard: the final open area of the map.
- Veranda: a slightly elevated platform accessible through RED's Room with an overview of the Final Yard and a long sight line of the Cart's Corridor.
- Checkpoint C: the hole in the ground that the cart must be thrown into. Once the cart goes over the steep ramp at the end of the tracks, it hits the planks below as it falls, breaking the improvised bridge and taking the large health kit (as well as any players unlucky to be crossing at that moment) down with it.
Strategy
Main article: Community Emerge strategy
 | “Sun Tzu's got nothing on us!” This map's Community strategy page is a stub. As such, it is not complete. You can help the Team Fortress Wiki Community Strategy Project by expanding it. Notes: None added |
Update history
December 7, 2023 Patch (Smissmas 2023)
- Added Emerge to the game.
- Updated
pl_emergeto fix missing.navfile.
- Fixed some malformed geometry in Blu's first spawn.
- Fixed unintentional perch point just outside Blu's(sic) first spawn.
Trivia
- A Tux can be seen under the stairs in BLU's first spawn.
- In the skybox and outside of the normal view is a frog's head coming out of a rock formation.
- On a wall of the second floor of the first building the car must go through, near the Auto-Borax sign and hidden behind a crate, is a drawing of one of the map creator's characters.
- Inside the wooden structure supporting the bridge above the cart's starting position are three Jimi Jam mascots painted on one of the walls.
- Behind the Maintenance doors next to the cart's starting position is a hidden room, lit by candles and braziers, containing four regular ghosts, the ghost of Zepheniah Mann, and a picture of the cat "Muji" ("2012 - 2022").
Gallery
| |||||||||||||||||||||||||||||||||||||||||||||||||||||||||||||||||||


