Well
 | Esta página está no processo de tradução (em inglês) para português do Brasil. Fluente em inglês e português? Ajude-nos a terminar a tradução deixando uma mensagem na página de discussão ou entrando em contato com quem já contribuiu para a tradução (disponível no histórico da página). |
| Well (Control Point) | |
|---|---|

| |
| Informações básicas | |
| Variantes: | Arena e Capture a Bandeira |
| Desenvolvedor(es): | Desconhecido |
| Informações do mapa | |
| Ambiente: | Industrial |
| Cenário: | Daylight, sunny |
| Perigos: | Trains |
| Imagens do mapa | |
 | |
| Vista aérea | |
_overview.png) | |
Well (Poço) é um mapa padrão de Ponto de Controle. Há três prédios, dos quais o primeiro e o último abrigam 2 pontos de controle. O segundo prédio abriga um ponto de controle neutro. O mapa é simétrico dos dois lados do prédio central.
Objetivo: Em Well, você deve capturar todos os 5 pontos de controle para vencer a rodada. Cada time começa com 2 pontos de controle próximos um do outro e 1 ponto de controle neutro no meio do mapa.
Não se esqueça de que igual a todos os outros mapas padrões de ponto de controle, como Granary, somente os 2 pontos de controle mais próximos um do outro podem ser capturados pelo time inimigo. Todos os outros pontos têm um símbolo de um cadeado sobre eles na HUD e não podem ser tomados por nenhum dos dois lados.
Há 6 trilhos de trem - 2 em cada pátio e 2 atravessando o prédio neutro. Somente os 2 no prédio central têm de fato trens transitando por eles: num período aleatório de mais ou menos 5 minutos, um trem atravessa o trilho e mata instantaneamente qualquer jogador com o qual ele colida.
O Well de TF2 muda drasticamente da versão do TFC, mas mantém as duas bases, as portas do Sniper e o prédio central.
Índice
Vídeo de Introdução
Localizações
Pontos de Controle 1 & 5

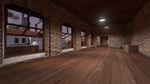
Pontos de Controle 1 & 5 (mais comumente conhecidos como '1' and '5') são os pontos mais próximos do respawn de cada time. No começo do mapa eles pertencem ao time que está no respawn mais próximo. A plataforma e a sala no qual ele está seria a sala da inteligência da versão original de Well do Team Fortress original. Esses pontos têm um tempo de captura curto.
- Pontos de Controle: Os pontos de controle ficam numa plataforma circular elevada numa sala grande, e atrás deles fica o respawn mais recuado do time que corresponde àquele ponto de captura.
- Saídas: A sala grande dentro da qual o ponto está localizado tem duas saídas em cada lado da parede oposta ao respawn. Quase diretamente acima dessas duas saídas estão outras duas saídas (uma de cada lado) que rapidamente se juntam e levam a uma área que dá uma visão geral dos pontos 2 e 4.
- Passarelas: Ao redor da sala estão as passarelas, que correm ao longo das paredes no segundo andar. Elas começam da sala de comando que tem uma visão aérea do ponto e dá toda uma volta pela parede até uma área atrás do ponto e a uma varanda sobre o ponto.
- Sala de Comando: A sala de comando é a sala de onde desembocam as entradas das passarelas. Ela contém vários computadores e uma janela grande que funciona como ponto de vantagem para a sala do ponto de controle.

Sacadas com visão aérea do último ponto.
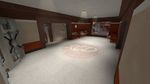
Sala de comando com visão aérea do ponto.
Segundo andar sobre o ponto 2/4.
Spawn inicial.


Pontos de Controle 2 & 4

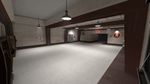
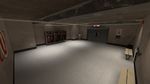
Ponto de Controle 2 & 4 (more easily referred to as '2' and '4') are the control points second closest to each team's respawn and are located inside the lower lobby of the corresponding team's building. It is accessible from two sides (the left and right), with the other two sides being a wall and a bulletproof glass window. These points have an average capture speed.
- Inner Lobby: Next to the first forward spawn and behind the control point is the inner lobby. It has two entrances to the final point room and a set of stairs which lead to a platform surrounding the area. On both sides of the platform are exits to the battlements.
- Third Floor: The third floor is the highest point of the building, there is a hole in the middle which drops down to the inner lobby. It is accessed from the battlements and has an entrance to the command room.
- Swing Doors: There are two entrances to each main base, which are called the swing doors. They are the only entrances to the main building and enter on both far sides of the complex.
- Well Room: The well room is the room between the swing doors which has a drop down pipe to the water ways.
- Battlements: The battlements are on the second floor of the base and have windows which overlook the yard areas. There are four exits, two of which lead around to the inner lobby, one of which to the well room, and the other which leads up to the third floor drop down above the inner lobby.
- Yard: Outside the swingdoors and between the main buildings and control point building is the yard. The yard contains two train carts, the waterway, and two entrances to the central control point building.
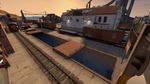
Yard between mid and the RED/BLU base.
Battlements overlooking yard.

Wellroom.

Spawn for teams that have capped mid.


Control Point 3

This point is arguably the hardest point to capture and the point at which most of the map's action happens.
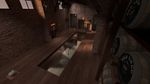
- Water Room: The waterway in the yard leads to an open room directly connected to the interior of the neutral building, which exits out to below the point.
- Entrances: There are two ground-level side entrances on the left and right side of the point. The side entrances of both one team and their enemy are separated by a stationary train car. When entering these entrances remain cautious, trains regularly run through these entrances.
- Bridge (Point): The point itself is situated on a bridge over the rail lines that is accessible from four platforms - one going to each corner of the room. The platform connects the walls closest to each enemy base together and there is a small opening in the wall on each end of the platform leading into the Battlements.
- Train Rails: Along the ground level of the Central Building are two train rails which run through the Entrances. Beware as trains often running through them.
- Battlements: Across from the central point are the battlements which overlook the spawn yard, a common spot for Snipers and Soldiers to safely pick off enemies.
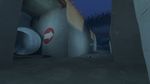
Water that leads to the point.

Sniper deck overlooking yard.
Spawn for teams that have capped 4.


Strategy
Control Point Timing
| Pontos de Controle | Multiplicador | Segundos | ||
|---|---|---|---|---|
| Pontos de Controle 1 e 5 | ×1 |
| ||
| ×2 |
| |||
| ×3 |
| |||
| ×4 |
| |||
| Pontos de Controle 2 e 4 | ×1 |
| ||
| ×2 |
| |||
| ×3 |
| |||
| ×4 |
| |||
| Pontos de Controle 3 | ×1 |
| ||
| ×2 |
| |||
| ×3 |
| |||
| ×4 |
|
Related Achievements
 General
|
|


 Scout
Scout
|

Update history
- Increased starting round timer to 10 minutes in Well
- Fixed players blocking doors in Well.
- Fixed Engineer building in exploit areas on final caps in Well.
- Added ctf_well to the default mapcycle.txt file.
- Added ctf_well to the default motd.txt file.
June 19, 2008 Patch (Pyro Update)
- Added a route from the forward central foyer up to the battlements.
- Redistributed health and ammunition throughout the bases.
- Fixed various exploits and performance problems in CP_Well.
April 14, 2011 Patch (Hatless Update)
- Spawn room by second cap for each time is now a one-way door.
Trivia
- Well is one of the maps designed after existing Team Fortress Classic maps, the others being 2Fort, Dustbowl, and Badlands. The original version was significantly different, with this version focusing more on a train station then any actual well.
- According to the Map of Mann's Land, Well (called The Well) is southwest from Gravel Pit. A sea of gravel (called The Gravel Sea on the map) lies north.
See also