Carrier
| Carrier | |
|---|---|

| |
| Basic Information | |
| Map type: | Attack/Defend |
| File name: | cp_carrier
|
| Released: | December 7, 2023 Patch (Smissmas 2023) |
| Developer(s): | John "MilkMaster72" Worden Lizard Of Oz Aeon "Void" Bollig Juniper Yiming "Coolchou" Zhao theatreTECHIE PearForceOne Harlen "UEAKCrash" Linke Zoey Smith Tim "SediSocks" BL Jen "NeoDement" Burnett Erik "Colteh" Coltey Populus Al "Square" Rodgers Benjamin "blaholtzen" Blåholtz Logan McCloud donhonk |
| Map Info | |
| Environment: | Alpine |
| Setting: | Night time |
| Hazards: | Pitfalls (and Banana Peel), Bomb (carrier only) |
| Map Photos | |
| Map Overview | |
| Map Stamp | |
| Supporters Leaderboard | |
| “ | Become the machine and destroy RED's missile!
— Carrier publicity blurb
|
” |
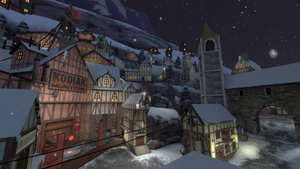
Carrier is a community-created Attack/Defend Control Point map. It is set in a mountain town with a RED missile base.
The map uses a unique mechanic in which only the BLU player carrying the bomb can capture the points. The player who picks up the bomb receives several effects, both positive and negative. Whenever a point is captured, the bomb explodes, killing the bomb carrier instantly.
Carrier was contributed to the Steam Workshop.
Contents
Locations
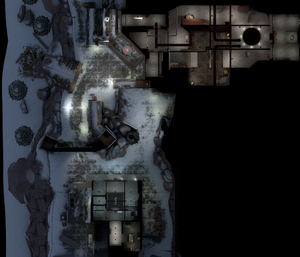
Control Point A
- BLU Spawn: a small room with a resupply cabinet.
- Bomb Pickup Area: a square room with a drop in the middle where the bomb is located. If multiple players try to pick the bomb up at the same time, the game selects on of them at random to be the carrier; all others are transported back to the spawn room. Players are also transported back if the bomb has already been picked up. There is one giant door for the carrier in the middle and one regular door and resupply cabinet on either side for the other players. Note that the bomb's drop and the space in-between it and the giant gate are not considered part of the resupply area; switching classes in them does not occur until the player dies or manually enters the spawn room in the back, and results in suicide if the option "Suicide after choosing a player class" is on in the Advanced multiplayer options.
- High Ground: a high piece of ground close to the town and away from the cliff. Wooden planks offer passage up and safely down; falling off likely results in fall damage.
- Arch: a thin building with an arch near the cliff.
- Green Building: a two-store building painted green on the outside. There is a medium health kit on the first floor and a medium ammo pack on the second.
- Yard: the big open area in front of the point.
- Bar: a partially-collapsed yellow building built over the cliff. A large ammo pack sits safely next to the jukebox; a large health pack sits dangerously next to the abyss and to a slippery Banana Peel.
- Shops: two buildings with interconnected interiors right next to the point, with an open window in the back.
- White Building: a thin and tall white building with a "Phantom Pane" poster on one of its outer walls. It houses a medium ammo pack and offers an overview of the Yard.
- Point A: BLU's first objective. When the point is captured, the bomb explodes, blowing the gate open and killing the carrier. There is also one regular door available at all times on each side; the bomb carrier must use the gate in order to enter the facility.
Control Point B
- Entrance: the area immediately inside the facility. The bomb carrier must choose one of two ways to reach the point. A large glass window lets RED players see in advance which path they take.
- Shipping Path: a straight path with crates and barrels, as well as a shipping container. The crates and barrels at the end can be easily climbed through smaller boxes that serve as steps; the crates near the shipping container are too tall to jump or crouch-jump onto normally, requiring jumping techniques such as double and flare jumps. An improvised platform near the Hatch offers an overview of the path.
- Bifurcated Path: a larger room with a wall in the middle that players must go around. Two shipping containers can be found atop one another in a corner; a wooden ramp provides easy access to their top, where a medium ammo pack and an overview of the capture zone can be found.
- Capture Zone: the capture zone is quite large; the carrier can stand anywhere past the orange and black stripes on the floor. Two improvised walls offer cover, with the one on the Bifurcated Path's side hiding a medium health kit from BLU and the one on the Shipping Path's side hiding a medium ammo pack. The rocket's rail coming out of the hatch can also serve as cover.
- Hatch (Control point B): BLU's final goal. Only the carrier can open it by standing anywhere in the capture zone and they must jump into in order to win, dying in the process.
Carrying the bomb
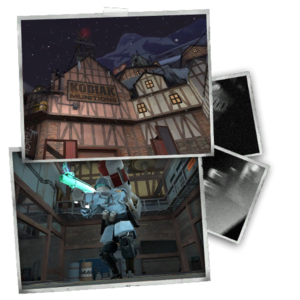
A player carrying the bomb is turned into a "Carrier"; a Giant Robot version of themselves that is three times the size of a normal player. All worn cosmetics are removed, voice pitch is reduced to 60%, and their weapons glow with mini-crit effects (similar to those gained from the Crit-a-Cola, Buffalo Steak Sandvich, and Cleaner's Carbine). The carrier explodes on death, although no damage is dealt as the effect is purely cosmetic. A Carrier receives the following attributes:[1]
 Increased max health (see table below for specifics)
 The Carrier is immune to backstabs and fall damage
 +25% added critical hit resistance
 Projectiles that do not explode on impact (such as stickybombs) bounce off the Carrier at a greater speed than normal[2], except for the Scorch Shot[3]
 Push force taken from damage reduced by 80%
 Enemy airblasts are nullified
 Ammo is regenerated every five seconds
 Gravity is multiplied by 200% of the original amount (equivalent to a maximum downward force of 1600 Hammer units); 300% (max. force of 2400 HU) if the Carrier is playing as a Medic
 Healing rate from Medics reduced by 75%
 Health gained from Medkits reduced by 95%
 Overheals are disabled
 Movement speed reduced by 50%
 Cannot cloak; Spies who try to pick up the bomb while cloaked are teleported back to spawn.
Dropping the bomb (default key: L) kills the Carrier.
| RED players | Health | RED players | Health |
|---|---|---|---|
| 1 | 3125 | 7 | 3875 |
| 2 | 3250 | 8 | 4000 |
| 3 | 3375 | 9 | 4125 |
| 4 | 3500 | 10 | 4250 |
| 5 | 3625 | 11 | 4375 |
| 6 | 3750 | 12 | 4500 |
Strategy
 | “Sun Tzu's got nothing on us!” This map's Community strategy page is a stub. As such, it is not complete. You can help the Team Fortress Wiki Community Strategy Project by expanding it. Notes: None added |
Update history
- Added Carrier to the game.
- Updated
cp_carrierto fix some visual issues.
- Adjusted fade distances of some areaportals.
- Adjusted Blu(sic) team's respawn times.
- Extended Blu team's respawn room.
- Fixed hud text overlapping.
- Fixed soundscapes not working correctly.
- Fixed objective text not displaying properly.
- Fixed the ability for the carrier to pick up restricted weapons.
- Fixed players not becoming the carrier while standing on the platform as it resets.
- Announcer's bomb voice lines no longer play after the bomb has been deployed.
- Half-Zatoichi kills now restore 25% of the carrier's health instead of 50%.
- Added 25% Crit resistance to the carrier.
- Added Overtime while there is a carrier.
- The carrier's health bar now displays their class icon.
- Decreased size of the frog.
- Fixed a clipping issue near the bell tower.
- Fixed the carrier being able to take Teleporters.
- Fixed players dropping flags during waiting for players.
- Adjusted gravity and health formula for the carrier.
- Half-Zatoichi reverted back to restoring 50% of the carrier's health.
- The carrier is now able to use the Thermal Thruster, the Pain Train, as well as taunts.
- Decreased size of the frog.
Bugs
- Using the Dead Ringer as a Spy while being the Carrier causes instant death.[4]
- The cloak meter on the watch itself may also be the wrong size.
- A player who becomes the Carrier while not at full health gains additional maximum health equal to the amount of health they were missing.[5]
- This happens because the game calculates the Carrier's health with the formula
x + 125 * RED player count, where x is a base value defined per class. It then adds this to the Carrier's current max health using a max health attribute and then substracts their current health. As a Scout with 100 HP and with 1 player on RED, the game adds 2125 health, resulting in 2250 max health, then subtracts 100 from that, leaving the Carrier with 2150 max health instead of the intended 2125.
- This happens because the game calculates the Carrier's health with the formula
- Some of the houses on the mountain have nodraw textures on the back of the roof, which can be visible from the playable space.[6]
Trivia
- Hitting the bell in one of the arched building's towers makes it ring.
- Three mice can be found with a RED Dalokohs Bar inside the Mann Co. crate next to the health kit inside the Green Building on alternating rounds.
Gallery
References
![]() When updates release, the code will likely have shifted a few lines or have moved somewhere else entirely.
When updates release, the code will likely have shifted a few lines or have moved somewhere else entirely.
- ↑ scripts\vscripts\cp_carrier:L40-78
- ↑ Projectiles bouncing off
- ↑ Scorch Shot not bouncing off
- ↑ Video demonstrating instant death with Dead Ringer and oversized cloak meter.
- ↑ Max health bug.
- ↑ Nodraw on roofs
| |||||||||||||||||||||||||
| |||||||||||||||||||||||||||||||||||||||||||||||||||||||||||||||||||


