Difference between revisions of "Jungle Inferno Update/fr"
BrazilianNut (talk | contribs) m (Added See also section with link to Jungle Inferno Contracts Pass.) |
BrazilianNut (talk | contribs) m (→Cosmétiques) |
||
| Line 103: | Line 103: | ||
==== Cosmétiques ==== | ==== Cosmétiques ==== | ||
| − | {{main|Cosmetic items | + | {{main|Cosmetic items{{if lang}}|l1={{common string|Cosmetic items}}}} |
{| class="wikitable collapsible" cellpadding=2 style="text-align:center;" | {| class="wikitable collapsible" cellpadding=2 style="text-align:center;" | ||
|- | |- | ||
| − | | style="background: #b5b85c; width:90px;" rowspan="3" | {{icon class|Scout}}<br/>'''[[Scout{{if lang}}|<span style="color: #000;">Scout</span>]]''' | + | | style="background: #b5b85c; width:90px;" rowspan="3" | {{icon class|Scout}}<br/>'''[[Scout{{if lang}}|<span style="color: #000;">{{class name|Scout}}</span>]]''' |
| − | | align="center" style="background: # | + | | align="center" style="background: #4B69FF "| {{Icon item|Forest Footwear|75px}} |
| style="background: #f8e2a1 "| '''{{item link|Forest Footwear}}''' | | style="background: #f8e2a1 "| '''{{item link|Forest Footwear}}''' | ||
|- | |- | ||
| − | | align="center" style="background: # | + | | align="center" style="background: #D32CE6 " | {{Icon item|Jungle Jersey|75px}} |
| style="background: #f8e2a1 "| '''{{item link|Jungle Jersey}}''' | | style="background: #f8e2a1 "| '''{{item link|Jungle Jersey}}''' | ||
|- | |- | ||
| − | | align="center" style="background: # | + | | align="center" style="background: #8847FF " | {{Icon item|Transparent Trousers|75px}} |
| style="background: #f8e2a1 "| '''{{item link|Transparent Trousers}}''' | | style="background: #f8e2a1 "| '''{{item link|Transparent Trousers}}''' | ||
|- | |- | ||
| − | | style="background: #b5b85c; width:90px;" rowspan="4" | {{icon class|Soldier}}<br/>'''[[Soldier{{if lang}}|<span style="color: #000;">Soldier</span>]]''' | + | | style="background: #b5b85c; width:90px;" rowspan="4" | {{icon class|Soldier}}<br/>'''[[Soldier{{if lang}}|<span style="color: #000;">{{class name|Soldier}}</span>]]''' |
| − | | align="center" style="background: # | + | | align="center" style="background: #4B69FF "| {{Icon item|Attack Packs|75px}} |
| style="background: #f8e2a1 "| '''{{item link|Attack Packs}}''' | | style="background: #f8e2a1 "| '''{{item link|Attack Packs}}''' | ||
|- | |- | ||
| − | | align="center" style="background: # | + | | align="center" style="background: #8847FF " | {{Icon item|Crit Cloak|75px}} |
| style="background: #f8e2a1 "| '''{{item link|Crit Cloak}}''' | | style="background: #f8e2a1 "| '''{{item link|Crit Cloak}}''' | ||
|- | |- | ||
| − | | align="center" style="background: # | + | | align="center" style="background: #4B69FF " | {{Icon item|Sharp Chest Pain|75px}} |
| style="background: #f8e2a1 "| '''{{item link|Sharp Chest Pain}}''' | | style="background: #f8e2a1 "| '''{{item link|Sharp Chest Pain}}''' | ||
|- | |- | ||
| − | | align="center" style="background: # | + | | align="center" style="background: #4B69FF " | {{Icon item|Shellmet|75px}} |
| style="background: #f8e2a1 "| '''{{item link|Shellmet}}''' | | style="background: #f8e2a1 "| '''{{item link|Shellmet}}''' | ||
|- | |- | ||
| − | | style="background: #b5b85c; width:90px;" rowspan="6" | {{icon class|Pyro}}<br/>'''[[Pyro{{if lang}}|<span style="color: #000;">Pyro</span>]]''' | + | | style="background: #b5b85c; width:90px;" rowspan="6" | {{icon class|Pyro}}<br/>'''[[Pyro{{if lang}}|<span style="color: #000;">{{class name|Pyro}}</span>]]''' |
| − | | align="center" style="background: # | + | | align="center" style="background: #4B69FF "| {{Icon item|Deity's Dress|75px}} |
| style="background: #f8e2a1 "| '''{{item link|Deity's Dress}}''' | | style="background: #f8e2a1 "| '''{{item link|Deity's Dress}}''' | ||
|- | |- | ||
| − | | align="center" style="background: # | + | | align="center" style="background: #8847FF " | {{Icon item|D-eye-monds|75px}} |
| style="background: #f8e2a1 "| '''{{item link|D-eye-monds}}''' | | style="background: #f8e2a1 "| '''{{item link|D-eye-monds}}''' | ||
|- | |- | ||
| − | | align="center" style="background: # | + | | align="center" style="background: #8847FF " | {{Icon item|Feathered Fiend|75px}} |
| style="background: #f8e2a1 "| '''{{item link|Feathered Fiend}}''' | | style="background: #f8e2a1 "| '''{{item link|Feathered Fiend}}''' | ||
|- | |- | ||
| − | | align="center" style="background: # | + | | align="center" style="background: #4B69FF " | {{Icon item|Fireman's Essentials|75px}} |
| style="background: #f8e2a1 "| '''{{item link|Fireman's Essentials}}''' | | style="background: #f8e2a1 "| '''{{item link|Fireman's Essentials}}''' | ||
|- | |- | ||
| − | | align="center" style="background: # | + | | align="center" style="background: #8847FF " | {{Icon item|Hot Huaraches|75px}} |
| style="background: #f8e2a1 "| '''{{item link|Hot Huaraches}}''' | | style="background: #f8e2a1 "| '''{{item link|Hot Huaraches}}''' | ||
|- | |- | ||
| − | | align="center" style="background: # | + | | align="center" style="background: #D32CE6 " | {{Icon item|Sacrificial Stone|75px}} |
| style="background: #f8e2a1 "| '''{{item link|Sacrificial Stone}}''' | | style="background: #f8e2a1 "| '''{{item link|Sacrificial Stone}}''' | ||
|- | |- | ||
| − | | style="background: #b5b85c; width:90px;" rowspan="8" | {{icon class|Heavy}}<br/>'''[[Heavy{{if lang}}|<span style="color: #000;">Heavy</span>]]''' | + | | style="background: #b5b85c; width:90px;" rowspan="8" | {{icon class|Heavy}}<br/>'''[[Heavy{{if lang}}|<span style="color: #000;">{{class name|Heavy}}</span>]]''' |
| − | | align="center" style="background: # | + | | align="center" style="background: #FFD700 "| {{Icon item|Abominable Snow Pants|75px}} |
| style="background: #f8e2a1 "| '''{{item link|Abominable Snow Pants}}''' | | style="background: #f8e2a1 "| '''{{item link|Abominable Snow Pants}}''' | ||
|- | |- | ||
| − | | align="center" style="background: # | + | | align="center" style="background: #D32CE6 " | {{Icon item|Aztec Aggressor|75px}} |
| style="background: #f8e2a1 "| '''{{item link|Aztec Aggressor}}''' | | style="background: #f8e2a1 "| '''{{item link|Aztec Aggressor}}''' | ||
|- | |- | ||
| − | | align="center" style="background: # | + | | align="center" style="background: #4B69FF " | {{Icon item|Commando Elite|75px}} |
| style="background: #f8e2a1 "| '''{{item link|Commando Elite}}''' | | style="background: #f8e2a1 "| '''{{item link|Commando Elite}}''' | ||
|- | |- | ||
| − | | align="center" style="background: # | + | | align="center" style="background: #4B69FF " | {{Icon item|Fat Man's Field Cap|75px}} |
| style="background: #f8e2a1 "| '''{{item link|Fat Man's Field Cap}}''' | | style="background: #f8e2a1 "| '''{{item link|Fat Man's Field Cap}}''' | ||
|- | |- | ||
| − | | align="center" style="background: # | + | | align="center" style="background: #4B69FF " | {{Icon item|Heavy Harness|75px}} |
| style="background: #f8e2a1 "| '''{{item link|Heavy Harness}}''' | | style="background: #f8e2a1 "| '''{{item link|Heavy Harness}}''' | ||
|- | |- | ||
| − | | align="center" style="background: # | + | | align="center" style="background: #FFD700 " | {{Icon item|Himalayan Hair Shirt|75px}} |
| style="background: #f8e2a1 "| '''{{item link|Himalayan Hair Shirt}}''' | | style="background: #f8e2a1 "| '''{{item link|Himalayan Hair Shirt}}''' | ||
|- | |- | ||
| − | | align="center" style="background: # | + | | align="center" style="background: #FFD700 " | {{Icon item|Kathman-Hairdo|75px}} |
| style="background: #f8e2a1 "| '''{{item link|Kathman-Hairdo}}''' | | style="background: #f8e2a1 "| '''{{item link|Kathman-Hairdo}}''' | ||
|- | |- | ||
| − | | align="center" style="background: # | + | | align="center" style="background: #4B69FF " | {{Icon item|Siberian Tigerstripe|75px}} |
| style="background: #f8e2a1 "| '''{{item link|Siberian Tigerstripe}}''' | | style="background: #f8e2a1 "| '''{{item link|Siberian Tigerstripe}}''' | ||
|- | |- | ||
| − | | style="background: #b5b85c; width:90px;" rowspan="2" | {{icon class|Engineer}}<br/>'''[[Engineer{{if lang}}|<span style="color: #000;">Engineer</span>]]''' | + | | style="background: #b5b85c; width:90px;" rowspan="2" | {{icon class|Engineer}}<br/>'''[[Engineer{{if lang}}|<span style="color: #000;">{{class name|Engineer}}</span>]]''' |
| − | | align="center" style="background: # | + | | align="center" style="background: #4B69FF "| {{Icon item|Conaghers' Utility Idol|75px}} |
| style="background: #f8e2a1 "| '''{{item link|Conaghers' Utility Idol}}''' | | style="background: #f8e2a1 "| '''{{item link|Conaghers' Utility Idol}}''' | ||
|- | |- | ||
| − | | align="center" style="background: # | + | | align="center" style="background: #D32CE6 " | {{Icon item|Tropical Toad|75px}} |
| style="background: #f8e2a1 "| '''{{item link|Tropical Toad}}''' | | style="background: #f8e2a1 "| '''{{item link|Tropical Toad}}''' | ||
|- | |- | ||
| − | | style="background: #b5b85c; width:90px;" rowspan="2" | {{icon class|Medic}}<br/>'''[[Medic{{if lang}}|<span style="color: #000;">Medic</span>]]''' | + | | style="background: #b5b85c; width:90px;" rowspan="2" | {{icon class|Medic}}<br/>'''[[Medic{{if lang}}|<span style="color: #000;">{{class name|Medic}}</span>]]''' |
| − | | align="center" style="background: # | + | | align="center" style="background: #4B69FF "| {{Icon item|Battle Boonie|75px}} |
| style="background: #f8e2a1 "| '''{{item link|Battle Boonie}}''' | | style="background: #f8e2a1 "| '''{{item link|Battle Boonie}}''' | ||
|- | |- | ||
| − | | align="center" style="background: # | + | | align="center" style="background: #4B69FF " | {{Icon item|Vitals Vest|75px}} |
| style="background: #f8e2a1 "| '''{{item link|Vitals Vest}}''' | | style="background: #f8e2a1 "| '''{{item link|Vitals Vest}}''' | ||
|- | |- | ||
| − | | style="background: #b5b85c; width:90px;" rowspan="6" | {{icon class|Sniper}}<br/>'''[[Sniper{{if lang}}|<span style="color: #000;">Sniper</span>]]''' | + | | style="background: #b5b85c; width:90px;" rowspan="6" | {{icon class|Sniper}}<br/>'''[[Sniper{{if lang}}|<span style="color: #000;">{{class name|Sniper}}</span>]]''' |
| − | | align="center" style="background: # | + | | align="center" style="background: #4B69FF "| {{Icon item|Bait and Bite|75px}} |
| style="background: #f8e2a1 "| '''{{item link|Bait and Bite}}''' | | style="background: #f8e2a1 "| '''{{item link|Bait and Bite}}''' | ||
|- | |- | ||
| − | | align="center" style="background: # | + | | align="center" style="background: #4B69FF " | {{Icon item|Cammy Jammies|75px}} |
| style="background: #f8e2a1 "| '''{{item link|Cammy Jammies}}''' | | style="background: #f8e2a1 "| '''{{item link|Cammy Jammies}}''' | ||
|- | |- | ||
| − | | align="center" style="background: # | + | | align="center" style="background: #4B69FF " | {{Icon item|Classy Capper|75px}} |
| style="background: #f8e2a1 "| '''{{item link|Classy Capper}}''' | | style="background: #f8e2a1 "| '''{{item link|Classy Capper}}''' | ||
|- | |- | ||
| − | | align="center" style="background: # | + | | align="center" style="background: #8847FF " | {{Icon item|Conspicuous Camouflage|75px}} |
| style="background: #f8e2a1 "| '''{{item link|Conspicuous Camouflage}}''' | | style="background: #f8e2a1 "| '''{{item link|Conspicuous Camouflage}}''' | ||
|- | |- | ||
| − | | align="center" style="background: # | + | | align="center" style="background: #4B69FF " | {{Icon item|Most Dangerous Mane|75px}} |
| style="background: #f8e2a1 "| '''{{item link|Most Dangerous Mane}}''' | | style="background: #f8e2a1 "| '''{{item link|Most Dangerous Mane}}''' | ||
|- | |- | ||
| − | | align="center" style="background: # | + | | align="center" style="background: #8847FF " | {{Icon item|Rifleman's Regalia|75px}} |
| style="background: #f8e2a1 "| '''{{item link|Rifleman's Regalia}}''' | | style="background: #f8e2a1 "| '''{{item link|Rifleman's Regalia}}''' | ||
|- | |- | ||
| style="background: #b5b85c; width:90px;" | '''{{Class link|Scout|color=black}}'''<br/>'''{{Class link|Engineer|color=black}}'''<br/>'''{{Class link|Spy|color=black}}''' | | style="background: #b5b85c; width:90px;" | '''{{Class link|Scout|color=black}}'''<br/>'''{{Class link|Engineer|color=black}}'''<br/>'''{{Class link|Spy|color=black}}''' | ||
| − | | align="center" style="background: # | + | | align="center" style="background: #4B69FF; " | {{Icon item|Aloha Apparel|75px}} |
| style="background: #f8e2a1; " | '''{{item link|Aloha Apparel}}''' | | style="background: #f8e2a1; " | '''{{item link|Aloha Apparel}}''' | ||
|- | |- | ||
| style="background: #b5b85c; width:90px;" | '''{{Class link|Soldier|color=black}}'''<br/>'''{{Class link|Pyro|color=black}}'''<br/>'''{{Class link|Demoman|color=black}}''' | | style="background: #b5b85c; width:90px;" | '''{{Class link|Soldier|color=black}}'''<br/>'''{{Class link|Pyro|color=black}}'''<br/>'''{{Class link|Demoman|color=black}}''' | ||
| − | | align="center" style="background: # | + | | align="center" style="background: #D32CE6; " | {{Icon item|Bananades|75px}} |
| style="background: #f8e2a1; " | '''{{item link|Bananades}}''' | | style="background: #f8e2a1; " | '''{{item link|Bananades}}''' | ||
| + | |- | ||
| + | | style="background: #b5b85c; width:90px;" | '''{{Class link|Soldier|color=black}}'''<br/>'''{{Class link|Demoman|color=black}}'''<br/>'''{{Class link|Heavy|color=black}}''' | ||
| + | | align="center" style="background: #EB4B4B; " | {{Icon item|War Eagle|75px}} | ||
| + | | style="background: #f8e2a1; " | '''{{item link|War Eagle}}''' | ||
|- | |- | ||
| style="background: #b5b85c; width:90px;" | '''{{Class link|Soldier|color=black}}'''<br/>'''{{Class link|Heavy|color=black}}''' | | style="background: #b5b85c; width:90px;" | '''{{Class link|Soldier|color=black}}'''<br/>'''{{Class link|Heavy|color=black}}''' | ||
| − | | align="center" style="background: # | + | | align="center" style="background: #4B69FF; " | {{Icon item|Nuke|75px}} |
| style="background: #f8e2a1; " | '''{{item link|Nuke}}''' | | style="background: #f8e2a1; " | '''{{item link|Nuke}}''' | ||
|- | |- | ||
| − | + | | style="background: #b5b85c; width:90px;" rowspan="14" | {{icon class|All Classes}}<br/>'''[[Classes{{if lang}}|<span style="color: #000;">{{class name|All Classes}}</span>]]''' | |
| − | + | | align="center" style="background: #EB4B4B " | {{Icon item|Aztec Warrior|75px}} | |
| − | |||
| − | |||
| − | | style="background: #b5b85c; width:90px;" rowspan=" | ||
| − | | align="center" style="background: # | ||
| style="background: #f8e2a1 "| '''{{item link|Aztec Warrior}}''' | | style="background: #f8e2a1 "| '''{{item link|Aztec Warrior}}''' | ||
|- | |- | ||
| − | | align="center" style="background: # | + | | align="center" style="background: #8847FF " | {{Icon item|Croaking Hazard|75px}} |
| style="background: #f8e2a1 "| '''{{item link|Croaking Hazard}}''' | | style="background: #f8e2a1 "| '''{{item link|Croaking Hazard}}''' | ||
|- | |- | ||
| − | | align="center" style="background: # | + | | align="center" style="background: #8847FF " | {{Icon item|Hunter in Darkness|75px}} |
| style="background: #f8e2a1 "| '''{{item link|Hunter in Darkness}}''' | | style="background: #f8e2a1 "| '''{{item link|Hunter in Darkness}}''' | ||
|- | |- | ||
| − | | align="center" style="background: # | + | | align="center" style="background: #D32CE6 " | {{Icon item|Jungle Wreath|75px}} |
| style="background: #f8e2a1 "| '''{{item link|Jungle Wreath}}''' | | style="background: #f8e2a1 "| '''{{item link|Jungle Wreath}}''' | ||
|- | |- | ||
| − | | align="center" style="background: # | + | | align="center" style="background: #FFD700 " | {{Icon item|Mannanas Hat|75px}} |
| + | | style="background: #f8e2a1 "| '''{{item link|Mannanas Hat}}''' | ||
| + | |- | ||
| + | | align="center" style="background: #FFD700 " | {{Icon item|Mercenary Park|75px}} | ||
| + | | style="background: #f8e2a1 "| '''{{item link|Mercenary Park}}''' | ||
| + | |- | ||
| + | | align="center" style="background: #FFD700 " | {{Icon item|Monstrous Memento|75px}} | ||
| style="background: #f8e2a1 "| '''{{item link|Monstrous Memento}}''' | | style="background: #f8e2a1 "| '''{{item link|Monstrous Memento}}''' | ||
|- | |- | ||
| − | | align="center" style="background: # | + | | align="center" style="background: #FFD700 " | {{Icon item|Never Forget Hat|75px}} |
| + | | style="background: #f8e2a1 "| '''{{item link|Never Forget Hat}}''' | ||
| + | |- | ||
| + | | align="center" style="background: #4B69FF " | {{Icon item|Pithy Professional|75px}} | ||
| style="background: #f8e2a1 "| '''{{item link|Pithy Professional}}''' | | style="background: #f8e2a1 "| '''{{item link|Pithy Professional}}''' | ||
|- | |- | ||
| − | | align="center" style="background: # | + | | align="center" style="background: #8847FF " | {{Icon item|Pocket Saxton|75px}} |
| style="background: #f8e2a1 "| '''{{item link|Pocket Saxton}}''' | | style="background: #f8e2a1 "| '''{{item link|Pocket Saxton}}''' | ||
|- | |- | ||
| − | | align="center" style="background: # | + | | align="center" style="background: #EB4B4B " | {{Icon item|Quizzical Quetzal|75px}} |
| style="background: #f8e2a1 "| '''{{item link|Quizzical Quetzal}}''' | | style="background: #f8e2a1 "| '''{{item link|Quizzical Quetzal}}''' | ||
|- | |- | ||
| − | | align="center" style="background: # | + | | align="center" style="background: #FFD700 " | {{Icon item|Saxton|75px}} |
| style="background: #f8e2a1 "| '''{{item link|Saxton}}''' | | style="background: #f8e2a1 "| '''{{item link|Saxton}}''' | ||
|- | |- | ||
| − | | align="center" style="background: # | + | | align="center" style="background: #EB4B4B " | {{Icon item|Slithering Scarf|75px}} |
| style="background: #f8e2a1 "| '''{{item link|Slithering Scarf}}''' | | style="background: #f8e2a1 "| '''{{item link|Slithering Scarf}}''' | ||
| + | |- | ||
| + | | align="center" style="background: #FFD700 " | {{Icon item|Yeti Park Hardhat|75px}} | ||
| + | | style="background: #f8e2a1 "| '''{{item link|Yeti Park Hardhat}}''' | ||
|} | |} | ||
Revision as of 00:26, 4 November 2019

| « | Si Jurassic Park nous a appris une chose, c'est que la vie sait trouver son équilibre. Si Jurassic Park nous a appris deux choses, c'est que la vie sait trouver son équilibre et que Jurassic Park est une superbe idée à piquer pour une mise à jour. Et si l'équipe juridique de Valve nous a appris une chose, c'était de nous crier dessus de ne surtout pas vous dire ce qu'est la deuxième chose que Jurassic Parc nous a dit.
Si les gens qui nous crient dessus nous ont appris une seule chose, c'est que les bruits agressifs nous rendent anxieux et que nous oublions où est la touche retour arrière. Donc nous sommes allés de l'avant et nous somme heureux de vous annoncer notre mise à jour complète et originale sur des animaux mortels qui se sont échappés d'un parc à thème. La vie sait trouver son équilibre, c'est la seule chose que nous avons — Site officiel de TF2
|
» |
La Jungle Inferno Update était une mise à jour majeure pour Team Fortress 2 qui a été dévoilée sur quatre jours, commençant le 17 octobre 2017, pour finalement sortir le 21 octobre 2017 après une journée de retard. Elle ajoute cinq nouvelles armes, cinq nouvelles cartes communautaires, une nouvelle carte de Valve, sept railleries, une nouvelle raillerie d'attaque, plus de quarante objets cosmétiques, un nouvel équilibre des armes et un équilibre pour la classe du Pyro. Elle a aussi introduit une refonte du système de contrat avec le Contr'Assistant ainsi que des Peinture de guerre.
Sommaire
Vidéo
Annonce
La page de la Jungle Inferno Update a officiellement débuté le 17 octobre 2017, annoncé dans le post « Welcome to... Mercenary Park! (anglais) » du Blog officiel de TF2.
Révélation de la mise à jour
La Jungle Inferno Update a été publiée sur une période de quatre jours.
- Le jour 1 a introduit les sept nouvelles railleries, les six nouvelles cartes et un court trailer SFM.
- Le jour 2 a introduit les Peinture de guerre, le nouveau PDA de contrat avec des contrats gratuits et payants, où les gratuits donnaient les nouvelles armes, et les payants donnaient de l'Argent sale et des Peintures de guerre.
- Le jour 3 a révélé les nouvelles armes : la Fureur du Dragon (une arme principale/lance-flammes), le Propulseur Thermique (une arme secondaire/jetpack avec une raillerie d'attaque), le Bidon d'Essence (une arme secondaire/gaz toxique), la Main Chaude (une arme de corps-à-corps/gant), et une arme pour le Heavy : la banane secondaire (un panier déjeuner)
- Le jour 4 a été le dernier jour, accompagné d'un post sur le blog avec un patch note complet et une date de sortie.
Jour 1
La Jungle Inferno Update a révélé une nouvelle carte officielle et cinq nouvelles cartes communautaires , accompagnée de deux nouvelles railleries de Valve et cinq nouvelles railleries communautaires.
Cartes
| Nom | Image | Mode de jeu | Nom du fichier |
|---|---|---|---|
| Banana Bay | 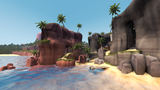
|
Course à la charge utile |
plr_bananabay
|
| Brazil | 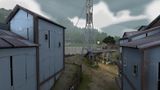
|
Roi de la Colline |
koth_brazil
|
| Enclosure | 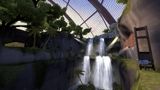
|
Charge Utile
|
pl_enclosure_final
|
| Lazarus | 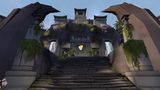
|
Roi de la Colline |
koth_lazarus
|
| Mercenary Park | 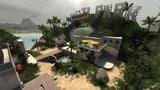
|
Point de Contrôle |
cp_mercenarypark
|
| Mossrock | 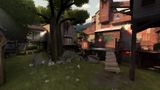
|
Attaque/Défense |
cp_mossrock
|
Railleries
Pyro |
Plat de résistance | |
Heavy |
Grandes pompes | |
| Halte aux haltères | ||
Engineer |
Pro du banjo | |
| Marteau piqueur | ||
Toutes les classes |
En plein dans le migou | |
| Abominable mercenaire des neiges |
Jour 2
Le deuxième jour a révélé la Campagne Jungle Inferno et les caisses Peinture de guerre qui vont remplacer les armes de campagnes dropées et les caisses à armes. Deux nouvelles caisses à cosmétiques ainsi qu'un nouveau système de campagne ont été annoncés. Cette campagne inclus 36 nouveaux contrats qui peuvent être complétés en coopération. La réussite des contrats vous fait gagner soit un objet de la campagne ou soit de l'Argent sale, qui peut être utilisé pour acheter des Peinture de guerre ou des caisses.
Campagne
La campagne Jungle Inferno requiert d'acheter le Passe de la campagne Jungle Inferno. Le Contr'Assistant est un PDA qui a aussi été introduit et présenté comme un objet vous montrant vos contrats personnalisés en cours et le magasin du Mercenary Park. Le Tir ami est maintenant disponible, ce qui permet aux joueurs de jouer contre leurs amis et aider chacun à compléter leurs contrats.
Cosmétiques
Ensemble d'objets
Heavy |
Pack Maximonstres |
Abominable homme des jungles | |
| Touffe himalayenne | |||
| Abominables pantalons de ski |
Outils
Jour 3
Le jour 3 a révélé quatre nouvelles armes pour le Pyro, une nouvelle raillerie d'attaque pour une arme du Pyro (le Propulseur thermique), un panier déjeuner pour le Heavy, et des changements pour le lance-flammes.
Armes
Pyro |
Fureur du dragon | |
| Propulseur thermique | ||
| Bidon d'essence | ||
| Main chaude | ||
Heavy |
Banane de consolation |
Modification des classes
| Classe | Modifications |
|---|---|
Pyro |
|
Modifications des armes
| Classe | Armes | Modifications |
|---|---|---|
Pyro |
Lance-flammes + Variantes |
|
Jour 4
Au jour 4, les notes du patch pour la mise à jour de la Jungle Inferno ont été annoncées, incluant de différents changements d'armes, des informations sur les nouvelles armes, plusieurs corrections de bug et le changement du système du matchmaking. Les notes de patch ont également annoncés la mécanique d'inspection première personne pour toutes les armes.
Modifications des classes
| Classe | Modifications |
|---|---|
Heavy |
|
Engineer |
Modifications des armes
| Classe | Arme | Modifications | |
|---|---|---|---|
Scout |
Bonk! Atomic Punch |
||
Crit-a-Cola |
|||
Pistolet de Poche du Beau Gosse |
|||
Guillotine volante |
|||
Marchand de sable |
|||
Atomiseur |
|||
Soldier |
Broyeur Bovin 5000 |
||
Bottes de Combat |
|||
Bison Vertueux |
|||
Demoman |
Claidheamh Mòr |
||
Heavy |
Gants de Retraite Urgente |
Morsure du pain |
|
Poings d'Acier |
|||
Avis d'Expulsion |
|||
Engineer |
Ranger du risque |
||
Medic |
Arbalète du Croisé |
||
Vita-Scie |
|||
Sniper |
Razorback |
||
Bouclier du risque Darwinien |
|||
Spy |
Ambassadeur |
||
Ton Éternelle Récompense |
Aiguille de Wanga |
||
Dead Ringer |
|||
Soldier Pyro |
Tireur Réserviste |
||
Soldier Demoman |
B.A.S.E. Jumper |
||
Soldier Pyro Heavy Engineer |
Crise de Panique |
||
Retard de la mise à jour
Le jour de la mise à jour, le jour 4, un message blog (anglais) a été posté pour indiquer un retard d'une journée pour que l'équipe de TF2 puisse faire des tests de performance supplémentaires.*
Anecdotes
- La dernière mise à jour à avoir été dévoilée avec un système à quatre jour était l'Über Update sortie en 2011.
- Ce fut la plus longue attente pour une mise à jour dans l'histoire du jeu pour une période de 10 mois et 29 jours (272 jours) depuis la dernière mise à jour majeure : Smissmas 2016.
- Au bas de la page du premier jour, il y a plusieurs fuites sur les nouvelles armes du Pyro. On peut y voir un Gas Passer sur le sol, et en arrière fond, le Pyro peut être vu en volant en utilisant le propulseur thermique.
- Sur la page du deuxième jour, il y a de nouveau plusieurs indices sur les nouvelles armes du Pyro. Dans la pile d'armes on peut apercevoir que les peintures de guerre peuvent être appliquées, on peut y voir une fureur du dragon en arrière plan. Sur la lineup de l'équipe on peut y apercevoir de nouveaux cosmétiques et avec le Pyro qui pose avec la fureur du dragon.
- Au fond de la page du jour deux, Saxton Hale est visible avec un ConTracker en main. Sur l'écran il y a deux noms. Un stipule On the "Mercenary Park", et l'autre dit "Pyroland". Il a été révélé plus tard que dans les options de "Pyroland", que les joueurs pouvaient gagner toutes les nouvelles armes du Pyro en complétant les 6 contrats gratuits.
Galerie

Notification in-game concernant la sortie de la mise à jour.

Jour 1. Cartes et railleries.

Jour 2. Pass de la campagne et cosmétiques.

Jour 4. Notes de mise à jour finales.

Le titre Jungle Inferno pendant l'événement d'Halloween.

Voir aussi
Liens externes
- Bienvenue au... Mercenary Park ! (anglais)
- Jungle Inferno Update, jour 1 (anglais)
- Le fil conducteur de la campagne ! (anglais)
- Jungle Inferno Update, jour 2 (anglais)
- Informations chaudes ! (anglais)
- Jungle Inferno Update, jour 3 (anglais)
- On y est presque ! (anglais)
- Jungle Inferno Update, jour 4 (anglais)
- Jungle Inferno est là ! (anglais)
| ||||||||||||||||||||||||||||||||||||||||||||||||||||||||||||||||||||||||||||||||||||||||||||||||||