Difference between revisions of "Brimstone (map)"
GrampaSwood (talk | contribs) (→{{anchor|Halloween bosses}} Halloween monsters: Removed awkward-looking images) |
|||
| (51 intermediate revisions by 19 users not shown) | |||
| Line 1: | Line 1: | ||
| − | {{ | + | {{Other uses|this=the Halloween map|for=other uses of Brimstone|Brimstone (disambiguation)}} |
| − | |||
{{Map infobox | {{Map infobox | ||
| − | | game-type | + | | map-status = community |
| − | | file-name | + | | map-name = Brimstone |
| − | | map-image | + | | map-game-type = Payload |
| − | | | + | | map-file-name = pl_fifthcurve_event |
| − | | | + | | map-image = pl fifthcurve event.png |
| − | + | | map-released = {{Patch name|10|21|2016}} | |
| − | | map-environment | + | | map-released-major = Scream Fortress 2016 |
| − | | map-setting | + | | map-environment = Halloween |
| − | | map-hazards | + | | map-setting = Nighttime, overcast |
| − | | map-deep-water | + | | map-stamp-link = https://steamcommunity.com/stats/TF2/leaderboards/1491254 |
| − | | map-pyrovision | + | | map-hazards = [[Pumpkin bomb]]s, [[Ghost]],<br>[[MONOCULUS]], [[Skeletons]],<br>[[Horseless Headless Horsemann]],<br>[[Merasmus]]<br>''Visual effects only:''<br>[[Environmental death#Steam|Steam]] |
| − | | map- | + | | map-hazards-underworld = [[Environmental death#Health drain|Health drain]], [[Environmental death#Lava|Infernal Lava]] |
| − | | map-health | + | | map-has-deep-water = no |
| − | | map-ammo | + | | map-has-pyrovision = no |
| − | | map-ammo | + | | map-has-magic-spells = yes |
| − | | map-ammo-pickups- | + | | map-pickups-health-small = 11 |
| + | | map-pickups-health-medium = 9 | ||
| + | | map-pickups-ammo-small = 6 | ||
| + | | map-pickups-ammo-medium = 10 | ||
| + | | map-pickups-ammo-large = 7 | ||
| + | | map-pickups-special-pumpkin = yes | ||
| + | | map-has-bots = yes | ||
}} | }} | ||
| − | |||
| − | '''Brimstone''' | + | {{Quotation|'''Brimstone''' publicity blurb|It's Friday night of the living dead! Let's lose our minds, here we go for Halloween! ... Redmond Mann has risen from the depths of Hell and you must return him to that ghastly awful place! Do it, if you dare!}} |
| − | With the exception of the two buildings housing the [[BLU]] Base and BLU's forward spawn, all buildings are marked for [[RED]], with a number of interiors decorated as [[Non-player characters#Blutarch and Redmond Mann|Redmond Mann's | + | '''Brimstone''' is a [[Steam Workshop|community-created]] [[Payload]] map added in the [[Scream Fortress 2016]] update. It is a [[Halloween map|Halloween version]] of [[Fifthcurve]]. |
| + | |||
| + | With the exception of the two buildings housing the [[BLU]] Base and BLU's forward spawn, all buildings are marked for [[RED]], with a number of interiors decorated as [[Non-player characters#Blutarch and Redmond Mann|Redmond Mann]]'s personal quarters or offices. The battle portrays BLU pushing the risen Redmond in the Payload cart to deliver him back to Hell; Blutarch and [[Hellstone|Veikko]] are already there, [[:File:Brimstone Blutarch's Grave 01.png|waiting]]. | ||
The map features the voice of [[Merasmus]], who casts spells on players for their suffering. The [[Horseless Headless Horsemann]], the [[Skeletons|Skeleton King]] and his minions, and [[MONOCULUS]] may appear. Merasmus himself may even appear if too much time is taken in the last area. | The map features the voice of [[Merasmus]], who casts spells on players for their suffering. The [[Horseless Headless Horsemann]], the [[Skeletons|Skeleton King]] and his minions, and [[MONOCULUS]] may appear. Merasmus himself may even appear if too much time is taken in the last area. | ||
| − | + | Brimstone is an open map with long sight lines and a series of defensive upper-story positions. Progressively stronger bosses can spawn ahead of the cart as it is pushed through both maps. This map's monsters spawn with some spontaneity. The Horsemann or MONOCULUS may show up when the cart gets far enough, [[Merasmus]] may show up near the end of the map, or | |
| + | |||
| + | In the spaces between the last two capture points lie a number<!-- do not write an exact number, leave some mystery and style --> of scattered coffins showing a white light within. Sometime after the fourth point is captured, the lids of these coffins disappear and a hidden haunted [[w:Calliope (music)|calliope]] winds up and plays [[Misfortune Teller (Soundtrack)|''Misfortune Teller'']]. Players who "go into the light" are transported to a Hell populated with rare Magic Spells, Skeletons, and, usually, other players shooting at them. | ||
| − | [ | + | Brimstone was [https://steamcommunity.com/sharedfiles/filedetails/?id=764966851 contributed] to the Steam Workshop. |
| − | |||
== Locations == | == Locations == | ||
| − | + | {{HelpfulOverviewNote}} | |
| − | + | * '''Lumber Mill''': The map opens on a fairly simple, large, open yard of a {{botignore|lumber mill}}. Even though the tracks run through low ground, some cover is provided by map structures until the cart reaches a long inclined slope. | |
| − | |||
| − | * '''Lumber Mill''': The map opens on a fairly simple, large open yard of a {{botignore|lumber mill}}. Even though the tracks run through low ground, some cover is provided by map structures until the cart reaches a long inclined slope. | ||
| − | * '''Garage''': After the inclined slope, the track turns into the long interior of the Garage; this track has a straight line of sight from the BLU base. | + | * '''Garage''': After the inclined slope, the track turns into the long interior of the Garage; this track has a straight line of sight from the BLU base. However, just before the capture point, the track turns into the capture point between two inclined slopes that are exposed to a range of RED fire. |
| − | |||
* '''Tumidum (A)''': Capture of the first point causes the opening of the shortcut between BLU Base and Gratanter (B). Capture of the first point also causes the arrival of Merasmus (voice only), who shortly after begins casting spells on the players. | * '''Tumidum (A)''': Capture of the first point causes the opening of the shortcut between BLU Base and Gratanter (B). Capture of the first point also causes the arrival of Merasmus (voice only), who shortly after begins casting spells on the players. | ||
| − | + | * '''Wet Paint!''': Shortly after the first point, the track has two alternate courses around the tower in the middle of the square. Selection of the path taken is random, complicating RED's defense of this section. | |
| − | * '''Wet Paint!''': Shortly after the first point, the track has two alternate courses around the tower in the middle of the square. | ||
* '''BLU's advanced spawn''': In the corner behind Wet Paint!, the advanced spawn for BLU has two alternate sets of doors; the first set of doors open on the side of Gratanter (B), while the second set of doors open on the side of Audere (C). | * '''BLU's advanced spawn''': In the corner behind Wet Paint!, the advanced spawn for BLU has two alternate sets of doors; the first set of doors open on the side of Gratanter (B), while the second set of doors open on the side of Audere (C). | ||
| − | |||
| − | |||
| − | |||
* '''Gratanter (B)''': Capture of the second point opens BLU's advanced spawn doors on that side. This capture also switches RED to its second spawn. | * '''Gratanter (B)''': Capture of the second point opens BLU's advanced spawn doors on that side. This capture also switches RED to its second spawn. | ||
| Line 58: | Line 58: | ||
* '''Audere (C)''': Capture of the third point switches BLU's advanced spawn doors to this side, and switches RED spawning to the final RED Base. | * '''Audere (C)''': Capture of the third point switches BLU's advanced spawn doors to this side, and switches RED spawning to the final RED Base. | ||
| + | |||
| + | *'''Brick building''': A small, two story building made out of brick which sits right in front of second checkpoint. | ||
* '''Sniper Nest''': The Sniper Nest commands the approach to Congeriae (D). Decently supplied with Ammo, it has good communication with the second RED spawn in the Warehouse and, given proper support, is difficult to take with a frontal assault.<!-- should this be here? sounds more like strategy than a desc of a location--> | * '''Sniper Nest''': The Sniper Nest commands the approach to Congeriae (D). Decently supplied with Ammo, it has good communication with the second RED spawn in the Warehouse and, given proper support, is difficult to take with a frontal assault.<!-- should this be here? sounds more like strategy than a desc of a location--> | ||
| Line 63: | Line 65: | ||
* '''Warehouse''': The Warehouse sets up a battle over the long hall with opposing balconies, which are secure to either side. | * '''Warehouse''': The Warehouse sets up a battle over the long hall with opposing balconies, which are secure to either side. | ||
| − | * '''Congeriae (D)''': Some time after the capture of the | + | * '''Congeriae (D)''': Some time after the capture of the fourth point, as the game progresses, several coffins in the final area open white portals to the island in Hell. |
| − | + | * '''Veteris (E)''': Capturing this point returns Redmond to Hell. The blast unleashes the fires and bats out of Hell. The [[Gibus]]-wearing Ghost that has been following the action is seen flying away. | |
| − | * '''Veteris (E)''': Capturing this point returns Redmond to Hell. The blast unleashes the fires and bats out of Hell. The Gibus-wearing Ghost that has been following the action is seen flying away. | ||
| − | * '''Hell Island''': The Underworld of this map has an island surrounded by [[Environmental Death#Lava|infernal lava]]. | + | * '''Hell Island''': ('''Hell Pit''') The Underworld of this map has an island surrounded by [[Environmental Death#Lava|infernal lava]]. |
| − | ** Hell Island has two sections, and at the distant end of each section is a glowing white portal exit back to the map. Three Rare Magic Spells pickups are available in each section. Several Skeletons spawn near the exits and chase down any players. | + | ** Hell Island has two sections, and at the distant end of each section is a glowing white portal exit back to the map. Three Rare Magic Spells pickups are available in each section. Several Skeletons spawn near the exits and chase down any players. |
*** One section, Purgatory, is reached by jumping through the purple portals left by teleporting MONOCULUS or jumping into the Bombinomicon that appears if Merasmus is defeated. | *** One section, Purgatory, is reached by jumping through the purple portals left by teleporting MONOCULUS or jumping into the Bombinomicon that appears if Merasmus is defeated. | ||
| − | *** The other section is reached by entering the coffins while the white portals are open | + | *** The other section is reached by entering the coffins while the white portals are open or by jumping into the portal opened when MONOCULUS is killed. |
| − | ** On entering the Underworld, players receive | + | ** On entering the Underworld, players receive a very brief [[Invulnerability]]. |
| − | ** Players on the island suffer the [[Environmental Death#Health drain| | + | ** Players on the island suffer the [[Environmental Death#Health drain|health drain]] that increases in damage over time. |
| − | ** When exiting the Underworld through a white portal, players receive Invulnerability, overheal, speed boost, and [[Critical hits| | + | ** When exiting the Underworld through a white portal, players receive Invulnerability, overheal, speed boost, and [[Critical hits|Crit boost]], each for limited times. |
| − | ** [[ | + | ** [[Teleporters]] and other [[buildings]] cannot be placed in the Underworld. |
| − | <gallery> | + | |
| − | Brimstone Purgatory.png|Purgatory. | + | <gallery widths=100px heights=50px> |
| − | Brimstone Hell 01.png|Hell Island. | + | File:Brimstone BLU Base.png|BLU Base and the Lumber Mill yard. |
| + | File:Brimstone Capture Point A.png|Capture point A from inside the Garage. | ||
| + | File:Brimstone alternate tracks.png|Alternate track routes around Wet Paint! | ||
| + | File:Brimstone Capture Point B and C.png|Capture points B and C; Library to the right. | ||
| + | File:Brimstone Capture Point D.png|Warehouse: interior hall and capture point D. | ||
| + | File:Brimstone Capture Point E.png|Final point E; cart dump into the Hell Pit. | ||
| + | File:Brimstone Purgatory.png|Purgatory. | ||
| + | File:Brimstone Hell 01.png|Hell Island. | ||
</gallery> | </gallery> | ||
| + | |||
| + | == Helpful overview == | ||
| + | [[File:Brimstone (map) overview with lines.png|250px|left|Brimstone's locations]] | ||
| + | <big>1.Lumber Mill</big> | ||
| + | <big>2.Garage</big> | ||
| + | <big>3.Wet Paint!</big> | ||
| + | <big>4.Shortcut to B point</big> | ||
| + | <big>5.Library</big> | ||
| + | <big>6.Dump truck</big> | ||
| + | <big>7.Brick building</big> | ||
| + | <big>8.Warehouse</big> | ||
| + | <big>9.Snipers nest</big> | ||
| + | |||
| + | <big>Blue/red diagonal lines: Blu/Red first spawn</big> | ||
| + | <big>Blue/red double diagonal lines: Blu/Red second spawn</big> | ||
| + | <big>Blue/red double diagonal lines w/ a circle: Third Red/Blu spawn</big> | ||
| + | |||
| + | <big>Yellow circle: First checkpoint (Tumidum)</big> | ||
| + | <big>Green circle: Second checkpoint (Gratanter)</big> | ||
| + | <big>Blue circle: Third checkpoint (Audere)</big> | ||
| + | <big>Purple circle: Fourth checkpoint (Congeriae)</big> | ||
| + | <big>White circle: Fifth checkpoint (Veteris)</big> | ||
| + | |||
{{clr}} | {{clr}} | ||
| − | |||
== Merasmus spells == | == Merasmus spells == | ||
[[File:Brimstone Steam 03.png|200px|thumb|Earthquakes shake players and release deadly clouds of [[Environmental death#Steam|steam]].]] | [[File:Brimstone Steam 03.png|200px|thumb|Earthquakes shake players and release deadly clouds of [[Environmental death#Steam|steam]].]] | ||
| Line 88: | Line 118: | ||
* '''Tiny Melee Curse''': All players are shrunk and restricted to melee weapons. The "Day of Defeat" anthem adapted for [[DeGroot Keep]] plays through to the end of the curse. Players that are on uneven ground or are too close to a wall or some other object at the end of the curse suffer a [[Environmental death#Crushing|crushing]] death. | * '''Tiny Melee Curse''': All players are shrunk and restricted to melee weapons. The "Day of Defeat" anthem adapted for [[DeGroot Keep]] plays through to the end of the curse. Players that are on uneven ground or are too close to a wall or some other object at the end of the curse suffer a [[Environmental death#Crushing|crushing]] death. | ||
| − | * '''The Crit Boostening''': | + | * '''The Crit Boostening''': All players are granted 100% Critical hits. |
* '''Super Speed''': All players run faster. | * '''Super Speed''': All players run faster. | ||
| Line 98: | Line 128: | ||
* '''Shake Yer Boo-ty''': Random [[Environmental death#Shake|earthquakes]] occur between Tumidum (A) and Congeriae (D), [[Environmental death#Shake|jostling]] players and releasing hellish clouds of [[Environmental death#Steam|deadly steam]]. | * '''Shake Yer Boo-ty''': Random [[Environmental death#Shake|earthquakes]] occur between Tumidum (A) and Congeriae (D), [[Environmental death#Shake|jostling]] players and releasing hellish clouds of [[Environmental death#Steam|deadly steam]]. | ||
| − | {{anchor|Halloween bosses}} | + | == {{anchor|Halloween bosses}} Halloween monsters == |
| − | + | The Halloween enemies have randomized chances of spawning at various times or capture points. | |
| − | + | * Two [[ghost]]s spawn at random times and places, taking randomly selected fixed courses. These Ghosts continue to haunt the action around the cart as it moves through the map. | |
| − | |||
| − | |||
| − | The Halloween enemies have randomized chances of spawning at various times or capture points. | ||
| − | * Two [[ | ||
** The [[Gibus]]-wearing Ghost spawns from the beginning of the round and takes course generally supportive of BLU (entering openings from BLU's direction). | ** The [[Gibus]]-wearing Ghost spawns from the beginning of the round and takes course generally supportive of BLU (entering openings from BLU's direction). | ||
** When the Tumidum (A) point is captured, a second hatless ghost spawns in the rear area of the RED team. This Ghost's paths tend to follow the tracks, occasionally interfering with BLU's push. | ** When the Tumidum (A) point is captured, a second hatless ghost spawns in the rear area of the RED team. This Ghost's paths tend to follow the tracks, occasionally interfering with BLU's push. | ||
| − | * At any time between the captures of Tumidum (A) and Congeriae (D), the Skeleton King and several skeletons may be summoned by one of Merasmus' random spells. | + | * At any time between the captures of Tumidum (A) and Congeriae (D), the Skeleton King and several skeletons may be summoned by one of Merasmus' random spells. |
| − | * At any capture of either Gratanter (B) or Audere (C), there is a one-in-eight<ref name="ics">[[User talk:Mikado282#OneInEight|ICS]]</ref> chance of the [[Horseless Headless Horsemann]] appearing. | + | * At any capture of either Gratanter (B) or Audere (C), there is a one-in-eight<ref name="ics">[[User talk:Mikado282#OneInEight|ICS]]</ref> chance of the [[Horseless Headless Horsemann]] appearing. |
| − | ** The Horsemann (B) should center on Audere and | + | ** The Horsemann (B) should center on Audere and does not chase players much further than either Wet Paint! or Congeriae. |
| − | ** The Horsemann (C) should work its way towards Veteris and once near there | + | ** The Horsemann (C) should work its way towards Veteris and, once near there, does not chase players much further back than Congeriae. |
* At any capture of Congeriae (D), there is a one-in-eight chance of [[MONOCULUS]] appearing, spawning over the open [[Environmental death#Lava|lava pit]] in direct view of the capture point.<ref name="ics" /> | * At any capture of Congeriae (D), there is a one-in-eight chance of [[MONOCULUS]] appearing, spawning over the open [[Environmental death#Lava|lava pit]] in direct view of the capture point.<ref name="ics" /> | ||
| − | * If play continues for more than 6.666666666666667<!-- 6.666666666666667 is how map creator ICS wants it; it is an intentional 666 reference; follow ref link --> minutes (400 seconds) after capture of Congeriae (D), [[Merasmus]] | + | * If play continues for more than 6.666666666666667<!-- 6.666666666666667 is how map creator ICS wants it; it is an intentional 666 reference; follow ref link --> minutes (400 seconds) after capture of Congeriae (D), [[Merasmus]] appears some time in the next 20 seconds, should the game continue that long.<ref>[[User talk:Mikado282#666|ICS]]</ref> |
| − | + | ||
| − | |||
| − | |||
| − | |||
| − | |||
{{clr}} | {{clr}} | ||
== Strategy == | == Strategy == | ||
| − | {{ | + | {{community strategy stub link}} |
| − | + | {{map strategy link|Brimstone|main=yes}} | |
| − | + | {{See also|Community Mann Manor strategy|l1=Community Mann Manor strategy for the Horseless Headless Horsemann}}<!-- Eyeaduct MONOCULUS strategy does not apply. --> | |
| − | |||
| − | |||
| − | |||
| − | |||
| − | |||
| − | |||
| − | |||
| − | |||
| − | |||
| − | |||
| − | |||
| − | |||
| − | |||
| − | |||
| − | |||
| − | |||
| − | |||
== Update history == | == Update history == | ||
| − | {{Update history|'''{{Patch name|10|21|2016}}''' ([[Scream Fortress 2016]]) | + | {{Update history | '''{{Patch name|10|21|2016}}''' ([[Scream Fortress 2016]]) |
* Brimstone was added to the game. | * Brimstone was added to the game. | ||
| Line 165: | Line 170: | ||
'''{{Patch name|10|26|2017}}''' | '''{{Patch name|10|26|2017}}''' | ||
| − | *Players now | + | * Players now Crit and healthboost when exiting the Hell area instead of just ubercharge. |
| − | *Increased slightly RED team respawn time on the last area. | + | * Increased slightly RED team respawn time on the last area. |
| − | *Fixed the coffin music playing into the next round from previous one. | + | * Fixed the coffin music playing into the next round from previous one. |
| − | *Fixed Monoculus sometimes getting stuck to certain locations. | + | * Fixed Monoculus sometimes getting stuck to certain locations. |
| − | *Fixed players sometimes getting stuck to other players in Hell area. | + | * Fixed players sometimes getting stuck to other players in Hell area. |
| − | *Adjusted preferred nav-path for Merasmus to prevent him going into RED final base. | + | * Adjusted preferred nav-path for Merasmus to prevent him going into RED final base. |
| − | }} | + | |
| + | '''{{Patch name|10|25|2018}}''' | ||
| + | * Fixed a bug where players could spam "escaped from underworld".}} | ||
| + | |||
| + | == Trivia == | ||
| + | * The map's control points are named after [[Spellbook Page|spellbook page]]s. | ||
| + | * There is an out of bounds sign by the cart's starting position that reads "MAP BY ICS". Reffering to ICS, the map's creator. | ||
| − | == | + | == Gallery == |
| − | + | <gallery> | |
| − | + | File:Brimstone Hell portal open.png|An open coffin. | |
| + | File:Secretskullisland.jpeg|The hidden island in Hell. | ||
| + | File:Horseless Headless Horseman HP Chart.png|Damage graph showing the number of players vs. the Horsemann's health. | ||
| + | File:Brimstone Blutarch's Grave 01.png|Blutarch Mann's Grave on Hell Island. | ||
| + | File:Brimstone Blutarch 01.png|Blutarch's minecart model used to show the tombstone. | ||
| + | File:Brimstone Hidden Ghost models.png|Models for the Ghost animations, hidden in the Gray Gravel building. | ||
| + | File:Brimstone - Map By ICS.png|The MAP BY ICS sign. | ||
| + | File:brimstoneeventworkshopImage.jpeg|Steam Workshop image for Brimstone. | ||
| + | </gallery> | ||
| − | ==References== | + | == References == |
<references/> | <references/> | ||
{{Scream Fortress 2016 Nav}} | {{Scream Fortress 2016 Nav}} | ||
| + | {{Halloween Map Nav}} | ||
{{Maps Nav}} | {{Maps Nav}} | ||
| + | |||
| + | [[Category:Halloween maps]] | ||
Latest revision as of 00:06, 30 November 2024
| Brimstone | |
|---|---|
| |
| Basic Information | |
| Map type: | Payload |
| File name: | pl_fifthcurve_event
|
| Released: | October 21, 2016 Patch (Scream Fortress VIII) |
| Developer(s): | Tomi "ICS" Uurainen |
| Map Info | |
| Environment: | Halloween |
| Setting: | Nighttime, overcast |
| Hazards: | Pumpkin bombs, Ghost, MONOCULUS, Skeletons, Horseless Headless Horsemann, Merasmus Visual effects only: Steam |
| Hazards (Underworld): | Health drain, Infernal Lava |
| Deep Water: | No |
| Pyrovision Support: | No |
| Magic spells: | Yes |
| Bot support: | Yes |
| Map Items | |
| Map Photos | |
| Map Stamp | |
| Supporters Leaderboard | |
| “ | It's Friday night of the living dead! Let's lose our minds, here we go for Halloween! ... Redmond Mann has risen from the depths of Hell and you must return him to that ghastly awful place! Do it, if you dare!
— Brimstone publicity blurb
|
” |
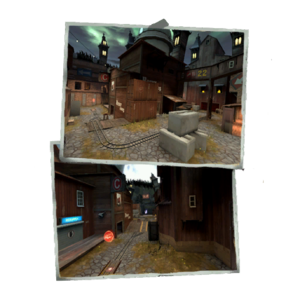
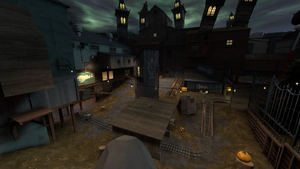
Brimstone is a community-created Payload map added in the Scream Fortress 2016 update. It is a Halloween version of Fifthcurve.
With the exception of the two buildings housing the BLU Base and BLU's forward spawn, all buildings are marked for RED, with a number of interiors decorated as Redmond Mann's personal quarters or offices. The battle portrays BLU pushing the risen Redmond in the Payload cart to deliver him back to Hell; Blutarch and Veikko are already there, waiting.
The map features the voice of Merasmus, who casts spells on players for their suffering. The Horseless Headless Horsemann, the Skeleton King and his minions, and MONOCULUS may appear. Merasmus himself may even appear if too much time is taken in the last area.
Brimstone is an open map with long sight lines and a series of defensive upper-story positions. Progressively stronger bosses can spawn ahead of the cart as it is pushed through both maps. This map's monsters spawn with some spontaneity. The Horsemann or MONOCULUS may show up when the cart gets far enough, Merasmus may show up near the end of the map, or
In the spaces between the last two capture points lie a number of scattered coffins showing a white light within. Sometime after the fourth point is captured, the lids of these coffins disappear and a hidden haunted calliope winds up and plays Misfortune Teller. Players who "go into the light" are transported to a Hell populated with rare Magic Spells, Skeletons, and, usually, other players shooting at them.
Brimstone was contributed to the Steam Workshop.
Contents
Locations
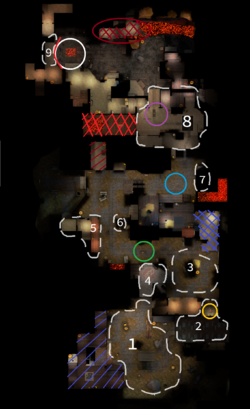
Note: If you are having trouble with finding the locations listed here, see the Helpful overview section to see their exact position marked on the map.
- Lumber Mill: The map opens on a fairly simple, large, open yard of a lumber mill. Even though the tracks run through low ground, some cover is provided by map structures until the cart reaches a long inclined slope.
- Garage: After the inclined slope, the track turns into the long interior of the Garage; this track has a straight line of sight from the BLU base. However, just before the capture point, the track turns into the capture point between two inclined slopes that are exposed to a range of RED fire.
- Tumidum (A): Capture of the first point causes the opening of the shortcut between BLU Base and Gratanter (B). Capture of the first point also causes the arrival of Merasmus (voice only), who shortly after begins casting spells on the players.
- Wet Paint!: Shortly after the first point, the track has two alternate courses around the tower in the middle of the square. Selection of the path taken is random, complicating RED's defense of this section.
- BLU's advanced spawn: In the corner behind Wet Paint!, the advanced spawn for BLU has two alternate sets of doors; the first set of doors open on the side of Gratanter (B), while the second set of doors open on the side of Audere (C).
- Gratanter (B): Capture of the second point opens BLU's advanced spawn doors on that side. This capture also switches RED to its second spawn.
- Satellite Dish/Library/Dump Truck: The two-story Library has a commanding view of Gratanter (B) and the Dump Truck choke point. If he spawns, the Horseless Headless Horsemann spawns between the Library and the concrete blocks (behind the bunch of autumn leaves).
- First RED Spawn: The Skeleton King's spawn point is inside the alcove to the right of the RED spawn.
- Audere (C): Capture of the third point switches BLU's advanced spawn doors to this side, and switches RED spawning to the final RED Base.
- Brick building: A small, two story building made out of brick which sits right in front of second checkpoint.
- Sniper Nest: The Sniper Nest commands the approach to Congeriae (D). Decently supplied with Ammo, it has good communication with the second RED spawn in the Warehouse and, given proper support, is difficult to take with a frontal assault.
- Warehouse: The Warehouse sets up a battle over the long hall with opposing balconies, which are secure to either side.
- Congeriae (D): Some time after the capture of the fourth point, as the game progresses, several coffins in the final area open white portals to the island in Hell.
- Veteris (E): Capturing this point returns Redmond to Hell. The blast unleashes the fires and bats out of Hell. The Gibus-wearing Ghost that has been following the action is seen flying away.
- Hell Island: (Hell Pit) The Underworld of this map has an island surrounded by infernal lava.
- Hell Island has two sections, and at the distant end of each section is a glowing white portal exit back to the map. Three Rare Magic Spells pickups are available in each section. Several Skeletons spawn near the exits and chase down any players.
- One section, Purgatory, is reached by jumping through the purple portals left by teleporting MONOCULUS or jumping into the Bombinomicon that appears if Merasmus is defeated.
- The other section is reached by entering the coffins while the white portals are open or by jumping into the portal opened when MONOCULUS is killed.
- On entering the Underworld, players receive a very brief Invulnerability.
- Players on the island suffer the health drain that increases in damage over time.
- When exiting the Underworld through a white portal, players receive Invulnerability, overheal, speed boost, and Crit boost, each for limited times.
- Teleporters and other buildings cannot be placed in the Underworld.
- Hell Island has two sections, and at the distant end of each section is a glowing white portal exit back to the map. Three Rare Magic Spells pickups are available in each section. Several Skeletons spawn near the exits and chase down any players.
Helpful overview
1.Lumber Mill
2.Garage
3.Wet Paint!
4.Shortcut to B point
5.Library
6.Dump truck
7.Brick building
8.Warehouse
9.Snipers nest

Blue/red diagonal lines: Blu/Red first spawn
Blue/red double diagonal lines: Blu/Red second spawn
Blue/red double diagonal lines w/ a circle: Third Red/Blu spawn
Yellow circle: First checkpoint (Tumidum)
Green circle: Second checkpoint (Gratanter)
Blue circle: Third checkpoint (Audere)
Purple circle: Fourth checkpoint (Congeriae)
White circle: Fifth checkpoint (Veteris)
Merasmus spells
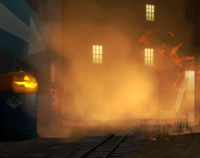
Several of the spells that Merasmus casts have effects similar to those experienced on Ghost Fort or Moonshine Event; however, many spells he casts have no effect other than a sound cue. Spells that have notable effects on players include:
- Tiny Melee Curse: All players are shrunk and restricted to melee weapons. The "Day of Defeat" anthem adapted for DeGroot Keep plays through to the end of the curse. Players that are on uneven ground or are too close to a wall or some other object at the end of the curse suffer a crushing death.
- The Crit Boostening: All players are granted 100% Critical hits.
- Super Speed: All players run faster.
- Skeleton Summons: The Skeleton King and some Skeletons are summoned.
- Jarate Curse: All players suffer the effects of Jarate.
- Shake Yer Boo-ty: Random earthquakes occur between Tumidum (A) and Congeriae (D), jostling players and releasing hellish clouds of deadly steam.
Halloween monsters
The Halloween enemies have randomized chances of spawning at various times or capture points.
- Two ghosts spawn at random times and places, taking randomly selected fixed courses. These Ghosts continue to haunt the action around the cart as it moves through the map.
- The Gibus-wearing Ghost spawns from the beginning of the round and takes course generally supportive of BLU (entering openings from BLU's direction).
- When the Tumidum (A) point is captured, a second hatless ghost spawns in the rear area of the RED team. This Ghost's paths tend to follow the tracks, occasionally interfering with BLU's push.
- At any time between the captures of Tumidum (A) and Congeriae (D), the Skeleton King and several skeletons may be summoned by one of Merasmus' random spells.
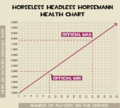
- At any capture of either Gratanter (B) or Audere (C), there is a one-in-eight[1] chance of the Horseless Headless Horsemann appearing.
- The Horsemann (B) should center on Audere and does not chase players much further than either Wet Paint! or Congeriae.
- The Horsemann (C) should work its way towards Veteris and, once near there, does not chase players much further back than Congeriae.
- At any capture of Congeriae (D), there is a one-in-eight chance of MONOCULUS appearing, spawning over the open lava pit in direct view of the capture point.[1]
- If play continues for more than 6.666666666666667 minutes (400 seconds) after capture of Congeriae (D), Merasmus appears some time in the next 20 seconds, should the game continue that long.[2]
Strategy
 | “Sun Tzu's got nothing on us!” This map's Community strategy page is a stub. As such, it is not complete. You can help the Team Fortress Wiki Community Strategy Project by expanding it. Notes: None added |
Update history
- Brimstone was added to the game.
- Fixed RED players getting inside BLU's 2nd forward spawn.
- Fixed skull's teeth in hell being non-solid.
- Fixed hell's coffin tune and tiny spell song sometimes playing to the next round from previous round.
- Fixed some players dropping into hell's lava in rare cases.
- Fixed big pumpkin in RED 2nd base being non-solid.
- Fixed exploit where players could get under the map near BLU starting area.
- Fixed exploit where players could get out of the map near graveyard.
- Fixed exploit where players could enter RED base as BLU.
- Fixed some skeletons running into lava when there are no enemies in Hell.
- Fixed medieval tiny spell & other Merasmus voice spells lasting too long for some players.
- Fixed big ghost getting stuck when map ends.
- Fixed a spot where players could get stuck if entering it under the Minify spell.
- Fixed another case of non-solid pumpkin.
- Tuned respawn time for RED team at last area.
- Players now Crit and healthboost when exiting the Hell area instead of just ubercharge.
- Increased slightly RED team respawn time on the last area.
- Fixed the coffin music playing into the next round from previous one.
- Fixed Monoculus sometimes getting stuck to certain locations.
- Fixed players sometimes getting stuck to other players in Hell area.
- Adjusted preferred nav-path for Merasmus to prevent him going into RED final base.
- Fixed a bug where players could spam "escaped from underworld".
Trivia
- The map's control points are named after spellbook pages.
- There is an out of bounds sign by the cart's starting position that reads "MAP BY ICS". Reffering to ICS, the map's creator.
Gallery
References
| ||||||||||||||||||||||||||||||||||||||||||||||
| |||||||||||||||||||||||||||||||||||||||||||||||||||||||||||||||||||
