Difference between revisions of "Thunder Mountain"
m (Undo edit by Slender (Talk) (3051557) Sorry, forgot this was the summary section, here's the video. https://youtu.be/h4v3z-3X2l4) (Tag: Undo) |
GrampaSwood (talk | contribs) |
||
| (17 intermediate revisions by 10 users not shown) | |||
| Line 1: | Line 1: | ||
| − | |||
{{Map infobox | {{Map infobox | ||
| − | | game-type=Payload | + | | map-status = official |
| − | | file-name=pl_thundermountain | + | | map-game-type = Payload |
| − | | map-image=PL Thunder Mountain.png | + | | map-file-name = pl_thundermountain |
| − | | map- | + | | map-image = PL Thunder Mountain.png |
| − | | map-environment = Alpine | + | | map-released = {{Patch name|7|8|2010}} |
| − | | map-setting = Daylight, raining | + | | map-released-major = Engineer Update |
| − | | map-deep-water = {{tooltip|Yes| Stage 2 only}} | + | | map-has-n-stages = 3 |
| − | | map-hazards = [[Environmental_death#Pitfalls|Pitfall]] | + | | map-environment = Alpine |
| − | | map-health | + | | map-setting = Daylight, raining |
| − | | map-health | + | | map-has-deep-water = {{tooltip|Yes|Stage 2 only}} |
| − | | map-health | + | | map-hazards = [[Environmental_death#Pitfalls|Pitfall]] |
| − | | map-ammo | + | | map-pickups-health-small = 25 |
| − | | map-ammo | + | | map-pickups-health-medium = 24 |
| − | | map-ammo | + | | map-pickups-health-large = 1 |
| − | | map-bots = | + | | map-pickups-ammo-small = 7 |
| + | | map-pickups-ammo-medium = 9 | ||
| + | | map-pickups-ammo-large = 21 | ||
| + | | map-has-bots = yes | ||
}} | }} | ||
| − | {{Quotation|'''The Engineer''' finding the Sniper's hidden camping spot|Aw, now you don't look like a happy camper.|sound= | + | {{Quotation|'''The Engineer''' finding the Sniper's hidden camping spot|Aw, now you don't look like a happy camper.|sound=Engineer dominationsniper07.wav}} |
| − | + | ||
| − | '''Thunder Mountain''' is a Valve-developed [[Payload]] map included with the [[Engineer Update]], [ | + | '''Thunder Mountain''' is a Valve-developed [[Payload]] map included with the [[Engineer Update]], [https://www.teamfortress.com/post.php?id=4048 revealed] on Day 4 thereof. It is the third official Payload map to be developed and released since the [[Heavy Update]], and one of three Payload-based maps released during the Engineer Update, the others being [[Upward]] and [[Hightower]] (a [[Payload Race]] map). |
Thunder Mountain is a multi-stage Payload map, like [[Gold Rush]] and [[Hoodoo]]. Unlike other Payload maps, Thunder Mountain features new gameplay mechanisms not used in earlier maps, including a bridge which must be raised in order for the cart to cross, and sloped tracks, marked with yellow and black caution stripes. | Thunder Mountain is a multi-stage Payload map, like [[Gold Rush]] and [[Hoodoo]]. Unlike other Payload maps, Thunder Mountain features new gameplay mechanisms not used in earlier maps, including a bridge which must be raised in order for the cart to cross, and sloped tracks, marked with yellow and black caution stripes. | ||
| Line 27: | Line 29: | ||
=== Stage 1 === | === Stage 1 === | ||
| − | * '''BLU Spawn''': A spawn with two exits, one on the left and one on the right wall leading to courtyard. | + | [[File:Thunder Mountain_stage_one.png|thumb|right|Details of stage 1 (large file).]] |
| + | |||
| + | * '''[[BLU]] Spawn''': A spawn with two exits, one on the left and one on the right wall leading to courtyard. | ||
* '''First Courtyard''': Just outside BLU spawn is a courtyard that resembles Gold Rush's Stage A, Checkpoint 1. | * '''First Courtyard''': Just outside BLU spawn is a courtyard that resembles Gold Rush's Stage A, Checkpoint 1. | ||
* '''Bridge''': At the end of the First Courtyard is a small, tighter section of woodwork that leads to an unraised bridge. By pushing the cart onto the point the bridge raises slowly until it is high enough for the Payload to cross. | * '''Bridge''': At the end of the First Courtyard is a small, tighter section of woodwork that leads to an unraised bridge. By pushing the cart onto the point the bridge raises slowly until it is high enough for the Payload to cross. | ||
| − | * '''RED Spawn''': A large spawn room with windows overviewing the entire courtyard and outside of BLU spawn. Leads down a couple of staircases to a singular exit near Stage A, Checkpoint 2. | + | * '''[[RED]] Spawn''': A large spawn room with windows overviewing the entire courtyard and outside of BLU spawn. Leads down a couple of staircases to a singular exit near Stage A, Checkpoint 2. |
| − | |||
=== Stage 2 === | === Stage 2 === | ||
| − | * '''BLU Spawn''': A large spawn room with | + | [[File:Thunder Mountain_stage_two.png|thumb|right|Details of stage 2 (large file).]] |
| + | |||
| + | * '''BLU Spawn''': A large spawn room with staircases leading to equipment and furniture which is purely cosmetic. It has two main exits, with one exit on the left and right walls, respectively. | ||
* '''Tunnel''': After crossing a bridge at BLU spawn, the cart is then pushed among a bottleneck track and to the first capture point. | * '''Tunnel''': After crossing a bridge at BLU spawn, the cart is then pushed among a bottleneck track and to the first capture point. | ||
* '''Final Cap''': The final capture point is right after the first capture point. The cart is pushed into a tunnel and among a ramp, and after the ramp lies the final capture point. | * '''Final Cap''': The final capture point is right after the first capture point. The cart is pushed into a tunnel and among a ramp, and after the ramp lies the final capture point. | ||
* '''RED Spawn''': A spawn room with two exits. One exit leads to the dropdown to the final cap, and the other inside a sheltered building to A. | * '''RED Spawn''': A spawn room with two exits. One exit leads to the dropdown to the final cap, and the other inside a sheltered building to A. | ||
| − | |||
=== Stage 3 === | === Stage 3 === | ||
| − | * '''BLU Spawn''': A spawn room that leads to two small areas with staircases. Each room has two exits | + | [[File:Thunder Mountain_stage_three.png|thumb|right|Details of stage 3 (large file).]] |
| − | * ''' | + | |
| − | * ''' | + | * '''BLU Spawn''': A spawn room that leads to two small areas with staircases. Each room has two exits; one of each serves as a quick route of shortcuts to B and A, left and right room respectively. The other two exits lead to the bomb cart's start. |
| − | * '''Final Spiral''': In Thunder Mountain's final stage is a large tower, which the BLU team slowly climbs over the course of the round until they push | + | * '''Payload Starting Point''': Just below the final tower is the bomb cart's start. This position is very vulnerable to enemy fire due to the lack of cover and most places on the map being able to fire on this area. |
| − | * '''RED Spawn''': A spawn room with similar design to BLU's spawn, | + | * '''Checkpoint B''': The second cap is on a bridge on the outskirts of the map. The cart then proceeds up a ramp to the final cap. |
| − | + | * '''Final Spiral''': In Thunder Mountain's final stage is a large tower, which the BLU team slowly climbs over the course of the round until they push the cart into a hole in the center, detonating it. | |
| + | * '''RED Spawn''': A spawn room with a similar design to BLU's spawn, though with more shallow staircases. The left room has a shortcut to A, and the right room a shortcut to B. Similarly to BLU's spawn, there are also two doors on each side that head towards the final tower. | ||
== Strategy == | == Strategy == | ||
| Line 54: | Line 59: | ||
== Gallery == | == Gallery == | ||
<gallery widths=150px heights=90px> | <gallery widths=150px heights=90px> | ||
| + | File:Thunder Mountain stage1.png|Overview of stage 1 | ||
| + | File:Thunder Mountain stage2.png|Overview of stage 2 | ||
| + | File:Thunder Mountain stage3 tunnels.png|Overview of stage 3 | ||
File:thunder_pl_01.png|Stage 1 Checkpoint 1 | File:thunder_pl_01.png|Stage 1 Checkpoint 1 | ||
File:thunder_pl_02.png|Stage 1 Checkpoint 2 | File:thunder_pl_02.png|Stage 1 Checkpoint 2 | ||
| Line 61: | Line 69: | ||
File:thunder_pl_06.png|Stage 3 Checkpoint 2 | File:thunder_pl_06.png|Stage 3 Checkpoint 2 | ||
File:thunder_pl_07.png|Stage 3 Checkpoint 3 | File:thunder_pl_07.png|Stage 3 Checkpoint 3 | ||
| − | File:Pl_thundermountainst1blu.png|The BLU characters as seen on Thunder Mountain, Stage 1, from BLU | + | File:Pl_thundermountainst1blu.png|The BLU characters as seen on Thunder Mountain, Stage 1, from BLU Spawn. |
File:Pl_thundermountainst1.png|The train as seen on Stage 1 of Thunder Mountain. | File:Pl_thundermountainst1.png|The train as seen on Stage 1 of Thunder Mountain. | ||
| − | File:Thundermountaineastereggswimmingpoolcloseup.jpg|The RED team in the swimming pool, as seen from inside the swimming pool | + | File:Thundermountaineastereggswimmingpoolcloseup.jpg|The RED team in the swimming pool on Stage 2, as seen from inside the swimming pool. |
File:Pl_thundermountaineastereggsnipercloseup.jpg|Close-up on the camping Sniper as seen on Thunder Mountain, Stage 3. The camper van is not visible on this screenshot. | File:Pl_thundermountaineastereggsnipercloseup.jpg|Close-up on the camping Sniper as seen on Thunder Mountain, Stage 3. The camper van is not visible on this screenshot. | ||
File:Pl thundermountain0005.jpg|An aerial picture of Sniper's tent and camper van on Thunder Mountain, Stage 3. | File:Pl thundermountain0005.jpg|An aerial picture of Sniper's tent and camper van on Thunder Mountain, Stage 3. | ||
| Line 105: | Line 113: | ||
== Bugs == | == Bugs == | ||
| − | * Players can get stuck on Stage 1 of the map if they crouch at the end of the bridge near the control point whilst it rises. The bridge | + | * Players can get stuck on Stage 1 of the map if they crouch at the end of the bridge near the control point whilst it rises. The bridge rises halfway and the player rises with it, but then the player stops rising while the bridge continues on. |
| − | * On Stage 3, a player's view can glitch out if they rub against Checkpoint 3's sign on top of the roof. | + | * On Stage 3, a player's view can glitch out if they rub against Checkpoint 3's sign on top of the roof. |
== Trivia == | == Trivia == | ||
| − | *On Stage 1, in the BLU spawn, the player may see some BLU characters in an area similar to the [[Target|Soldier Training]] map, around a blackboard. They | + | * On Stage 1, in the BLU spawn, the player may see some BLU characters in an area similar to the [[Target|Soldier Training]] map, around a blackboard. They occasionally [[Taunts|taunt]], albeit with no weapons, and also occasionally do the [[Taunts#Thriller taunt|Thriller taunt]] regardless of the time of the year. |
| − | *On Stage 2, in the [[RED]] spawn, one may see the RED team swimming in a pool. | + | * On Stage 2, in the [[RED]] spawn, one may see the RED team swimming in a pool. |
| − | *On Stage 3, near the second checkpoint (third dot), off in the distance the [[Sniper]] can be seen near his camper van (the same one seen in [[Meet the Sniper]]), a tent, and a fire. He only appears after BLU team has pushed the Payload past the first checkpoint. | + | * On Stage 3, near the second checkpoint (third dot), off in the distance the [[Sniper]] can be seen near his camper van (the same one seen in [[Meet the Sniper]]), a tent, and a fire. He only appears after BLU team has pushed the Payload past the first checkpoint. |
| − | * Thunder Mountain was originally teased on Day 1 of the Engineer Update, on the | + | * Thunder Mountain was originally teased on Day 1 of the Engineer Update, on the [[Map of Badlands|map of ''Badlands'']], an area that several game maps occupy. |
| − | * There is an actual mountain named Thunder Mountain in [[w:Thunder Mountain (California)|Sierra Nevada, California]]. | + | * There is an actual mountain named Thunder Mountain in [[w:Thunder Mountain (California)|Sierra Nevada, California, USA]]. |
| − | ** However, this map's name references the history of nuclear weapon development at [[Map of Badlands#Correspondence to | + | ** However, this map's name references the history of nuclear weapon development at [[Map of Badlands#Correspondence to actual New Mexico geography|Los Alamos National Laboratory]] (see also the mushroom cloud reference on the [http://www.teamfortress.com/engineerupdate/ Engineer Update page]), with a few underground nuclear tests occurring just north of where this map is located. |
| − | + | * A train can occasionally be seen pulling a logging train across a trestle outside of the playable area, near BLU's spawn on stage 1. | |
| − | * A | ||
| − | |||
| − | |||
| − | |||
| − | |||
| − | |||
== External links == | == External links == | ||
| − | *[ | + | * [https://www.teamfortress.com/engineerupdate/ The Engineer Update] |
| + | {{Engineer Update Nav}} | ||
| + | {{Maps Nav}} | ||
| − | |||
| − | |||
[[Category:Quickplay maps]] | [[Category:Quickplay maps]] | ||
Latest revision as of 23:03, 7 August 2024
| Thunder Mountain | |
|---|---|

| |
| Basic Information | |
| Map type: | Payload |
| File name: | pl_thundermountain
|
| Released: | July 8, 2010 Patch (Engineer Update) |
| Variants: | Mannpower |
| Developer(s): | Valve |
| Map Info | |
| No. of Stages: | 3 |
| Environment: | Alpine |
| Setting: | Daylight, raining |
| Hazards: | Pitfall |
| Deep Water: | Yes |
| Bot support: | Yes |
| Map Items | |
| Map Photos | |
| “ | Aw, now you don't look like a happy camper.
Click to listen
— The Engineer finding the Sniper's hidden camping spot
|
” |
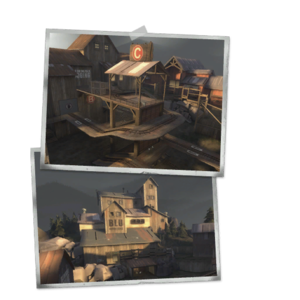
Thunder Mountain is a Valve-developed Payload map included with the Engineer Update, revealed on Day 4 thereof. It is the third official Payload map to be developed and released since the Heavy Update, and one of three Payload-based maps released during the Engineer Update, the others being Upward and Hightower (a Payload Race map).
Thunder Mountain is a multi-stage Payload map, like Gold Rush and Hoodoo. Unlike other Payload maps, Thunder Mountain features new gameplay mechanisms not used in earlier maps, including a bridge which must be raised in order for the cart to cross, and sloped tracks, marked with yellow and black caution stripes.
Contents
Locations
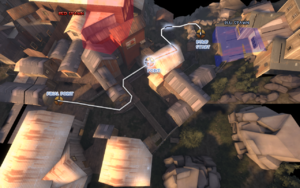
Stage 1
- BLU Spawn: A spawn with two exits, one on the left and one on the right wall leading to courtyard.
- First Courtyard: Just outside BLU spawn is a courtyard that resembles Gold Rush's Stage A, Checkpoint 1.
- Bridge: At the end of the First Courtyard is a small, tighter section of woodwork that leads to an unraised bridge. By pushing the cart onto the point the bridge raises slowly until it is high enough for the Payload to cross.
- RED Spawn: A large spawn room with windows overviewing the entire courtyard and outside of BLU spawn. Leads down a couple of staircases to a singular exit near Stage A, Checkpoint 2.
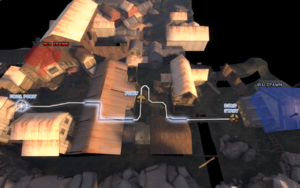
Stage 2
- BLU Spawn: A large spawn room with staircases leading to equipment and furniture which is purely cosmetic. It has two main exits, with one exit on the left and right walls, respectively.
- Tunnel: After crossing a bridge at BLU spawn, the cart is then pushed among a bottleneck track and to the first capture point.
- Final Cap: The final capture point is right after the first capture point. The cart is pushed into a tunnel and among a ramp, and after the ramp lies the final capture point.
- RED Spawn: A spawn room with two exits. One exit leads to the dropdown to the final cap, and the other inside a sheltered building to A.
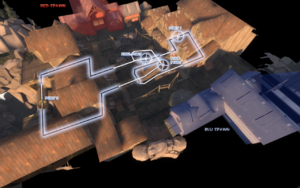
Stage 3
- BLU Spawn: A spawn room that leads to two small areas with staircases. Each room has two exits; one of each serves as a quick route of shortcuts to B and A, left and right room respectively. The other two exits lead to the bomb cart's start.
- Payload Starting Point: Just below the final tower is the bomb cart's start. This position is very vulnerable to enemy fire due to the lack of cover and most places on the map being able to fire on this area.
- Checkpoint B: The second cap is on a bridge on the outskirts of the map. The cart then proceeds up a ramp to the final cap.
- Final Spiral: In Thunder Mountain's final stage is a large tower, which the BLU team slowly climbs over the course of the round until they push the cart into a hole in the center, detonating it.
- RED Spawn: A spawn room with a similar design to BLU's spawn, though with more shallow staircases. The left room has a shortcut to A, and the right room a shortcut to B. Similarly to BLU's spawn, there are also two doors on each side that head towards the final tower.
Strategy
Main article: Community Thunder Mountain strategy
 | “Sun Tzu's got nothing on us!” This map's Community strategy page is a stub. As such, it is not complete. You can help the Team Fortress Wiki Community Strategy Project by expanding it. Notes: None added |
Gallery
Update history
July 8, 2010 Patch (Engineer Update)
- Added Thunder Mountain to the game.
- Clipped off sticky outcrops for smoother movement.
- Clipped various exploit ledges.
- Increased environment ambient exterior light level.
- Stage 1
- Fixed hole in respawn room brushes in RED spawn.
- Shifted respawn times to favor BLU by two seconds.
- Stage 3
- Clipped rocks off by BLU's spawn exit that leads to building B. (allowed Snipers to snipe the entire area)
- Removed embedded displacement. (building B interior roof)
- Removed rogue clip brush from building A balcony.
- Updated the final stage to have the train begin receding after 25 seconds. (15 seconds on the final stretch)
- [Undocumented] Reduced the cart speed on the final two ramps in the final stage to 1/2 normal speed.
- Fixed a build-in-spawn exploit in the Blue spawn room for stage 2.
- Fixed gate visible through ceiling in stage 3
- Fixed clipping in stage 3 Blu spawn
- Prevented players from building in the cliffside kill zone in stage 1
- Fixed being able to build on rocks outside of the fence by the capture points.
July 7, 2016 Patch #1 (Meet Your Match Update)
- Fixed the first and second cap points of stage 3 each awarding 2 points to the capturing team instead of 1.
Bugs
- Players can get stuck on Stage 1 of the map if they crouch at the end of the bridge near the control point whilst it rises. The bridge rises halfway and the player rises with it, but then the player stops rising while the bridge continues on.
- On Stage 3, a player's view can glitch out if they rub against Checkpoint 3's sign on top of the roof.
Trivia
- On Stage 1, in the BLU spawn, the player may see some BLU characters in an area similar to the Soldier Training map, around a blackboard. They occasionally taunt, albeit with no weapons, and also occasionally do the Thriller taunt regardless of the time of the year.
- On Stage 2, in the RED spawn, one may see the RED team swimming in a pool.
- On Stage 3, near the second checkpoint (third dot), off in the distance the Sniper can be seen near his camper van (the same one seen in Meet the Sniper), a tent, and a fire. He only appears after BLU team has pushed the Payload past the first checkpoint.
- Thunder Mountain was originally teased on Day 1 of the Engineer Update, on the map of Badlands, an area that several game maps occupy.
- There is an actual mountain named Thunder Mountain in Sierra Nevada, California, USA.
- However, this map's name references the history of nuclear weapon development at Los Alamos National Laboratory (see also the mushroom cloud reference on the Engineer Update page), with a few underground nuclear tests occurring just north of where this map is located.
- A train can occasionally be seen pulling a logging train across a trestle outside of the playable area, near BLU's spawn on stage 1.
External links
| |||||||||||||||||||||||


