Difference between revisions of "Pipeline"
m (Filtered Pipeline: [] (Review RC#329478)) |
m (Explained the mechanics of this map) |
||
| (51 intermediate revisions by 38 users not shown) | |||
| Line 1: | Line 1: | ||
{{Map infobox | {{Map infobox | ||
| − | |game-type=Payload Race | + | | map-status = official |
| − | |file-name=plr_pipeline | + | | map-game-type = Payload Race |
| − | |map-image=Pipeline.jpg | + | | map-file-name = plr_pipeline |
| + | | map-image = Pipeline.jpg | ||
| + | | map-released = {{Patch name|5|21|2009}} | ||
| + | | map-released-major = Sniper vs. Spy Update | ||
| + | | map-has-n-stages = 3 | ||
| + | | map-environment = Industrial | ||
| + | | map-setting = Nighttime, clear | ||
| + | | map-has-deep-water = {{tooltip|Yes|Stage 3 only}} | ||
| + | | map-pickups-health-small = 17 | ||
| + | | map-pickups-health-medium = 8 | ||
| + | | map-pickups-health-large = 2 | ||
| + | | map-pickups-ammo-small = 2 | ||
| + | | map-pickups-ammo-medium = 9 | ||
| + | | map-pickups-ammo-large = 17 | ||
}} | }} | ||
| − | {{Quotation|'''Abraham Lincoln'''|America's pipelines are a stirring beacon of hope. Let no man befoul their majesty with calumny or bombs.}} | + | {{Quotation|'''Abraham Lincoln'''|America's pipelines are a stirring beacon of hope. Let no man befoul their majesty with calumny or bombs.<ref>[https://www.teamfortress.com/sniper_vs_spy/day02_english.htm ''Greetings from ''PIPELINE] postcard - Official ''Team Fortress'' website</ref>}} |
| − | '''Pipeline''' is a [[Payload Race]] map | + | |
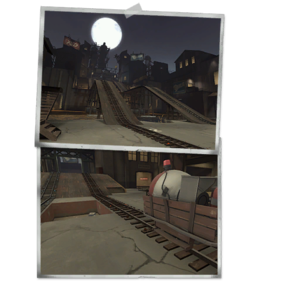
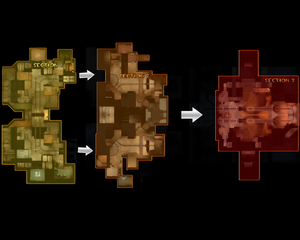
| + | '''Pipeline''' is a three-stage [[Payload Race]] map, included in the [[Sniper vs. Spy Update]] as the first official Payload Race map. | ||
| + | |||
| + | Furthermore, upon winning the round, the victorious team will get a slight early advantage at the next stage, with their [[Payload#Carts|Cart]] starting further down the track. | ||
== Locations == | == Locations == | ||
| + | === Stage A (Docking Bays) === | ||
| + | [[File:Pipeline stage one.png|thumb|right|Details of stage 1. (Large file)]] | ||
| − | + | Stage A is located at the teams' docking bays, separated by a gate in the middle where the Payload tracks cross. | |
| − | |||
| − | |||
| − | |||
| − | |||
| − | |||
| − | |||
| − | + | * '''Docking Bay''': On both sides next to the spawn area and across from the capture point is a docking bay. | |
| + | * '''Gate''': In the center of the stage, where the tracks cross lies the gate which separates each team's sides. | ||
| + | * '''Central Flank''': Next to the gate is an entrance which leads up flanks that cover both of the teams' areas near the gate. | ||
| + | * '''Side Flank/Staircase Area''': From each team's side is a flank which connects to both teams' docking bays. On BLU's side, it is more notably the winding staircase. | ||
| − | |||
| − | |||
| − | |||
| − | |||
| − | |||
<gallery widths=150px heights=80px> | <gallery widths=150px heights=80px> | ||
| − | File:Pipeline01. | + | File:Pipeline01.png|Track overview. |
| − | File:Pipeline1dockingbay. | + | File:Pipeline1dockingbay.png|Docking bay |
| − | File:pipeline1flank. | + | File:pipeline1flank.png|Central flank |
| − | File:pipeline1stairs. | + | File:pipeline1stairs.png|Side flank and stairs (BLU side) |
</gallery> | </gallery> | ||
=== Stage B (Terminal) === | === Stage B (Terminal) === | ||
| + | [[File:Pipeline_stage_two.png|thumb|right|Details of stage 2. (Large file)]] | ||
| + | |||
| + | Stage B is located at a train terminal which connects to both teams' sides. | ||
| + | |||
| + | * '''Terminal''': The train terminal situated in a tunnel which connects both teams' sides. | ||
| + | * '''Battlements''': Each team's spawn areas are surrounded by battlements which contain many small houses and the flank entrances. | ||
| + | * '''Maintenance Room (Flank)''': Accessible from the battlements is maintenance room which serves as a major flank. It exits out above the capture points. | ||
| − | |||
| − | |||
| − | |||
| − | |||
<gallery widths=150px heights=80px> | <gallery widths=150px heights=80px> | ||
| − | File:Pipeline02. | + | File:Pipeline02.png|Spawn area |
| − | File:pipeline2battlements. | + | File:pipeline2battlements.png|Battlements |
| − | File:pipeline2flank. | + | File:pipeline2flank.png|Maintenance Room (Flank) |
| − | File:pipeline2terminal. | + | File:pipeline2terminal.png|Train terminal |
</gallery> | </gallery> | ||
=== Stage C (Heart of the Factory) === | === Stage C (Heart of the Factory) === | ||
| + | [[File:Pipeline stage three.png|thumb|right|Details of stage 3. (Large file)]] | ||
| + | |||
| + | Stage C appears to be located in the heart of the factories which surround the pipeline stages. The final stage contains a set of ramps that each team must push their cart up. If a cart is left alone on one of the ramps, it will slide back down. | ||
| + | |||
| + | * '''Basin''': The basin is the area below the ramps containing a stream and an entrance to a set of staircases that lead to the upper flank. | ||
| + | * '''Ramps/Tracks''': The ramps are situated in the center of the stage parallel with each other. | ||
| + | * '''Battlements/Roofs''': From each team's spawn areas are battlements which connect to the spawns and roofs. | ||
| + | * '''Stairs/Upper Flank''': From the basin is a staircase which leads to the upper flank, or the half way point after the first ramp. The Upper Flank also has two exits from the spawn rooms. | ||
| − | |||
| − | |||
| − | |||
| − | |||
| − | |||
<gallery widths=150px heights=80px> | <gallery widths=150px heights=80px> | ||
| − | File:Pipeline03. | + | File:Pipeline03.png|Overview |
| − | File:pipeline3basin. | + | File:pipeline3basin.png|Basin below the tracks |
| − | File:pipeline3upperexits. | + | File:pipeline3upperexits.png|Upper flank area |
| − | File:pipeline3overview. | + | File:pipeline3overview.png|Final capture area |
</gallery> | </gallery> | ||
== Strategy == | == Strategy == | ||
| − | + | {{main|Community Pipeline strategy}} | |
| − | + | {{community strategy stub link}} | |
| − | |||
| − | |||
| − | |||
| − | |||
== Update history == | == Update history == | ||
| − | '''[[ | + | {{Update history| |
| + | '''{{Patch name|5|21|2009}}''' ([[Sniper vs. Spy Update]]) | ||
| + | * Added Pipeline to the game. | ||
| + | |||
| + | '''{{Patch name|8|13|2009}}''' | ||
* Increased the starting advantage in the third round if a team has won the first two rounds. | * Increased the starting advantage in the third round if a team has won the first two rounds. | ||
* Fixed carts not continuing to the second round if they're capped at the same time in the first round. | * Fixed carts not continuing to the second round if they're capped at the same time in the first round. | ||
| Line 76: | Line 92: | ||
* Fixed players being able to get onto rooftops and out of the map boundaries. | * Fixed players being able to get onto rooftops and out of the map boundaries. | ||
* Fixed other minor bugs and exploits. | * Fixed other minor bugs and exploits. | ||
| − | |||
| − | |||
| − | |||
| − | |||
| − | |||
| − | |||
| − | |||
| − | ==Trivia== | + | '''{{Patch name|5|20|2010}}''' ([[Second Community Contribution Update]]) |
| − | * The Sniper sent a postcard to his mother detailing his experiences fighting at "Scenic Pipeline" | + | * Added stairwell in Stage 1 and window access to both team's platforms by main choke point to help alleviate stalemates. |
| − | * Pipeline was first seen in the background | + | * Reverted the starting position for the cart in Stage 3 if a team had won the first 2 stages to where you no longer get a big cart-start-position advantage. |
| − | * | + | * Fixed rare cases where stage would break when cart had no nearby capper(s). |
| − | + | * Fixed carts not always moving to their starting locations correctly. | |
| + | * Fixed respawn times in Stage 3 not being set to the proper values. | ||
| + | * Fixed the map not finishing correctly in Stage 3 if the two teams capture the final point at the same time. | ||
| + | |||
| + | '''{{Patch name|7|10|2013}}''' | ||
| + | * Fixed invisible faces. | ||
| + | * Handrails no longer collide with bullets and projectiles. | ||
| + | }} | ||
| + | |||
| + | == Bugs == | ||
| + | * In stage A, explosions or [[fire]] by the gated wall at the starting gate can harm or kill players standing close enough on the other side. | ||
| + | * In stage C, there is a way to build [[Buildings|buildings]] in the back of both spawns. The location is at the back of each spawn room, in the corner near the white object. For the RED spawn, this is the left corner. For the BLU spawn, this is the right corner. | ||
| + | * In stage C, certain parts of the Basin allow players to be set on fire, [[Crouching|crouch]] and be unable to drown, despite being completely submerged in the [[water]].<ref>[https://youtu.be/MB2Ew8DB7XU Video example.]</ref> | ||
| + | * In the entirety of stage C, due to the lack of [[Setup]] phase at the start, [[Engineer]]s can upgrade buildings much faster than intended, with each melee swing using 50 metal instead of 25, the same amount that is applied during Setup time in any other map.<ref>[https://www.youtube.com/watch?v=mRinp7OG8xk Video example.]</ref> | ||
| + | ** However, this does not apply to the [[Medic]]'s ÜberCharge rate, as it does not increase in the same way that it does during Setup time, therefore, functioning as intended. | ||
| + | |||
| + | == Trivia == | ||
| + | * The Sniper sent a postcard to his mother detailing his experiences fighting at "Scenic Pipeline". | ||
| + | * Pipeline was first seen in the background of the [[Bonk! Atomic Punch]] page for the [[Scout Update]] page.<ref>https://www.teamfortress.com/scoutupdate/energydrink.htm</ref> The image shows the third stage of the map, but with the traditional desert theme (during the day) rather than the night time industrial style used at its release. | ||
| + | * Near the center of the [[Map of Badlands]], beside the {{botignore|Badwater Pipeline}} that stretches out across the [[Badlands]], is a drawing in profile of the center ramps with a bomb cart on the ramp, presumably locating the Pipeline game map on the region map. | ||
| − | == | + | == External links == |
| − | *The | + | * [https://www.teamfortress.com/sniper_vs_spy/day02_english.htm The Sniper vs. Spy Update: Day 2 - New maps] |
| − | == | + | == References == |
| − | + | <references/> | |
| + | {{Sniper Vs Spy Update Nav}} | ||
| + | {{Maps Nav}} | ||
| − | + | [[Category:Quickplay maps]] | |
| − | |||
Latest revision as of 18:29, 30 July 2024
| Pipeline | |
|---|---|
| |
| Basic Information | |
| Map type: | Payload Race |
| File name: | plr_pipeline
|
| Released: | May 21, 2009 Patch (Sniper vs. Spy Update) |
| Developer(s): | Valve |
| Map Info | |
| No. of Stages: | 3 |
| Environment: | Industrial |
| Setting: | Nighttime, clear |
| Deep Water: | Yes |
| Map Items | |
| Map Photos | |
| Map Overview | |
| “ | America's pipelines are a stirring beacon of hope. Let no man befoul their majesty with calumny or bombs.[1]
— Abraham Lincoln
|
” |
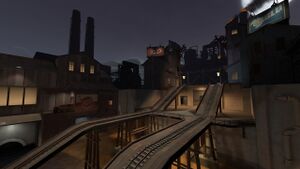
Pipeline is a three-stage Payload Race map, included in the Sniper vs. Spy Update as the first official Payload Race map.
Furthermore, upon winning the round, the victorious team will get a slight early advantage at the next stage, with their Cart starting further down the track.
Contents
Locations
Stage A (Docking Bays)
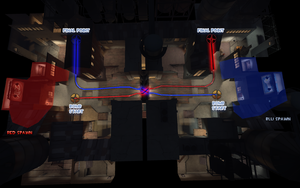
Stage A is located at the teams' docking bays, separated by a gate in the middle where the Payload tracks cross.
- Docking Bay: On both sides next to the spawn area and across from the capture point is a docking bay.
- Gate: In the center of the stage, where the tracks cross lies the gate which separates each team's sides.
- Central Flank: Next to the gate is an entrance which leads up flanks that cover both of the teams' areas near the gate.
- Side Flank/Staircase Area: From each team's side is a flank which connects to both teams' docking bays. On BLU's side, it is more notably the winding staircase.
Stage B (Terminal)
Stage B is located at a train terminal which connects to both teams' sides.
- Terminal: The train terminal situated in a tunnel which connects both teams' sides.
- Battlements: Each team's spawn areas are surrounded by battlements which contain many small houses and the flank entrances.
- Maintenance Room (Flank): Accessible from the battlements is maintenance room which serves as a major flank. It exits out above the capture points.
Stage C (Heart of the Factory)
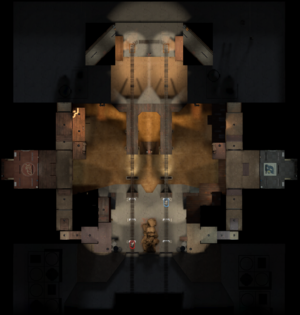
Stage C appears to be located in the heart of the factories which surround the pipeline stages. The final stage contains a set of ramps that each team must push their cart up. If a cart is left alone on one of the ramps, it will slide back down.
- Basin: The basin is the area below the ramps containing a stream and an entrance to a set of staircases that lead to the upper flank.
- Ramps/Tracks: The ramps are situated in the center of the stage parallel with each other.
- Battlements/Roofs: From each team's spawn areas are battlements which connect to the spawns and roofs.
- Stairs/Upper Flank: From the basin is a staircase which leads to the upper flank, or the half way point after the first ramp. The Upper Flank also has two exits from the spawn rooms.
Strategy
 | “Sun Tzu's got nothing on us!” This map's Community strategy page is a stub. As such, it is not complete. You can help the Team Fortress Wiki Community Strategy Project by expanding it. Notes: None added |
Update history
- Added Pipeline to the game.
- Increased the starting advantage in the third round if a team has won the first two rounds.
- Fixed carts not continuing to the second round if they're capped at the same time in the first round.
- Fixed being able to shoot pipebombs over the starting gates in the first round.
- Fixed being able to open the doors in the first round before the setup time was finished.
- Fixed players getting stuck in some doors.
- Fixed players being able to get onto rooftops and out of the map boundaries.
- Fixed other minor bugs and exploits.
May 20, 2010 Patch (Second Community Contribution Update)
- Added stairwell in Stage 1 and window access to both team's platforms by main choke point to help alleviate stalemates.
- Reverted the starting position for the cart in Stage 3 if a team had won the first 2 stages to where you no longer get a big cart-start-position advantage.
- Fixed rare cases where stage would break when cart had no nearby capper(s).
- Fixed carts not always moving to their starting locations correctly.
- Fixed respawn times in Stage 3 not being set to the proper values.
- Fixed the map not finishing correctly in Stage 3 if the two teams capture the final point at the same time.
- Fixed invisible faces.
- Handrails no longer collide with bullets and projectiles.
Bugs
- In stage A, explosions or fire by the gated wall at the starting gate can harm or kill players standing close enough on the other side.
- In stage C, there is a way to build buildings in the back of both spawns. The location is at the back of each spawn room, in the corner near the white object. For the RED spawn, this is the left corner. For the BLU spawn, this is the right corner.
- In stage C, certain parts of the Basin allow players to be set on fire, crouch and be unable to drown, despite being completely submerged in the water.[2]
- In the entirety of stage C, due to the lack of Setup phase at the start, Engineers can upgrade buildings much faster than intended, with each melee swing using 50 metal instead of 25, the same amount that is applied during Setup time in any other map.[3]
- However, this does not apply to the Medic's ÜberCharge rate, as it does not increase in the same way that it does during Setup time, therefore, functioning as intended.
Trivia
- The Sniper sent a postcard to his mother detailing his experiences fighting at "Scenic Pipeline".
- Pipeline was first seen in the background of the Bonk! Atomic Punch page for the Scout Update page.[4] The image shows the third stage of the map, but with the traditional desert theme (during the day) rather than the night time industrial style used at its release.
- Near the center of the Map of Badlands, beside the Badwater Pipeline that stretches out across the Badlands, is a drawing in profile of the center ramps with a bomb cart on the ramp, presumably locating the Pipeline game map on the region map.
External links
References
- ↑ Greetings from PIPELINE postcard - Official Team Fortress website
- ↑ Video example.
- ↑ Video example.
- ↑ https://www.teamfortress.com/scoutupdate/energydrink.htm
| ||||||||||||||||||||||||||||||||
