Difference between revisions of "Brazil"
m (→Locations) |
m |
||
| (5 intermediate revisions by 3 users not shown) | |||
| Line 1: | Line 1: | ||
{{Map infobox | {{Map infobox | ||
| − | | game-type | + | | map-status = community |
| − | | file-name | + | | map-game-type = King of the Hill |
| + | | map-file-name = koth_brazil | ||
| map-image = Brazil main.jpg | | map-image = Brazil main.jpg | ||
| − | | | + | | map-released = {{Patch name|10|20|2017}} |
| − | + | | map-released-major = Jungle Inferno Update | |
| map-environment = Jungle | | map-environment = Jungle | ||
| map-setting = Daylight, overcast | | map-setting = Daylight, overcast | ||
| map-hazards = [[Pitfall]] | | map-hazards = [[Pitfall]] | ||
| − | | map-health | + | | map-pickups-health-small = 5 |
| − | | map-health | + | | map-pickups-health-medium = 5 |
| − | | map-ammo | + | | map-pickups-ammo-small = 5 |
| − | | map-ammo | + | | map-pickups-ammo-medium = 2 |
| − | | map-bots = | + | | map-has-bots = yes |
| + | | map-stamp-link = https://steamcommunity.com/stats/TF2/leaderboards/2240346 | ||
}} | }} | ||
| − | {{Quotation|'''Steam Workshop description'''|Koth_brazil, une map koth qui se déroule dans une base secrete dans la jungle, les joueurs se battent pour le contrôle du radar. | + | {{Quotation|'''Steam Workshop description'''|Koth_brazil, une map koth qui se déroule dans une base secrete dans la jungle, les joueurs se battent pour le contrôle du radar.}} |
'''Brazil''' is a [[Steam Workshop|community-created]] [[King of the Hill]] map released during the [[Jungle Inferno Update]]. | '''Brazil''' is a [[Steam Workshop|community-created]] [[King of the Hill]] map released during the [[Jungle Inferno Update]]. | ||
| Line 25: | Line 27: | ||
__TOC__ | __TOC__ | ||
| − | [[File:Brazil main.png|center|thumb|550px|'''Central Locations/Control Area''':<br>''Center:'' Dish pit, Back Road, Underpass, Overpass, Control Point, and Hurg Perch.<br>''BLU and RED (outside to inside):''Coal House, Alley, Catwalk, Inside Route doorway.]] | + | <br> |
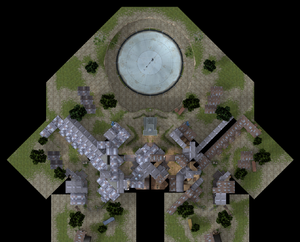
| + | [[File:Brazil main.png|center|thumb|550px|'''Central Locations / Control Area''':<br>''Center:'' Dish pit, Back Road, Underpass, Overpass, Control Point, and Hurg Perch.<br>''BLU and RED (outside to inside):'' Coal House, Alley, Catwalk, Inside Route doorway.]] | ||
== Locations == | == Locations == | ||
| Line 81: | Line 84: | ||
* '''Overpass''': The exposed High Road between the Coal Houses and the stairs to the point, hidden from the Hurg Perch, the bridge can be used defensively to keep the enemy away from those stairs. | * '''Overpass''': The exposed High Road between the Coal Houses and the stairs to the point, hidden from the Hurg Perch, the bridge can be used defensively to keep the enemy away from those stairs. | ||
| − | * '''Control | + | * '''Control Point''': A ''very'' exposed "hill", the Control point completely covers the elevated platform that can only be accessed by two narrow stairs or by Jumping. |
<gallery widths=140px heights=80px> | <gallery widths=140px heights=80px> | ||
| Line 91: | Line 94: | ||
== Helpful overview == | == Helpful overview == | ||
[[File:Brazil overview with lines.png|left|Brazil's locations|450px]] | [[File:Brazil overview with lines.png|left|Brazil's locations|450px]] | ||
| − | <big>1.Spawn Yard | + | <big>1. Spawn Yard |
| − | 2.Outside Route | + | 2. Outside Route |
| − | 3.Middle Route | + | 3. Middle Route |
| − | 4.Inside Route | + | 4. Inside Route |
| − | 5.Alley | + | 5. Alley |
| − | 6.Vault Room ( | + | 6. Vault Room (above the Alley) |
| − | 7.Stairwell | + | 7. Stairwell |
| − | 8.Hurg Perch (Data Center) | + | 8. Hurg Perch (Data Center) |
| − | 9.Coal House | + | 9. Coal House |
| − | 10.Back Road | + | 10. Back Road |
| − | Red diagonal lines: | + | Red diagonal lines: RED spawn room |
| − | + | Blue diagonal lines: BLU spawn room | |
| − | Yellow circle: Hill/Control | + | Yellow circle: Hill/Control Point</big> |
{{clr}} | {{clr}} | ||
== Strategy == | == Strategy == | ||
| − | {{main| | + | {{map strategy link|Brazil|main=yes|stub=yes}} |
| − | |||
== Control Point Timing == | == Control Point Timing == | ||
Latest revision as of 10:37, 6 June 2024
| Brazil | |
|---|---|
| |
| Basic Information | |
| Map type: | King of the Hill |
| File name: | koth_brazil
|
| Released: | October 20, 2017 Patch (Jungle Inferno Update) |
| Developer(s): | Jérémie "RaVaGe" Nicolas Tyler "Yyler" King Sean "Heyo" Cutino Nassim "NassimO" Sadoun |
| Map Info | |
| Environment: | Jungle |
| Setting: | Daylight, overcast |
| Hazards: | Pitfall |
| Bot support: | Yes |
| Map Items | |
| Map Overview | |
| Map Stamp | |
| Supporters Leaderboard | |
| “ | Koth_brazil, une map koth qui se déroule dans une base secrete dans la jungle, les joueurs se battent pour le contrôle du radar.
— Steam Workshop description
|
” |
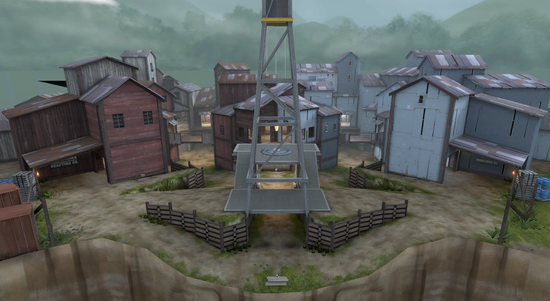
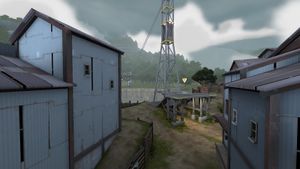
Brazil is a community-created King of the Hill map released during the Jungle Inferno Update.
A portion of the money made from the sales of the Jungle Inferno Campaign Pass goes to the authors of the map.
Brazil was contributed to the Steam Workshop.
Contents
Locations
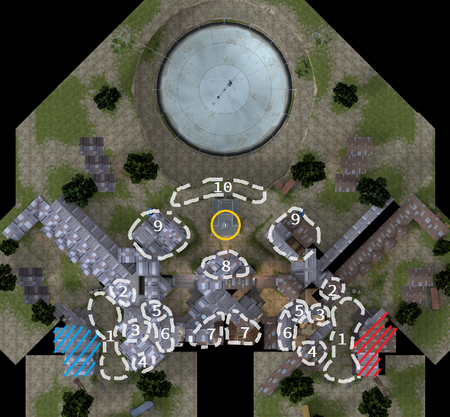
Note: If you are having trouble with finding the locations listed here, see the Helpful overview section to see their exact position marked on the map.
The Control point is elevated and has no cover except for that elevation; that is to say, it is more protected from enemy players on the ground right next to the point than it is from those that can fire from protective cover far away.
While most previous King of the Hill Maps have had a shallow building that cuts clear across the map defining an entrance yard for each team's spawn, here, a sprawling building complex holds a three-dimensional maze of disorienting passages from a small yard to just outside the wide open Control Area.
As a map symmetrical about a 90 degree axis, locations are described as being "inside" (closest to team Spawns) or "outside" (farther away from the team Spawns). The inner corner is the Hurg Perch and the outer corner is the Dish.
Spawn
- Spawn Yard: As Spawn Yards go, this one is particularly shallow; each of the three Spawn Gates lead directly to one of the corresponding three Yard Exits: the Outside Exit to the widest route to the Coal House next to the point, a Middle Exit, and the Inside Exit, which is on the side nearest the enemy Spawn.
Spawn Routes
- Outside Route: This outside route is the most direct route to the Coal House. From the Spawn Yard, the Outside Exit opens on the Gate 1 room, which has exits to the entry room of the Middle Route and the Alley. Passing around a jutting corner, players enter the room with Gate 3 and Gate 4. From here the Main Staircase rises to the interior of the Coal House.
- Middle Route: The Middle Exit opens on a room with a doorway to the Gate 1 room and Stairs to the Inside Route, and the route continues out another doorway to the automatic Exit gate and through that into the Alley.
- Inside Route: This route is a straight, if narrow, path to the Hurg Perch; its relatively straight line is only broken with the dogleg around the wall of the Stairwell.
Battlements
- Certain forward locations are involved in the struggle to control the perimeter of the Control Area; the team that controls most of these locations controls the point:
- Coal House (Rio Grande Coal Co.): The Coal House is the primary Engineer nest location. Its possible weakness is enemy flanks from the Alley or Vault Room up the Main Stairs.
- Vault Room: This is the widest room of the upper story, and with the small Ammo Pickup, it is a secondary nest location. It is more secure than either the Coal House or the Hurg Perch, but it's farther from the point.
- Catwalk: The Catwalk is a connecting link from just outside the Hurg Perch to the far end of the Vault Room. Thus, this route is used as a flank in both directions against either position.
- The Catwalk has a clear line of fire covering the entire point.
- There is boarded fence cover at each end of the Catwalk; however, the player's head is exposed unless crouching.
- Alley: The Alley may be seen as the shortest rush back into the action after respawning; but it is low and exposed, meant to be crossed in a hurry.
- Hurg Perch (or Data Center): This second-story position is the closest and clearest shot at the point. It also commands the Control Area.
- Once the Hurg Perch is secure, it is a relatively easy jump from the Hurg Perch to the point for technical Jumpers; and all classes can make the running jump the other way from the point to the Hurg Perch (Heavy will have to crouch-jump).
Control Area
- Back Road: A straight path from one Coal House to the other; it gives cover from any enemy in the second story of the buildings, but is exposed to the Dish Pitfall.
- Underpass: A sheltered low road on the centerline between the Hurg Perch and the Dish, it has a Small Health Kit at each end.
- Overpass: The exposed High Road between the Coal Houses and the stairs to the point, hidden from the Hurg Perch, the bridge can be used defensively to keep the enemy away from those stairs.
- Control Point: A very exposed "hill", the Control point completely covers the elevated platform that can only be accessed by two narrow stairs or by Jumping.
Helpful overview
1. Spawn Yard
2. Outside Route
3. Middle Route
4. Inside Route
5. Alley
6. Vault Room (above the Alley)
7. Stairwell
8. Hurg Perch (Data Center)
9. Coal House
10. Back Road
Red diagonal lines: RED spawn room
Blue diagonal lines: BLU spawn room
Yellow circle: Hill/Control Point
Strategy
 | “Sun Tzu's got nothing on us!” This map's Community strategy page is a stub. As such, it is not complete. You can help the Team Fortress Wiki Community Strategy Project by expanding it. Notes: None added |
Control Point Timing
| Control Point | Multiplier | Seconds | ||
|---|---|---|---|---|
| Control Point | ×1 |
| ||
| ×2 |
| |||
| ×3 |
| |||
| ×4 |
|
Changelog
Mar 21, 2016 @ 8:40am
Update history
October 20, 2017 Patch #1 (Jungle Inferno Update)
- Added Brazil to the game.
Trivia
- The installation that the mercenaries are fighting over is a miniature version of the famous jungle Arecibo Observatory, decommissioned in 2020, that performed radio and radar astronomy.
Gallery
| ||||||||||||||||||||||||||||||||||||||||||||||||||||
