Difference between revisions of "Mossrock"
m (→Locations: templates are better) |
m (→Bugs: https://youtu.be/2kiUXmGuURA) |
||
| Line 166: | Line 166: | ||
* Players can glitch out and temporarily get stuck near the sign in front of cap A. <!-- Despite what patch notes before 12/02/2022 say, this bug is still possible. Please remove if future update actually fixes it. --> | * Players can glitch out and temporarily get stuck near the sign in front of cap A. <!-- Despite what patch notes before 12/02/2022 say, this bug is still possible. Please remove if future update actually fixes it. --> | ||
* Sometimes white boxes constantly appear and disappear near the player. | * Sometimes white boxes constantly appear and disappear near the player. | ||
| + | * There is a buildable spot outside of map near the first BLU spawn. | ||
== Trivia == | == Trivia == | ||
Revision as of 22:44, 2 January 2024
| Mossrock | |
|---|---|
| |
| Basic Information | |
| Developer(s): | Unknown |
| Map Info | |
| Environment: | Jungle |
| Setting: | Daylight, sunny |
| Hazards: | Trains, Pitfalls |
| Map Photos | |
| Map Overview | |
| “ | Mossrock is a 2CP A/D map (Gorge-Like) jungle map, with deathpits, trains and mind-controlling radio broadcast stations.
— Steam Workshop description
|
” |
Mossrock is a community-created Attack/Defend Control Point map released during the Jungle Inferno Update. It takes place in a jungle that houses radio stations that can control minds. Mossrock is a jungle-themed remake of the community-made map Whiterock.
A portion of the money made from the sales of the Jungle Inferno Campaign Pass goes to the authors of the map.
Mossrock was contributed to the Steam Workshop.
Contents
Locations
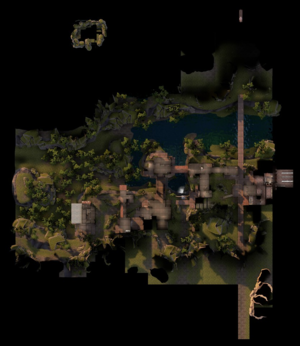
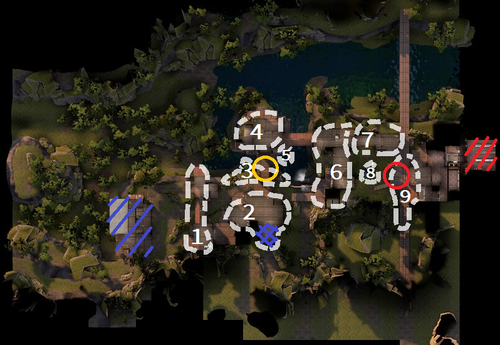
Note: If you are having trouble with finding the locations listed here, see the Helpful overview section to see their exact position marked on the map.
From BLU Base to RED Base is a series of three buildings for the teams to control, each separated by a small yard of broken terrain to fight through. Each building carries the name of one of the generally unaligned companies. The main BLU attack usually proceeds up the right to gain one end of The Bridge. With the capture of The Bridge, the BLU attack splits to control wide attack angles on The Trestle just outside of RED Base.
There are two Capture points:
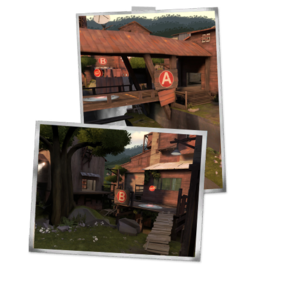
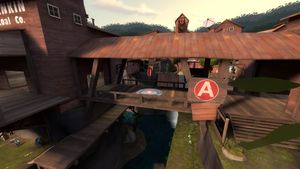
Capture point A: "The Bridge"; on a covered bridge across the Chasm. Capturing this point before time runs out advances the BLU Spawn to the Casali building and adds time to the game clock.
Capture point B: "The Trestle"; on the platform across the Train trestle from BED Base. Capturing this point before time runs out wins the game for BLU.
The balanced design of this map gives RED easier to defend positions the furthest from their spawn: RED has a narrower front with high ground positions to defend when furthest from their spawn. But after the loss of the Casali building, RED must split its forces to defend and counter-attack 2 or 3 positions depending on the thrusts of the BLU Team. Should The Bridge fall, BLU then has three main ways into the Jenkin building from its forward spawn, which is relatively central to all of them. The final point faces three positions behind which BLU can rally for short pushes onto the point, possibly time with the passing of the Train that cuts through RED defense of the point.
BLU Base
This building is a small control center for BLU, containing the initial BLU spawn, with all three exits covered by RED's high, sheltered positions on both the left and right.
Captain Dan's Wood Pulp
This building controls the high left and right exit paths from BLU Base and has a firing position over the low middle path from BLU Base.
- The cliff-side end of the building has exit stairs down to the Riverwalk flank to the Casali building Side Door as well as to the Radio Shack.
Casali Shafting Co.
This building has an Entry room and a large Main room with a large doorway opening directly on the Bridge point, a Balcony opposite with BLU's forward spawn, and a smaller Side Door that flanks both ways depending on who controls the building and The Bridge. Typically, BLU secures the Main Room before attempting The Bridge.
- Chasm: A deep but expertly jumpable gorge separating the approaches of The Bridge.
- Riverwalk: A boardwalk below the rim of the Chasm connects the exit stairs from Captain Dan's, the Casalli Side Door, and the narrow "Low Bridge" to the Island Flanks. This path is protected from direct fire except for both ends but is vulnerable to fire from players who have gotten up on the roof over The Bridge.
- Pond: BLU must attack up a single ramping bridge across a Pond with a medium Health Kit against two facing exits and two flanking exits (Garage and Backdoor) held by RED.
Jenkin Coal Co.
This is a complex of three buildings connected by Corridors that controls the final approaches to The Trestle.
- Radio Shack: Balanced on an island bluff, this is the base of the "mind control" radio transmitter. It commands the far end of The Bridge should BLU capture the Casali building. It is connected to RED Base by straight and relatively protected Corridors, and a RED Engineer nest is usually set up with a Teleporter exit nearby.
- Radio Room: This room is the main RED defense across The Bridge from the Casali building.
- Patio: This open deck is an alternate protected location for a RED Teleporter Exit. Skilled jumpers can also jump from or to the Patio across the Chasm.
- Backroom: This is an obvious flank to the Radio Room.
- Island Flank: The Riverwalk continues beneath the Radio Shack, splitting into the Downstream Flank to the Back Porch and the Upstream Flank to the adjoining Backroom.
- Back Porch: A relatively short technical jump can reach the broken stairs in the corner to the corridor roof and from there gain the roof over The Bridge.
- Main Building: The 2-story main Jenkins building cuts across 5 paths from the Casali building.
- Loft: An upper platform at the junction of the Main Building and the Corridors, this can be flanked through the ground floor Backdoor.
- Garage: With two wide automatic overhead doors, this is a low route into the final yard.
- A Trap Door in a corner over a platform connects the Garage with the upper floor near the Stairwell.
- Stairwell: A forward cover on BLU's right that helps secure the Alley.
- Alley: A very narrow passageway under the end of the main Jenkin building between the Pond and the final yard.
- Shipping: The last Jenkin building is against The Trestle and is the closest cover BLU has to the final point.
- At the opening of Shipping is an elevated Dock that is across the track from the Platform.
RED Base
The RED Base contains the satellite Data Link inside a mining facility and faces the final yard the teams have to fight over. The Trestle and final yard in front of the RED Base is naturally RED's "last stand" should that team be driven from the Jenkin building.
- The central exit from the spawn opens on an Entryway that exits to the Platform to RED's right and the Lean-to on their left. The lower left exit opens underneath The Trestle and into a defensive Trench. The upper right exit is an exposed door onto the Platform.
- One Tree Hill: The One Tree on the boulders on the hill in the center of the yard provide cover for players on both teams, especially those playing between the Alley and Garage on the BLU side or playing from underneath The Trestle on the RED side. It also blocks direct fire between the Alley and any Sentry Gun on the Platform.
- Trench: The low ground in front of and beneath The Trestle offers much protection.
- The Trestle: The passing Train briefly reduces RED's access and fire support to the final yard.
- Players can pass under either end of The Trestle at any time.
- The Jumping classes can easily jump over the gondola cars and all classes can cross the flat cars.
Helpful overview
1.Captain Dan's Wood pulp
2.Casali Shafting Co.
3.Riverwalk
4.Radio Shack with Radio Room
5.Island flank
6.Jenkin Coal Co.
7.Shipping
8.One Tree Hill
9.Trestle

Red/blue diagonal lines: Red/Blu first spawn
Blue double diagonal lines: Blu second spawn
Yellow circle: Capture point A
Red circle: Capture point B
Strategy
 | “Sun Tzu's got nothing on us!” This map's Community strategy page is a stub. As such, it is not complete. You can help the Team Fortress Wiki Community Strategy Project by expanding it. Notes: None added |
Control Point timing
| Control Point | Multiplier | Seconds | ||
|---|---|---|---|---|
| Control Point A | ×1 |
| ||
| ×2 |
| |||
| ×3 |
| |||
| ×4 |
| |||
| Control Point B | ×1 |
| ||
| ×2 |
| |||
| ×3 |
| |||
| ×4 |
|
Changelog
- Added soundscapes
- Fixed cubemaps
- Improved 3d skybox
- Added some foliage from Pear
- Fixed exploits where engineer could build outside the map
- Improved clipping
Jun 27 @ 4:42am
Update history
- Added Mossrock to the game.
- Fixed small area where Engineers could build in initial BLU spawn.
- Fixed area where you could fall in the pit and not die.
- Fixed cases where you could block the train without dying.
- The train now doesn't kill you if your toe touches it.
- Optimized FPS around the last point. Should be significantly better.
- Brightened the underside of last point slightly.
- Improved clipping around the ramp to last point.
- Fixed a case where your view would glitch out on the sign near cap A.
July 12, 2023 Patch #1 (Summer 2023 Update)
- Fixed numerous perch points.
- Fixed players being able to get under Blu spawn.
- Fixed a location where a teleporter could be build out of the map.
- Fixed collision on rock near final point so it is more accurate to the visuals.
- Fixed lots of small visual bugs.
- Fixed some small exploits.
- Improved optimisation.
Bugs
- Players can glitch out and temporarily get stuck near the sign in front of cap A.
- Sometimes white boxes constantly appear and disappear near the player.
- There is a buildable spot outside of map near the first BLU spawn.
Trivia
- The Radio Room features a poster that lists various radio broadcasting frequencies and their purpose, some of which reference other TF2 maps[1]:
- "404Hz - Frequency Not Found" is a reference to 404 error messages.
- "502Hz - Contact Moonbase" is a reference to Asteroid.
- "600Hz - Japanese Outpost" is a reference to Suijin.
- "650Hz - Arctic Research Station" is a reference to custom map Wilkes.
- "750Hz - Contact Train God" is a reference to Trainsawlaser.
Gallery
References
- ↑ Discussion confirming the references
| ||||||||||||||||||||||||||||||||||||||||||||||||||||
