Difference between revisions of "Hassle Castle"
(→Trivia: Speculation (need Cite) Plenty were called "Hassle Castle". (the Shrek Game?) The UK Pop Psyc group Focal Point publish ''First Byte of the Apple'', featuring the song ''Hassle Castle'' ([https://www.dailymotion.com/video/x176vq3 Listen])) |
(Reworked the locations) |
||
| Line 34: | Line 34: | ||
== Locations == | == Locations == | ||
| − | + | '''Note''': If you are having trouble finding the locations listed here, you can scroll down to the ''Helpful overview section'' to see there exact position marked on the map. | |
| − | * ''' | + | ===Checkpoint A=== |
| + | *'''Cart start''': The [[Cart]] starts in front of the Blu spawn's middle exit, to reach the first checkpoint, the cart will need to go through a gap in the cliff and pass a small house. | ||
| + | *'''Roof''': The [[Blu]]'s right spawn exit is actually a long building extending deep into the map. The roof of this building is standable on for both team. Positioning yourself on the roof gives you an overview of the entire area before the slope. | ||
| + | *'''Behind roof''': There is an area even more right of the roof itself. This area isn't really behind the rood but it is rater barren and mostly hidden by the roof so one could say that "it is behind the roof". | ||
| + | *'''Slope''': The area leading to the checkpoint A is split in two by the "slope". A rather large hill spanning from the top of the stairs to the edge of the map. The area in front of the slope contains the first stretches of track while the area behind the slope contains the house and the first checkpoint itself. There is a small gap in the slope through witch the cart passes in order to get to the other side of the slope. | ||
| + | *'''House''': Right behind the slope is small, two story house. The house is positioned side by side the checkpoint A. | ||
| + | *'''Cliff''': Opposite the house, right across the checkpoint A is a small cliff hugging the border of the map. One could say that the cliff is an extension of the slope. | ||
| − | * ''' | + | ===Checkpoint B=== |
| + | *'''Hill''': There is a very large hill spanning all the way from the checkpoint A to the checkpoint B. This hill isn't particularly high but it is very long as we mentioned earlier. | ||
| + | *'''Tunnel''': There is a large tunnel complex dug out through the aforementioned hill, the tunnel is also the place where the cart passes to get to the second checkpoint. The entrance to this tunnel begins just a few meters after the first checkpoint and the exit is also just a few meters before the second checkpoint. The people in the tunnel are shielded from people up above them on the hill, however, whoever controls the hill also controls the exit from the tunnel. | ||
| + | *'''Flanking cliff''': One part of the tunnel branches out to the outer edge of the hill where it "breaks" outside to the edge of the map. From there on, a small cliff (which isn't anymore apart of the tunnel), slithers its way up while hugging the right side of the hill. | ||
| + | *'''Rocks''': There is a group of rocks located in the middle of the hill, these rocks split the hill in two. | ||
| + | *'''B hut''': There is a small hut which sits right across the tunnel exit and is positioned side-by-side the checkpoint B. | ||
| + | *'''Platform''': Just as the [[Red]] team exit there spawn, they will find themselves on a small elevated platform sitting just behind the checkpoint. | ||
| + | *'''Apartments''': There is a two story building sitting on the left of the checkpoint overlooking it. | ||
| − | * ''' | + | ===Checkpoint C=== |
| − | + | *'''Sewers''':There is an small sewer system located right beneath the first Red spawn. | |
| − | * ''' | + | *'''Spiraling bride''': After capturing the second checkpoint, the cart will cruise for a little while until it will find itself in front of a bridge which crosses a large gap. However, this bridge isn't like any bridge, it spiral upwards like a spiraling staircase. Once the cart has "climbed up" this bridge it will find itself practically right on top of the third checkpoint. |
| − | + | *'''Under bridge''': There is a small pathway sneaking its way under the spiral bridge toward the C hut. | |
| − | * ''' | + | *'''C hut''': A small hut is positioned on the right side of the checkpoint. |
| − | + | *'''Balcony''': There is an elevated ledge located right across the C hut or on the left of the checkpoint C. | |
| − | * ''' | ||
| + | ===Checkpoint D=== | ||
| + | *'''Valley''': After the cart has "climbed up" the spiral bridge and reached the third checkpoint, it will now stroll through a valley to the final area of the map. | ||
| + | *'''Final area''': A huge area encompassing the final Red spawn, pit, and the across buildings, | ||
| + | *'''Pit''': A hole right in the center of the final area of the final area in which the cart is supposed to be thrown. | ||
| + | *'''Across buildings''': A set of buildings sitting opposite of the Red spawn room right across the pit. | ||
| + | |||
<gallery widths=140px heights=80px> | <gallery widths=140px heights=80px> | ||
Image:HassleCastle1.png|First Checkpoint | Image:HassleCastle1.png|First Checkpoint | ||
Revision as of 14:01, 6 April 2021
| Hassle Castle | |
|---|---|

| |
| Basic Information | |
| Variants: | Upward |
| Developer(s): | {{{map-developer}}} |
| Map Info | |
| Environment: | Halloween |
| Setting: | Night |
| Hazards: | Skeletons, Pitfalls |
| Map Photos | |
 | |
| Map Overview | |
 | |
| Map Stamp | |
| Supporters Leaderboard | |
| “ | RED found out about Frankenstein's shenanigans and had a brilliant idea to resurrect Redmond Mann and get their jobs back. ...Little did they know, that the BLU team found out about this whole thing too, albeit a few days later, and had exactly the same idea. ...Will they bring their leader back to life, or will RED prevent them from doing that?
You decide! — Hassle Castle publicity blurb
|
” |
Hassle Castle is a Payload map included with the Scream Fortress 2020 update. It is a community-made Halloween-themed version of Upward.
Hassle Castle, like its unhaunted version, is a single-stage map, similar in design and layout to Badwater Basin, with multiple control points in one round, unlike Gold Rush and Thunder Mountain, which are each made up of three short stages with 2-3 control points.
Hassle Castle was contributed to the Steam Workshop.
Contents
Magic Spells
While this map has no Rare magic spells, it does have many regular magic spell pickup locations that respawn every 10 seconds, and even more that spawn with the skeletons, making this map a spell-slinging spectacle. Three of these are located within the first BLU Spawn.
Skeletons
Groups of Skeletons spawn at every point capture. Additional groups of Skeletons spawn as the Cart passed two other locations; the coffin under the tracks in the Mine and the end of the Wooden Bridge.
Locations
Note: If you are having trouble finding the locations listed here, you can scroll down to the Helpful overview section to see there exact position marked on the map.
Checkpoint A
- Cart start: The Cart starts in front of the Blu spawn's middle exit, to reach the first checkpoint, the cart will need to go through a gap in the cliff and pass a small house.
- Roof: The Blu's right spawn exit is actually a long building extending deep into the map. The roof of this building is standable on for both team. Positioning yourself on the roof gives you an overview of the entire area before the slope.
- Behind roof: There is an area even more right of the roof itself. This area isn't really behind the rood but it is rater barren and mostly hidden by the roof so one could say that "it is behind the roof".
- Slope: The area leading to the checkpoint A is split in two by the "slope". A rather large hill spanning from the top of the stairs to the edge of the map. The area in front of the slope contains the first stretches of track while the area behind the slope contains the house and the first checkpoint itself. There is a small gap in the slope through witch the cart passes in order to get to the other side of the slope.
- House: Right behind the slope is small, two story house. The house is positioned side by side the checkpoint A.
- Cliff: Opposite the house, right across the checkpoint A is a small cliff hugging the border of the map. One could say that the cliff is an extension of the slope.
Checkpoint B
- Hill: There is a very large hill spanning all the way from the checkpoint A to the checkpoint B. This hill isn't particularly high but it is very long as we mentioned earlier.
- Tunnel: There is a large tunnel complex dug out through the aforementioned hill, the tunnel is also the place where the cart passes to get to the second checkpoint. The entrance to this tunnel begins just a few meters after the first checkpoint and the exit is also just a few meters before the second checkpoint. The people in the tunnel are shielded from people up above them on the hill, however, whoever controls the hill also controls the exit from the tunnel.
- Flanking cliff: One part of the tunnel branches out to the outer edge of the hill where it "breaks" outside to the edge of the map. From there on, a small cliff (which isn't anymore apart of the tunnel), slithers its way up while hugging the right side of the hill.
- Rocks: There is a group of rocks located in the middle of the hill, these rocks split the hill in two.
- B hut: There is a small hut which sits right across the tunnel exit and is positioned side-by-side the checkpoint B.
- Platform: Just as the Red team exit there spawn, they will find themselves on a small elevated platform sitting just behind the checkpoint.
- Apartments: There is a two story building sitting on the left of the checkpoint overlooking it.
Checkpoint C
- Sewers:There is an small sewer system located right beneath the first Red spawn.
- Spiraling bride: After capturing the second checkpoint, the cart will cruise for a little while until it will find itself in front of a bridge which crosses a large gap. However, this bridge isn't like any bridge, it spiral upwards like a spiraling staircase. Once the cart has "climbed up" this bridge it will find itself practically right on top of the third checkpoint.
- Under bridge: There is a small pathway sneaking its way under the spiral bridge toward the C hut.
- C hut: A small hut is positioned on the right side of the checkpoint.
- Balcony: There is an elevated ledge located right across the C hut or on the left of the checkpoint C.
Checkpoint D
- Valley: After the cart has "climbed up" the spiral bridge and reached the third checkpoint, it will now stroll through a valley to the final area of the map.
- Final area: A huge area encompassing the final Red spawn, pit, and the across buildings,
- Pit: A hole right in the center of the final area of the final area in which the cart is supposed to be thrown.
- Across buildings: A set of buildings sitting opposite of the Red spawn room right across the pit.
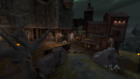
First Checkpoint
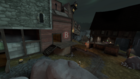
Second Checkpoint
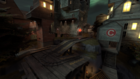
Third Checkpoint
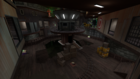
Final Terminus


Strategy
 | “Sun Tzu's got nothing on us!” This map's Community strategy page is a stub. As such, it is not complete. You can help the Team Fortress Wiki Community Strategy Project by expanding it. Notes: None added |
Update history
- Added Hassle Castle to the game.
- Added occluders to improve optimization
- Added a spell book near the first RED spawn and the first BLU spawn
- Brightened up some areas
- Fixed some texture misalignments
- Reduced the saturation of purple spell book patches
- Changed the ending when BLU wins
- Fixed the arrow signs not changing near the first RED spawn
- Fixed an out-of-bounds exploit near the first point
- Fixed an out-of-bounds exploit in the second BLU spawn
- Fixed an out-of-bounds exploit near the cliff at the second-to-last point
- Changed the doors in the second BLU and the first RED spawn rooms to standard ones
- Fixed a displacement error near the entrance to the last point
- Moved the resupply cabinet from the second BLU spawn out of the wall
- Updated the "Kill with a pumpkin bomb" bonus objective to be "Win a round"
- Fixed some texture errors
- Brightened up the map
- General improvements
- Fixed BLU players spawning in the wrong spawn room
- Fixed Engineers building Teleporters the first BLU spawn room
- General improvements
- Fixed more out-of-bounds exploits
- Improved clipping
- General improvements
Trivia
- There is a green signage in several places written in alchemical symbols that reads "frankenstein crypt" if deciphered.
| |||||||||||||||||||
| ||||||||||||||||||||||||||||||||||||||||