Nucleus (Arena)
Nucleus has multiple variations, including King of the Hill, Player Destruction, Versus Saxton Hale and Galleria.
| Nucleus (Arena) | |
|---|---|
| 300px | |
| Basic Information | |
| Variants: | King of the Hill, Player Destruction, Versus Saxton Hale and Galleria |
| Developer(s): | Unknown |
| Map Info | |
| Environment: | Spytech |
| Setting: | Indoor |
| Hazards: | Pit |
| Map Photos | |
| Map Overview | |
| “ | A diabolical doomsday device is the foundation of this circular arena map, which features long sightlines and a bottomless radioactive pit underneath most of the game area. The cap, located in the center of the arena, is only accessible for most classes by catwalks suspended over a chasm, which open after the timer has run down.
|
” |
Nucleus is an Arena map, released along with Sawmill as part of The Sniper vs Spy Update.
Contents
Locations
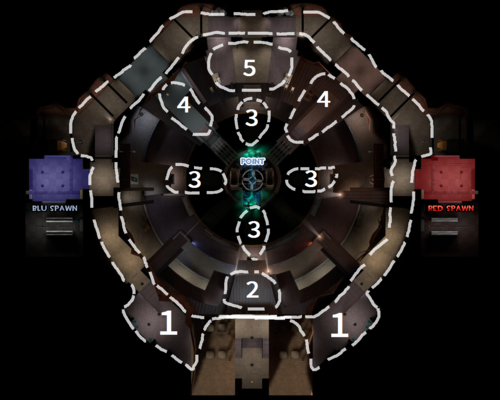
Note: If you are having trouble with finding the locations listed here, you can scroll down to the Helpful overview section to see their exact position marked on the map.
- The Device - The swirling, colorful Doomsday Device which dominates the center of the map. It contains the map's Control point, which unlocks after 60 seconds.
- The Pit - Directly below The Device is a bottomless radioactive pit with a narrow catwalk suspended just above it. The catwalk holds a Medium Health Pickup, but the pit is an unavoidable death for anyone unfortunate enough to fall in.
- The Perimeter - The series of ledges and catwalks which directly surround the Pit. The Perimeter is further divided into "RED-Side Perimeter" and "BLU-Side Perimeter", based on which spawn room is on that side of the map. Narrow bridges to the control point appear across the pit after the control point is opened.
- Roofs - On top of the buildings along the perimeter are roofs which are accessible by Rocket Jumping or Sticky Jumping. These are useful spots, as they give a great height advantage and a view of the entire area.
- The Bridges - Once the timer has ticked the control point will open and bridges will extend out so that it is reachable. There are three bridges, one on each side in front of each team's spawn, and one far bridge in the center between the spawns.
- Flank Building - The flank building is one of the buildings on the perimeter. It is mostly blue colored and has no bridge connecting to the point from it, but has a bridge connecting to the catwalks below the point.
- Access Building - Directly across from the flank building is the access building. It is entered from each team's side by a set of staircases and in its center are two sets of staircases which lead down to the central bridge of the point. On each side there are entrances to balconies which overlook most of the area.
See also: Category:Nucleus images
Helpful overview
1.Perimiter
2.Roofs
3.Bridges (Not shown here as they have not yet appeared)
4.Flank Buildings
5.Access Buildings
Strategy
Main article: Community Nucleus (Arena) strategy
 | “Sun Tzu's got nothing on us!” This map's Community strategy page is a stub. As such, it is not complete. You can help the Team Fortress Wiki Community Strategy Project by expanding it. Notes: None added |
Control Point Timing
| Control Point | Multiplier | Seconds | ||
|---|---|---|---|---|
| Capture point | ×1 |
| ||
| ×2 |
| |||
| ×3 |
| |||
| ×4 |
|
Update history
May 21, 2009 Patch (Sniper vs. Spy Update)
- Added Nucleus (Arena) to the game.
- Fixed z-fighting bug on lower platform.
Bugs
- The Righteous Bison's and Pomson 6000's projectiles cannot pass through the control point area and simply disappear.
Trivia
- The particles seen around Nucleus's centerpiece are re-used from Portal's ending.
Notes
- It is possible to get behind the RED and BLU billboards by rocket jumping, sticky jumping, jumping using the Force-A-Nature, or jumping with the Atomizer.
- It is also possible to reach the two lights above the Access Building, but only through rocket jumping and sticky jumping.
See also
External links
| ||||||||||||||||||||||||||||||||


