Difference between revisions of "Banana Bay"
m (Auto: EnforceCapitalization(Payload), infoboxIndentFilter (Review RC#2265052)) |
m (Added links) |
||
| (78 intermediate revisions by 31 users not shown) | |||
| Line 1: | Line 1: | ||
| − | |||
| − | |||
{{Map infobox | {{Map infobox | ||
| − | | game-type | + | | map-status = community |
| − | | file-name | + | | map-game-type = Payload Race |
| + | | map-file-name = plr_bananabay | ||
| map-image = Bananabay main.jpg | | map-image = Bananabay main.jpg | ||
| − | | | + | | map-released = {{Patch name|10|20|2017}} |
| − | + | | map-released-major = Jungle Inferno Update | |
| − | | | ||
| map-environment = Jungle, tropical | | map-environment = Jungle, tropical | ||
| map-setting = Daylight, sunny | | map-setting = Daylight, sunny | ||
| − | | map-deep-water | + | | map-stamp-link = https://steamcommunity.com/stats/TF2/leaderboards/2240344 |
| − | | map-hazards = [[Train]]s | + | | map-has-deep-water = yes |
| − | | map-health | + | | map-hazards = [[Environmental death#Drowning|Drowning]], [[Train]]s,<br>[[Environmental death#Payload Cart explosion|Payload Cart explosion]] |
| − | | map-health | + | | map-pickups-health-small = 6 |
| − | | map-ammo | + | | map-pickups-health-medium = 8 |
| − | | map-ammo | + | | map-pickups-ammo-small = 2 |
| − | | map-ammo | + | | map-pickups-ammo-medium = 4 |
| + | | map-pickups-ammo-large = 2 | ||
}} | }} | ||
| − | |||
| − | + | {{Quotation|'''Publicity blurb'''|The antithesis of room-corridor-room syndrome.}} | |
| − | Banana Bay | + | '''Banana Bay''' is a [[Steam Workshop|community-created]], rotationally symmetric [[Payload#Payload Race|Payload Race]] map set in a tropical environment. |
| + | Each team must push its cart along overlapping loops around the map in order to reach its Finish Point, while simultaneously preventing the enemy team from doing the same, possibly facing the other team and its cart head-on on parallel tracks. There is no time limit; the round only finishes when one team reaches the Final Point and manages to hold the cart at the top of the exposed [[Payload#Inclined slope|inclined slope]] long enough for it to be hit by a passing [[Train]], akin to [[Cactus Canyon]]. | ||
| + | |||
| + | Banana Bay was released in the [[Jungle Inferno Update]]. | ||
| + | |||
| + | {{campaign pass map commission|Jungle Inferno}} | ||
| + | |||
| + | Banana Bay was [https://steamcommunity.com/sharedfiles/filedetails/?id=951657912 contributed] to the Steam Workshop. | ||
| + | |||
| + | == Locations == | ||
| + | {{HelpfulOverviewNote}}<br> | ||
| + | |||
| + | This unusual map has the teams competing in a three-dimensional [[w:Rabbit warren layout|rabbit warren]] that encourages flanking and ambushing. The [[RED]] and [[BLU]] Payload tracks trace identical figure-8 [[w:Model railroad layout#Track layout|point-to-point]] layouts. Two sections of [[w:Double-track railway|passing tracks]] have players on both teams potentially pushing and defending their own cart while simultaneously firing on enemy cart pushers. | ||
| + | |||
| + | * '''[[w:High line (disambiguation)|Highline]]''': The [[w:Banana|B.N.N.A.]] Railroad [[w:Main line (railway)|main line]] shoots a straight [[w:Viaduct|viaduct]] across loops of the Payload tracks. Periodically, a ridable banana [[Train]] runs across the Highline. A [[w:Train horn|diesel air horn]] and [[w:Level crossing|crossing bells]] warn of an approaching Train. Sets of four [[w:Railway signals#Colour light signals|searchlight-style railway signals]] on each of the three Highline bridges and inside each spawn indicate the direction that the approaching Train is running. | ||
| + | |||
| + | * '''Payload Tracks''': The rotational symmetry results in two perfectly identical Payload track layouts: | ||
| + | ** '''Start Point''': The Start Point is in full sight of the spawn, set near the beach. | ||
| + | ** '''[[w:Subway|Subway]]''': This is a double-track passage between the two team Start Points at either end. | ||
| + | ** '''Syphon''': As the track passes the enemy Start Point, it drops underwater into an [[w:Siphon#Inverted siphon|inverted siphon]] cave, after which it completes a turn back to the Low Bridge. | ||
| + | ** '''Low Bridge''': This double-track bridge passes over the Subway and beneath the middle Highline bridge. | ||
| + | ** '''[[w:Ruling gradient|Incline]]''': The final segment of the track is a long push up multiple [[Payload#Inclined slope|inclined slopes]], passing directly beneath the exits of the enemy's spawn. A flank tunnel passes beneath the Incline between two sets of Health and Ammo Pickups. | ||
| + | ** '''Finish Point''': The Finish Point is a short rollback zone onto the Highline tracks. The team must hold the cart there in that exposed position for the Train to hit and end the round. | ||
| + | |||
| + | <gallery widths=160px heights=90px> | ||
| + | File:Plr_bananabay_BLU_start.png|BLU's start point as viewed from the dock. | ||
| + | File:Plr_bananabay_subway.png|RED's side of the Subway. | ||
| + | File:Plr_bananabay_flank.png|One of the ends of a Syphon area. | ||
| + | File:Plr_bananabay_lowbridge.png|An upper view of the Low Bridge. | ||
| + | File:Plr bananabay syphon.png|The entrance to the syphon on RED side. | ||
| + | File:Plr_bananabay_tunnel.png|The flank tunnel under the Incline. | ||
| + | File:Plr_bananabay_finish.png|The finish point for BLU. | ||
| + | </gallery> | ||
| + | |||
| + | * '''[[w:Train station|Stations]]''': The team spawns are located in railroad stations perched high on cliffs at opposite ends of the map. Each spawn has three exit gates to choose From, right to left; | ||
| + | ** [[w:Railway platform|'''Platform''']]: This side exit crosses the Train track between two gates to the [[w:Footbridge#Catwalk|'''Catwalk''']]. Players can "beat the train" through the left gate when it opens or they can easily [[w:Freighthopping|hop the freight]], largely unseen, to ambush the enemy on [[wikt:down the line|down the line]]. | ||
| + | ** '''Deck''': The deck has a straight shot down the Highline at the enemy spawn. It also commands the team's Start Point and the enemy's Final Point, but its view of much of the lower enemy Incline is obstructed by the Highline's girder bridge. Players can jump from the Deck to the Train tracks; this is the shortest route to the Final Points. | ||
| + | ** '''[[w:Sally port|Sally Port]]''': The lower gate from Spawn gives a more hidden exit towards the beach over the dock and the team's Start Point. A crate and leaning pallet are near the gate that can be hopped by even by a flanking enemy [[Heavy]] to get up onto the Deck. | ||
| + | |||
| + | <gallery widths=160px heights=90px> | ||
| + | File:Plr_bananabay_RED_platform.png|The Platform on RED's side. | ||
| + | File:Plr_bananabay_RED_sally_port.png|The Sally Sort near RED's side. | ||
| + | File:Plr bananabay RED dock.png|The dock right near RED's sally port. | ||
| + | File:Plr_bananabay_BLU_deck.png|The deck outside BLU spawn. | ||
| + | </gallery> | ||
| + | |||
| + | * '''Bays''': In contrast to the confines of the core of the map, either side of the map has a large open stretch of deep water and two beaches divided by a jutting cliff. Each Bay provides a swimming, jumping, or flying flank from the team's Deck to its Incline. | ||
| + | ** '''RED Bay''': This bay is visible from the windows in RED Spawn. A high, dark-red cliff divides the beaches where BLU's Start Point and Incline are located. | ||
| + | ** '''BLU Bay''': This bay is visible from the windows in BLU's spawn. A high, dark-blue cliff divides the beaches where RED's Start Point and Incline are located. A double-volcano island is visible beyond the bay that resembles [[Mercenary Park (map)|Mercenary Park]].<!-- The beast cage elevator tower seems to be inside a second extinct (non-smoking) unmodeled volcano that should stand a short distance beyond the smoking one. --> | ||
| + | |||
| + | <gallery widths=160px heights=90px> | ||
| + | File:Plr_bananabay_RED_bay.png|The bay on RED's side. | ||
| + | File:Plr_bananabay_BLU_bay.png|The bay on BLU's side. | ||
| + | File:Plr_bananabay_BLU_window.png|The double-volcano island as seen from BLU's spawn. | ||
| + | </gallery> | ||
| + | |||
| + | == Helpful overview == | ||
| + | [[File:Banana Bay overview with lines.png|725px|left|Banana Bay's locations]] | ||
| + | <big>1.Highline | ||
| + | 2.Incline | ||
| + | 3.Platform | ||
| + | 4.Deck | ||
| + | 5.Sally Port | ||
| + | 6.Docks | ||
| + | 7.Start point | ||
| + | 8.Siphon | ||
| + | |||
| + | Red diagonal lines: Red spawn | ||
| + | Blu diagonal lines: Blu spawn | ||
| + | |||
| + | Red circle: Part of the Highline with the Low Bridge and the Subway underneath it | ||
| + | Pink circle: Red finish point | ||
| + | Green circle: Blu finish point</big> | ||
| + | |||
| + | {{clr}} | ||
== Strategy == | == Strategy == | ||
{{main|Community Banana Bay strategy}} | {{main|Community Banana Bay strategy}} | ||
| Line 38: | Line 110: | ||
* Increased murkiness of water | * Increased murkiness of water | ||
* Added advertisement for a brand new ice cream flavor | * Added advertisement for a brand new ice cream flavor | ||
| − | * Displacement touchups | + | * [[vdc:Displacement|Displacement]] touchups |
'''Aug 14 @ 7:30am / rc3''' | '''Aug 14 @ 7:30am / rc3''' | ||
* Matched and shortened final rollback zones | * Matched and shortened final rollback zones | ||
| − | * Minorly overhauled | + | * Minorly overhauled [[vdc:Soundscape|soundscape]]s |
* Marked my territory | * Marked my territory | ||
| Line 56: | Line 128: | ||
* Improved beach details | * Improved beach details | ||
* Touched up displacements | * Touched up displacements | ||
| − | * Updated train | + | * Updated train [[vdc:3D model|model]]s |
* Changed train sounds | * Changed train sounds | ||
* Implemented cart sparks when brushing against train | * Implemented cart sparks when brushing against train | ||
| Line 97: | Line 169: | ||
'''Jun 21 @ 1:41am''' | '''Jun 21 @ 1:41am''' | ||
}} | }} | ||
| + | |||
| + | == Update history == | ||
| + | '''{{Patch name|10|20|2017}} #1''' ([[Jungle Inferno Update]]) | ||
| + | * Added Banana Bay to the game. | ||
| + | |||
| + | '''{{Patch name|11|17|2017}}''' | ||
| + | * The train will now pass at its maximum frequency after both payloads make it up the large hill. | ||
| + | * Fixed players getting pushed into the underwater tunnel and ceiling over right spawn exit. | ||
| + | * Fixed spawn gates trapping enemy players. | ||
| + | * Amplified train engine sound. | ||
| + | * Reworked left spawn exit. | ||
| + | * Added small barrier near final cap. | ||
| + | * Improved performance in some areas. | ||
| + | * Reduced push force near outer rocks. | ||
| + | |||
| + | == Bugs == | ||
| + | * By placing themselves between the barrier near the gates and the train, players can clip into the roof.<ref>[https://youtu.be/fIetC1C8wV4 Video example.]</ref> | ||
| + | * Players can see through the shipping containers on the train if they get close enough to them while on the train. | ||
| + | * [[ÜberCharge|Übered]] players phase through the train if they get trapped in-between the shipping containers and the train entry gate. | ||
| + | * Sometimes white boxes constantly appear and disappear near the player.<ref>[https://steamuserimages-a.akamaihd.net/ugc/862863172262275925/A668E62D785EED6B38FCBB5747073A39FD4C29F7/ Community-taken screenshot]</ref> | ||
| + | |||
| + | == Trivia == | ||
| + | * Underneath the BLU spawn is a summoning circle for [[Non-player characters#Poopy Joe|Poopy Joe]] made up of toxic waste, candles, and a large collection of bananas. | ||
| + | * Underneath the RED spawn are two conveyor belts for converting dozens of bananas into [[Australium]] bars. | ||
| + | * "Cool beans" are hidden in a number of places around the map: | ||
| + | ** Watching television on the desk to the side of BLU Spawn. | ||
| + | ** Next to a banana under the steel bridge. | ||
| + | ** Sitting on a rope on the BLU dock. | ||
| + | * There are inaccessible rooms across from each team's spawn, housing their own secrets. Both rooms feature a wall safe, and below them are the previously-mentioned underground rooms. | ||
| + | ** On RED, this room houses its wall safe as well as the [[Doomsday]] Australium briefcase. | ||
| + | ** On BLU, this room houses the aforementioned "Cool beans", its wall safe, and a Poopy Joe hat. | ||
| + | *** The wall safe in RED spawn contains a black mineral cube and two [[Australium]] bars. | ||
| + | *** The wall safe in BLU spawn contains a [[Saxxy]], a banana peel, and three bottles of turquoise-colored liquid. | ||
| + | * In spite of being represented on this map as a [[w:Steam locomotive|steam locomotive]], that is, with steam exhaust sounds, billowing smoke clouds from the exhaust pipe, and light steam whistle calls when crossing the capture points<!-- regular modern diesel air chimes are sounded at other times -->, the B.N.N.A. 064 locomotive ([[Thunder Mountain#ADME105|A.D.M.E. 105]] on earlier maps) is in fact a 1937 [[w:Diesel locomotive|diesel locomotive]] with [[w:Coupling rod|side-rods]]. | ||
| + | * The map thumbnail has a face drawn underneath it that is not normally visible. | ||
| + | |||
| + | == Gallery == | ||
| + | <gallery> | ||
| + | File:Bananabaypoopyjoe.png|The summoning circle hidden below BLU spawn''. | ||
| + | File:Plr_bananabay_poopy_joe_closeup.png|Close up of Poopy Joe's portrait''. | ||
| + | File:Plr bananabay hat.jpg|A Poopy Joe hat. | ||
| + | File:Plr_bananabay_red_conveyor.png|The two conveyor belts hidden below RED spawn''. | ||
| + | File:Plr_bananabay_cool_beans_tv.png|"Cool beans" watching TV on the desk in BLU spawn''. | ||
| + | File:Plr_bananabay_cool_beans_dock.png|"Cool beans" sitting on a pile of rope on BLU dock''. | ||
| + | File:Plr_bananabay_cool_beans_bridge.png|"Cool beans" with the banana peel under the bridge''. | ||
| + | File:Plr_bananabay_BLU_wallsafe.png|The wall safe in BLU spawn. | ||
| + | File:Plr_bananabay_RED_wallsafe.png|The wall safe in RED spawn. | ||
| + | File:Plr_bananabay_akiraelevator.jpg|The [[w:Inclined elevator|inclined elevator]] featured in both spawns. | ||
| + | File:Plr bananabay_weapon.jpg|The Australium briefcase from Doomsday. | ||
| + | File:Menu thumb plr bananabay.png|The menu thumbnail for banana bay, with the face visible. | ||
| + | File:Banana Bay Workshop image.jpg|Steam Workshop thumbnail for Banana Bay. | ||
| + | </gallery> | ||
| + | |||
| + | == References == | ||
| + | <references/> | ||
{{Jungle Inferno Update Nav}} | {{Jungle Inferno Update Nav}} | ||
{{Maps Nav}} | {{Maps Nav}} | ||
Latest revision as of 21:29, 31 December 2024
| Banana Bay | |
|---|---|

| |
| Basic Information | |
| Map type: | Payload Race |
| File name: | plr_bananabay
|
| Released: | October 20, 2017 Patch (Jungle Inferno Update) |
| Developer(s): | Neal "Blade x64" Smart Jennifer "NeoDement" Burnett PEAR Stiffy360 Fuzzymellow Aeon "Void" Bollig Freyja |
| Map Info | |
| Environment: | Jungle, tropical |
| Setting: | Daylight, sunny |
| Hazards: | Drowning, Trains, Payload Cart explosion |
| Deep Water: | Yes |
| Map Items | |
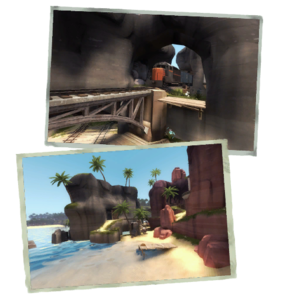
| Map Photos | |
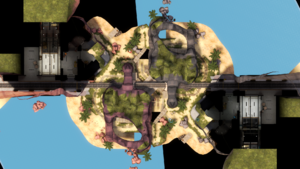
| Map Overview | |
| “ | The antithesis of room-corridor-room syndrome.
— Publicity blurb
|
” |
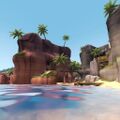
Banana Bay is a community-created, rotationally symmetric Payload Race map set in a tropical environment.
Each team must push its cart along overlapping loops around the map in order to reach its Finish Point, while simultaneously preventing the enemy team from doing the same, possibly facing the other team and its cart head-on on parallel tracks. There is no time limit; the round only finishes when one team reaches the Final Point and manages to hold the cart at the top of the exposed inclined slope long enough for it to be hit by a passing Train, akin to Cactus Canyon.
Banana Bay was released in the Jungle Inferno Update.
A portion of the money made from the sales of the Jungle Inferno Campaign Pass goes to the authors of the map.
Banana Bay was contributed to the Steam Workshop.
Contents
Locations
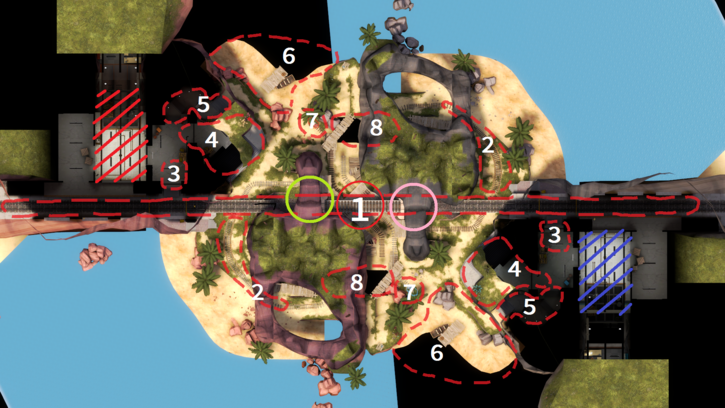
Note: If you are having trouble with finding the locations listed here, see the Helpful overview section to see their exact position marked on the map.
This unusual map has the teams competing in a three-dimensional rabbit warren that encourages flanking and ambushing. The RED and BLU Payload tracks trace identical figure-8 point-to-point layouts. Two sections of passing tracks have players on both teams potentially pushing and defending their own cart while simultaneously firing on enemy cart pushers.
- Highline: The B.N.N.A. Railroad main line shoots a straight viaduct across loops of the Payload tracks. Periodically, a ridable banana Train runs across the Highline. A diesel air horn and crossing bells warn of an approaching Train. Sets of four searchlight-style railway signals on each of the three Highline bridges and inside each spawn indicate the direction that the approaching Train is running.
- Payload Tracks: The rotational symmetry results in two perfectly identical Payload track layouts:
- Start Point: The Start Point is in full sight of the spawn, set near the beach.
- Subway: This is a double-track passage between the two team Start Points at either end.
- Syphon: As the track passes the enemy Start Point, it drops underwater into an inverted siphon cave, after which it completes a turn back to the Low Bridge.
- Low Bridge: This double-track bridge passes over the Subway and beneath the middle Highline bridge.
- Incline: The final segment of the track is a long push up multiple inclined slopes, passing directly beneath the exits of the enemy's spawn. A flank tunnel passes beneath the Incline between two sets of Health and Ammo Pickups.
- Finish Point: The Finish Point is a short rollback zone onto the Highline tracks. The team must hold the cart there in that exposed position for the Train to hit and end the round.
- Stations: The team spawns are located in railroad stations perched high on cliffs at opposite ends of the map. Each spawn has three exit gates to choose From, right to left;
- Platform: This side exit crosses the Train track between two gates to the Catwalk. Players can "beat the train" through the left gate when it opens or they can easily hop the freight, largely unseen, to ambush the enemy on down the line.
- Deck: The deck has a straight shot down the Highline at the enemy spawn. It also commands the team's Start Point and the enemy's Final Point, but its view of much of the lower enemy Incline is obstructed by the Highline's girder bridge. Players can jump from the Deck to the Train tracks; this is the shortest route to the Final Points.
- Sally Port: The lower gate from Spawn gives a more hidden exit towards the beach over the dock and the team's Start Point. A crate and leaning pallet are near the gate that can be hopped by even by a flanking enemy Heavy to get up onto the Deck.
- Bays: In contrast to the confines of the core of the map, either side of the map has a large open stretch of deep water and two beaches divided by a jutting cliff. Each Bay provides a swimming, jumping, or flying flank from the team's Deck to its Incline.
- RED Bay: This bay is visible from the windows in RED Spawn. A high, dark-red cliff divides the beaches where BLU's Start Point and Incline are located.
- BLU Bay: This bay is visible from the windows in BLU's spawn. A high, dark-blue cliff divides the beaches where RED's Start Point and Incline are located. A double-volcano island is visible beyond the bay that resembles Mercenary Park.
Helpful overview
1.Highline
2.Incline
3.Platform
4.Deck
5.Sally Port
6.Docks
7.Start point
8.Siphon

Red diagonal lines: Red spawn
Blu diagonal lines: Blu spawn
Red circle: Part of the Highline with the Low Bridge and the Subway underneath it
Pink circle: Red finish point
Green circle: Blu finish point
Strategy
Changelog
- Fixed a few clip issues
- Fixed shadows poking through places they shouldn't have poked
- Made train appoarching(sic) signals more noticable(sic)
- Cut down train crossing ambient_generics from 4 to 3 active at once, let's hope I don't have to cut it to 2
- Made rock arch paths less fragile looking
- Cool beans
- Increased murkiness of water
- Added advertisement for a brand new ice cream flavor
- Displacement touchups
Aug 14 @ 7:30am / rc3
- Matched and shortened final rollback zones
- Minorly overhauled soundscapes
- Marked my territory
Aug 11 @ 12:20am
- I probably forgot to pack something
Aug 11 @ 11:33am / rc2
- Fixed a clipping issue over the battlements
- Fixed train stuck spot
- Reduced bloom
- Overhauled soundscapes
- Improved horizon details
- Improved beach details
- Touched up displacements
- Updated train models
- Changed train sounds
- Implemented cart sparks when brushing against train
Jul 4 @ 4:44am
- Added bananas
- Added signals around track to indicate direction train is approaching
- Made a few detail improvements
Jul 3 @ 7:17am
- Illuminated area under bridge
- Further detailed spawns
- Fixed spawnrooms only partially being covered by spawnroom volume
- Extended rollback zones for final cap to avoid constant warning sounds
- Touched up out of bounds detailing
- Added some clips around train path to prevent some cases of players getting stuck
- Train now slows down after hitting the payload
Jun 30 @ 10:04am
- Added pretty flowers
- Detailed spawns
- Replaced two boxcards with flatbeds
- Made payload explode properly
Jun 24 @ 7:55pm
- Optimized somewhat
- Clipped some edges to prevent getting caught running backwards or shoved into walls by the payload
- Fixed Red team winning on Blu cap (hopefully)
- Added way to jump back up to right spawn exit
- Widened area around cap to prevent getting stuck and allow moving around the cart
- Added dock
- Added push triggers to palm tops
Jun 21 @ 8:37pm
- Packed missing underwater texture
- Adjusted texturing of the arch
- Patched a few seams
- Brightened the battlements
Jun 21 @ 1:41am
Update history
October 20, 2017 Patch #1 (Jungle Inferno Update)
- Added Banana Bay to the game.
- The train will now pass at its maximum frequency after both payloads make it up the large hill.
- Fixed players getting pushed into the underwater tunnel and ceiling over right spawn exit.
- Fixed spawn gates trapping enemy players.
- Amplified train engine sound.
- Reworked left spawn exit.
- Added small barrier near final cap.
- Improved performance in some areas.
- Reduced push force near outer rocks.
Bugs
- By placing themselves between the barrier near the gates and the train, players can clip into the roof.[1]
- Players can see through the shipping containers on the train if they get close enough to them while on the train.
- Übered players phase through the train if they get trapped in-between the shipping containers and the train entry gate.
- Sometimes white boxes constantly appear and disappear near the player.[2]
Trivia
- Underneath the BLU spawn is a summoning circle for Poopy Joe made up of toxic waste, candles, and a large collection of bananas.
- Underneath the RED spawn are two conveyor belts for converting dozens of bananas into Australium bars.
- "Cool beans" are hidden in a number of places around the map:
- Watching television on the desk to the side of BLU Spawn.
- Next to a banana under the steel bridge.
- Sitting on a rope on the BLU dock.
- There are inaccessible rooms across from each team's spawn, housing their own secrets. Both rooms feature a wall safe, and below them are the previously-mentioned underground rooms.
- On RED, this room houses its wall safe as well as the Doomsday Australium briefcase.
- On BLU, this room houses the aforementioned "Cool beans", its wall safe, and a Poopy Joe hat.
- The wall safe in RED spawn contains a black mineral cube and two Australium bars.
- The wall safe in BLU spawn contains a Saxxy, a banana peel, and three bottles of turquoise-colored liquid.
- In spite of being represented on this map as a steam locomotive, that is, with steam exhaust sounds, billowing smoke clouds from the exhaust pipe, and light steam whistle calls when crossing the capture points, the B.N.N.A. 064 locomotive (A.D.M.E. 105 on earlier maps) is in fact a 1937 diesel locomotive with side-rods.
- The map thumbnail has a face drawn underneath it that is not normally visible.
Gallery
The inclined elevator featured in both spawns.
References
| ||||||||||||||||||||||||||||||||||||||||||||||||||||
