Difference between revisions of "Laughter"
Nagykaland1 (talk | contribs) (→Gallery) |
m |
||
| (94 intermediate revisions by 34 users not shown) | |||
| Line 1: | Line 1: | ||
| − | |||
| − | |||
{{Map infobox | {{Map infobox | ||
| − | | game-type | + | | map-status = community |
| − | | file-name | + | | map-game-type = King of the Hill |
| − | | map-image = Laughter main. | + | | map-file-name = koth_slaughter_event |
| − | | | + | | map-image = Laughter main.png |
| − | + | | map-released = {{Patch name|10|10|2019}} | |
| − | | | + | | map-released-major = Scream Fortress 2019 |
| map-environment = Carnival / Halloween | | map-environment = Carnival / Halloween | ||
| map-setting = Night | | map-setting = Night | ||
| − | | map-hazards = [[Environmental death#Crocodiles|Crocodiles]], <br>[[ | + | | map-hazards = [[Environmental death#Crocodiles|Crocodiles]], [[Environmental death#Dynamite Balloons|Dynamite Balloons]] |
| − | | map-stamp-link = | + | | map-hazards-underworld = [[Environmental death#Health_drain|Health drain]], [[Environmental death#Bomb Head|Bomb Head]],<br/>[[Pitfall]]s <small>(only in certain rooms)</small> |
| − | | map-health | + | | map-stamp-link = https://steamcommunity.com/stats/TF2/leaderboards/3833395 |
| − | | map-health | + | | map-pickups-health-small = 6 |
| − | | map | + | | map-pickups-health-medium = 7 |
| − | + | | map-pickups-ammo-small = 6 | |
| − | | map-ammo | + | | map-pickups-ammo-medium = 4 |
| − | | map-ammo | + | | map-pickups-ammo-large = 2 |
| − | | map-special- | + | | map-pickups-special-pumpkin = yes |
| + | | map-has-bots = yes | ||
}} | }} | ||
| − | |||
| − | |||
| − | Laughter | + | {{Quotation|'''Laughter''' publicity blurb|The ride never ends... no refunds!<br><br>Laughter is a fast-paced King of the Hill event map with a focus on chaos and interaction. With a handful of fully-functioning carnival games, exploding balloons, and an otherworldly Funhouse, there's something for everyone on the pier - after all, you can't spell Slaughter without... Laughter!}} |
| − | + | '''Laughter''' is a [[Steam Workshop|community-created]] [[King of the Hill]] map released during the [[Scream Fortress 2019]] update. It is set in the Laughing Tides Amusement Park and Boardwalk, a carnival built on a beach boardwalk. It is a [[Halloween map|Halloween version]] of the [[Custom maps|custom map]] [[Slaughter]]. | |
| − | |||
| − | |||
| − | |||
| − | |||
| − | |||
| − | |||
| − | |||
| − | |||
| − | |||
| − | |||
| − | |||
| − | + | Laughter was [https://steamcommunity.com/sharedfiles/filedetails/?id=1872236402 contributed] to the Steam Workshop. | |
| − | |||
| − | |||
== Locations == | == Locations == | ||
| + | {{HelpfulOverviewNote}} | ||
| − | + | * '''Spawn Area''': the teams spawn on opposite ends of the boardwalk. Each Spawn Area has two front doors side by side and one side door to the right, as well as a Shooting Gallery: Badlands Bandito for RED and Pirate's Plunder for BLU. Players who stand on the footprints on the ground and shoot the opposite team-colored targets until all the lights in the back are lit receive a [[Halloween pumpkin]]. | |
| − | * ''' | ||
| − | |||
| − | |||
| − | |||
| − | |||
| − | |||
| − | |||
| + | * '''Spawn Yard''': the area directly outside the Spawn Area, with four paths to take. On the RED side is the Bottle Buster and the Gift Shop; on the BLU side is the Pumpkin Smash and the Arcade. | ||
| + | ** The far left path takes players to either the Battlements or the exit of the opposite team's Tunnel and Conveyors. On the RED side are a queue area at the entrance and the Hall of Mirrors and Milk Toss in the lower area; on the BLU side are some bumper cars at the entrance and the Can-Can Ka-Blam and Bananarama in the lower area. | ||
| + | ** The middle left path is an S-shaped corridor with an exit protected by a glass window, from where players can safely see the point's surroundings, and the shortest path to the point. On the RED side is the Robotic Sideshow, where players can hit a mechanical [[Merasmus]] head for a misfortune telling; on the BLU side are the Real Live Crocodiles. | ||
| + | ** The middle right path is a simple turn that leads directly to the front of the entrance to the Conveyors. | ||
| + | ** The far right path is a straight corridor that leads to the team's Tunnel. | ||
| + | * '''Battlements''': a small perch overseeing the entire control point area. | ||
| − | + | * '''Covered Exit''': the exit of the far left path is protected by a curved wooden wall, and offers quick and easy access to the other team's Tunnel and Conveyors. | |
| − | |||
| − | |||
| − | |||
| − | |||
| − | |||
| − | |||
| − | ;BLU | + | * '''Tunnel''': a long and curved passage around the point that leads to the other team's side of the map. RED's Tunnel is the Log Chute of Love; BLU's Tunnel is the Monster Basher. |
| − | * ''' | + | * '''Conveyors''': each team has a building on one side of the point with an accessible second floor, which consists of two rooms with windows overseeing the point connected by a catwalk over two conveyors that toss any players that get on them onto the point. RED's building is the Sawmill of Love; BLU's building is the Mad Manor. |
| − | |||
| − | |||
| − | |||
| + | * '''Control Point''': the Control Point sits on a broken section of some train tracks, which are a bit higher than the surrounding area. Holes on the tracks drop players onto the [[Environmental death#Crocodiles|crocodile]]-infested waters below the boardwalk, and the doors at the ends open periodically, granting access to the Underworld. | ||
| + | * '''Underpass''': a passage beneath the point connecting the two sides of the map. | ||
<gallery> | <gallery> | ||
| − | File:Koth slaughter event | + | File:Koth slaughter event RED spawn.png|The inside of RED's spawn. |
| − | File: | + | File:Koth slaughter event BLU courtyard.png|The courtyard outside the BLU spawn. |
| − | File: | + | File:Koth slaughter event conveyor.png|The Control Point, as seen from the Conveyors. |
| − | File: | + | File:Koth slaughter event underpass.png|Underpass entrance on the RED side. |
| − | + | </gallery> | |
| − | </ | + | * {{anchor|Underworld|Funhouse}} '''Underworld''': a [[w:Funhouse|Funhouse]] made up of three rooms, which are randomly selected every time the doors are opened. The possible rooms are: |
| + | ** A room with slanted platforms and rings of fire in between them;<sup>†</sup> | ||
| + | ** A room that gets increasingly small, with the exit being so small players must crouch to fit through; | ||
| + | ** A room with bouncing pads that bounce with unusual direction and force;<sup>†</sup> | ||
| + | ** A room with several different doors in a hallway; | ||
| + | ** A twisted room; | ||
| + | ** A room with zig-zagging floors and ceilings; | ||
| + | ** A room with a conveyor belt moving backward;<sup>†</sup> | ||
| + | ** An upside-down room where players must climb on several mantles to exit; | ||
| + | ** A rotating room. | ||
| + | :<sup>†</sup><small>The room contains a [[Environmental death#Pitfalls|bottomless pit]], making it possible to die in it.</small> | ||
| + | |||
| + | :There is a small chance for the [[Bombinomicon (character)|Bombinomicon]] to place a bomb on the heads of players that stay inside it for too long. Exiting in the normal way removes the bomb. Players may not place [[buildings]] in these rooms. Stepping into the last portal instantly teleports the player back into the main map, granting invulnerability, a 200% [[overheal]], a speed boost, and a [[Critical hits|crit boost]] for a limited time. | ||
| − | |||
| − | |||
| − | |||
<gallery> | <gallery> | ||
| − | File: | + | File:Laughter under1.jpg|The rings of fire. |
| − | File: | + | File:Laughter under2.jpg|The shrinking room. |
| − | File: | + | File:Laughter under3.jpg|The bounce pads room. |
| + | File:Laughter under4.jpg|The room full of doors. | ||
| + | File:Laughter under5.jpg|The twisted room. | ||
| + | File:Laughter under6.jpg|The zig-zagged room. | ||
| + | File:Laughter under7.jpg|The conveyor belt room. | ||
| + | File:Laughter under8.jpg|The upside-down room. | ||
| + | File:Laughter under9.gif|The rotating room.<br><small><i>(Click on the image to view the animation.)</i></small> | ||
</gallery> | </gallery> | ||
| − | + | == Helpful overview == | |
| − | + | [[File:Laughter overview with lines.png|left|200px|Laughter's locations]] | |
| − | < | + | <big>1.Badlands Bandito/Pirate's Blunder |
| − | + | 2.Bottle Buster/Pumpkin Smash | |
| − | + | 3.Spawn Yard | |
| − | + | 4.Gift Shop/Arcade | |
| − | + | 5.Robotic Sideshow/Real Live Crocodiles | |
| − | + | 6.Stairs | |
| − | + | 7.Mike Toss/Hall of Mirrors | |
| + | 8.Balcony | ||
| + | 9.Sawmill of Love/Mad Mansion | ||
| + | |||
| + | Red diagonal lines: Red spawn | ||
| + | Blue diagonal lines: Blu spawn | ||
| + | Red circle: The Hill/Control point</big> | ||
| + | {{clr}} | ||
== Strategy == | == Strategy == | ||
| − | + | {{map strategy link|Laughter|main=yes|stub=yes}} | |
== Update history == | == Update history == | ||
| Line 107: | Line 106: | ||
'''{{Patch name|10|11|2019}}''' | '''{{Patch name|10|11|2019}}''' | ||
| − | + | * Fixed players being able to survive and build in the crocodile pit. | |
| − | + | * Fixed an issue with the conveyor in the Funhouse. | |
| − | + | ||
| + | '''{{Patch name|10|16|2019}}''' | ||
| + | * Fixed a spot where players could spam the Underworld exit effect. | ||
| + | * Fixed a sightline into the [[Respawn#Respawn|spawn room]]s. | ||
| + | * Fixed players being able to perch on flood lights. | ||
| + | * Implemented additional prop fades to increase performance. | ||
| + | |||
| + | '''{{Patch name|10|18|2019}}''' | ||
| + | * Fixed a server crash exploit with the Shooting Galleries. | ||
== Trivia == | == Trivia == | ||
| − | * A skull | + | * A [[Sledder's Sidekick]] wearing a Scout's headset can be found looking at a group of monitors within one the ending sections of the Underworld. |
| − | *A [[ | + | * Several skulls are hidden through the map: |
| − | + | ** One skull has a glowing blue eye and a [[Paka Parka]]'s collar, and can be found on the inaccessible pizza shop on the terrace behind the BLU spawn. | |
| − | + | ** A second skull is green and wears a BLU [[Pyromancer's Hood]], and can be found behind the Madd Manor building on the roof. | |
| − | ** | + | ** A third skull has red eyes and is tipping an [[Ebenezer]], and can be found in the queue area above the gift shop. |
| − | + | ** A fourth skull wears a [[Ye Olde Baker Boy]], and can be found on the platform to the Ferris wheel. | |
| − | * | + | ** A fifth skull has glowing red eyes and wears a blue [[Toadstool Topper]] with [[Grenadier Helm]]'s horns, and can be found behind the window on the upper floor of the RED tunnel. |
| − | * | + | * A [[Horseless Headless Horsemann]] animatronic can be found propped up against a [[Necro Smasher]] at the Pumpkin Smash attraction. Hitting it causes it to play various [[Halloween Boss voice responses#Previously unused responses|voice responses]]. |
| − | * | + | ** Another Horsemann animatronic can be found broken in a sewer tunnel below the RED spawn. Shooting it causes it to play various [[Demoman Robot]] voice responses. |
| − | * | + | * A skeleton wearing a BLU [[Foul Cowl]] can be found peeking out of a coffin in the Monster Basher. |
| − | * | + | * Outside the Tunnel of Love near RED spawn, two [[Archimedes]] doves can be found on the rails close to the rooftops, with the Cloud 9 [[Unusual]] effect over them. |
| − | * | + | * The [[Environmental death|crocodiles]] that swim underneath the control point each wear a team-colored [[Sydney Straw Boat]]. |
| + | * When touching the resupply locker, sometimes a yellow skeleton appears and utters a Boo!, though it does not put the player into a scared state. | ||
| − | == | + | == Gallery == |
| − | + | ; Attractions and shops | |
| + | <gallery> | ||
| + | File:Laughter badlands.jpg|Badlands Bandito. | ||
| + | File:Laughter pirate.jpg|Pirate's Plunder. | ||
| + | File:Laughter bottle.jpg|Bottle Buster. | ||
| + | File:Laughter pumpkin.jpg|Pumpkin Smash. | ||
| + | File:Laughter arcade.jpg|Arcade. | ||
| + | File:Laughter ride.jpg|Log Chute of Love. | ||
| + | File:Laughter monster.jpg|Monster Basher. | ||
| + | File:Koth slaughter event jelbertson.png|J. Elbertson's Robotic Sideshow. | ||
| + | File:Laughter gift.jpg|Gift Shop. | ||
| + | File:Koth slaughter event vinny.png|Vinny's Water Ice. | ||
| + | </gallery> | ||
| − | + | ; Hidden skulls | |
<gallery> | <gallery> | ||
| − | + | File:Koth slaughter event joel.png|Skull on the log chute loading area. | |
| − | + | File:Koth slaughter event skull.png|Skull behind BLU spawn. | |
| − | + | File:Laughter skele1.jpg|Skull in the queue<!-- queue is a line --> above the Gift Shop. | |
| − | + | File:Laughter skele2.jpg|Skull on the roof of Mad Manor. | |
| − | + | File:Laughter skele3.jpg|Skull at the base of the Ferris wheel. | |
| − | + | </gallery> | |
| − | File:Koth slaughter event joel.png| | ||
| − | |||
| − | File:Koth slaughter event | ||
| − | File: | ||
| − | |||
| − | |||
| − | |||
| − | File: | ||
| − | File:Laughter | ||
| + | ; Other | ||
| + | <gallery> | ||
| + | File:Laughter overview.jpg|Overview of the map. | ||
| + | File:Pumpkinbomb laughter.png|[[Environmental death#Dynamite Balloons|Dynamite Balloons]]. | ||
| + | File:Koth slaughter event croc.png|[[Environmental death#Crocodiles|Crocodile]]. | ||
| + | File:Laughter outside.jpg|Beach under the pier and city skyline. | ||
| + | File:Koth slaughter event hhh.png|Broken [[Horseless Headless Horsemann|HHH]] animatronic under the RED spawn. | ||
| + | File:Koth slaughter event yeti cakes.jpg|thumb|Yeti Cakes poster in the Gift Shop. | ||
| + | File:Koth slaughter event merasmus.png|The [[Carnival of Carnage|misfortune teller]] ([[Merasmus]]) inside the Robotic Sideshow. | ||
| + | File:Koth slaughter event birds.jpg|Two birds seen with a Cloud 9 unusual effect. | ||
| + | File:Koth slaughter event bort.jpg|thumb|"BORT" license plates in the Gift Shop. | ||
| + | File:Laughter RE.jpg|"Dog ending" easter egg in the Funhouse. | ||
| + | File:Laughter Workshop image.jpg|Steam Workshop thumbnail for Laughter. | ||
</gallery> | </gallery> | ||
| + | |||
{{Scream Fortress 2019 Nav}} | {{Scream Fortress 2019 Nav}} | ||
{{Halloween Map Nav}} | {{Halloween Map Nav}} | ||
{{Maps Nav}} | {{Maps Nav}} | ||
Latest revision as of 22:09, 17 January 2024
| Laughter | |
|---|---|
| |
| Basic Information | |
| Map type: | King of the Hill |
| File name: | koth_slaughter_event
|
| Released: | October 10, 2019 Patch (Scream Fortress XI) |
| Developer(s): | Aeon "Void" Bollig Liam "Diva Dan" Moffitt Fuzzymellow Zoey Smith |
| Map Info | |
| Environment: | Carnival / Halloween |
| Setting: | Night |
| Hazards: | Crocodiles, Dynamite Balloons |
| Hazards (Underworld): | Health drain, Bomb Head, Pitfalls (only in certain rooms) |
| Bot support: | Yes |
| Map Items | |
| Map Photos | |
| Map Overview | |
| Map Stamp | |
| Supporters Leaderboard | |
| “ | The ride never ends... no refunds!
Laughter is a fast-paced King of the Hill event map with a focus on chaos and interaction. With a handful of fully-functioning carnival games, exploding balloons, and an otherworldly Funhouse, there's something for everyone on the pier - after all, you can't spell Slaughter without... Laughter! — Laughter publicity blurb
|
” |
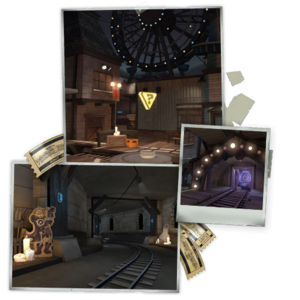
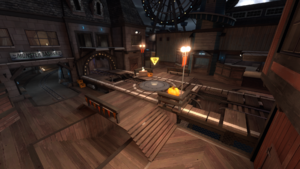
Laughter is a community-created King of the Hill map released during the Scream Fortress 2019 update. It is set in the Laughing Tides Amusement Park and Boardwalk, a carnival built on a beach boardwalk. It is a Halloween version of the custom map Slaughter.
Laughter was contributed to the Steam Workshop.
Locations
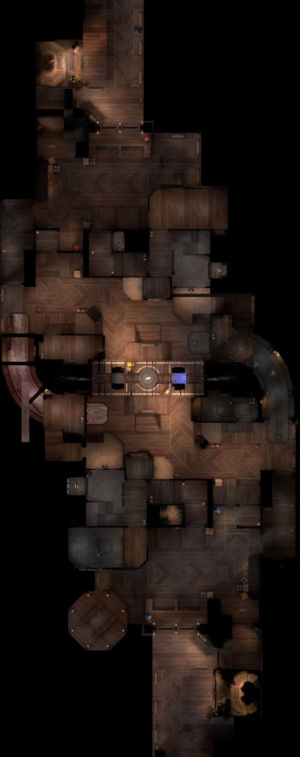
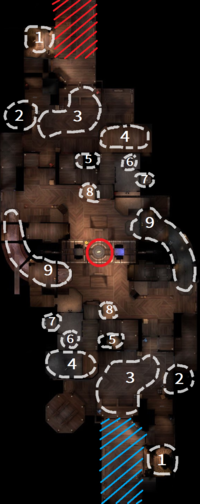
Note: If you are having trouble with finding the locations listed here, see the Helpful overview section to see their exact position marked on the map.
- Spawn Area: the teams spawn on opposite ends of the boardwalk. Each Spawn Area has two front doors side by side and one side door to the right, as well as a Shooting Gallery: Badlands Bandito for RED and Pirate's Plunder for BLU. Players who stand on the footprints on the ground and shoot the opposite team-colored targets until all the lights in the back are lit receive a Halloween pumpkin.
- Spawn Yard: the area directly outside the Spawn Area, with four paths to take. On the RED side is the Bottle Buster and the Gift Shop; on the BLU side is the Pumpkin Smash and the Arcade.
- The far left path takes players to either the Battlements or the exit of the opposite team's Tunnel and Conveyors. On the RED side are a queue area at the entrance and the Hall of Mirrors and Milk Toss in the lower area; on the BLU side are some bumper cars at the entrance and the Can-Can Ka-Blam and Bananarama in the lower area.
- The middle left path is an S-shaped corridor with an exit protected by a glass window, from where players can safely see the point's surroundings, and the shortest path to the point. On the RED side is the Robotic Sideshow, where players can hit a mechanical Merasmus head for a misfortune telling; on the BLU side are the Real Live Crocodiles.
- The middle right path is a simple turn that leads directly to the front of the entrance to the Conveyors.
- The far right path is a straight corridor that leads to the team's Tunnel.
- Battlements: a small perch overseeing the entire control point area.
- Covered Exit: the exit of the far left path is protected by a curved wooden wall, and offers quick and easy access to the other team's Tunnel and Conveyors.
- Tunnel: a long and curved passage around the point that leads to the other team's side of the map. RED's Tunnel is the Log Chute of Love; BLU's Tunnel is the Monster Basher.
- Conveyors: each team has a building on one side of the point with an accessible second floor, which consists of two rooms with windows overseeing the point connected by a catwalk over two conveyors that toss any players that get on them onto the point. RED's building is the Sawmill of Love; BLU's building is the Mad Manor.
- Control Point: the Control Point sits on a broken section of some train tracks, which are a bit higher than the surrounding area. Holes on the tracks drop players onto the crocodile-infested waters below the boardwalk, and the doors at the ends open periodically, granting access to the Underworld.
- Underpass: a passage beneath the point connecting the two sides of the map.
- Underworld: a Funhouse made up of three rooms, which are randomly selected every time the doors are opened. The possible rooms are:
- A room with slanted platforms and rings of fire in between them;†
- A room that gets increasingly small, with the exit being so small players must crouch to fit through;
- A room with bouncing pads that bounce with unusual direction and force;†
- A room with several different doors in a hallway;
- A twisted room;
- A room with zig-zagging floors and ceilings;
- A room with a conveyor belt moving backward;†
- An upside-down room where players must climb on several mantles to exit;
- A rotating room.
- †The room contains a bottomless pit, making it possible to die in it.
- There is a small chance for the Bombinomicon to place a bomb on the heads of players that stay inside it for too long. Exiting in the normal way removes the bomb. Players may not place buildings in these rooms. Stepping into the last portal instantly teleports the player back into the main map, granting invulnerability, a 200% overheal, a speed boost, and a crit boost for a limited time.
Helpful overview
1.Badlands Bandito/Pirate's Blunder
2.Bottle Buster/Pumpkin Smash
3.Spawn Yard
4.Gift Shop/Arcade
5.Robotic Sideshow/Real Live Crocodiles
6.Stairs
7.Mike Toss/Hall of Mirrors
8.Balcony
9.Sawmill of Love/Mad Mansion
Red diagonal lines: Red spawn
Blue diagonal lines: Blu spawn
Red circle: The Hill/Control point
Strategy
Main article: Community Laughter strategy
 | “Sun Tzu's got nothing on us!” This map's Community strategy page is a stub. As such, it is not complete. You can help the Team Fortress Wiki Community Strategy Project by expanding it. Notes: None added |
Update history
October 10, 2019 Patch (Scream Fortress 2019)
- Added Laughter to the game.
- Fixed players being able to survive and build in the crocodile pit.
- Fixed an issue with the conveyor in the Funhouse.
- Fixed a spot where players could spam the Underworld exit effect.
- Fixed a sightline into the spawn rooms.
- Fixed players being able to perch on flood lights.
- Implemented additional prop fades to increase performance.
- Fixed a server crash exploit with the Shooting Galleries.
Trivia
- A Sledder's Sidekick wearing a Scout's headset can be found looking at a group of monitors within one the ending sections of the Underworld.
- Several skulls are hidden through the map:
- One skull has a glowing blue eye and a Paka Parka's collar, and can be found on the inaccessible pizza shop on the terrace behind the BLU spawn.
- A second skull is green and wears a BLU Pyromancer's Hood, and can be found behind the Madd Manor building on the roof.
- A third skull has red eyes and is tipping an Ebenezer, and can be found in the queue area above the gift shop.
- A fourth skull wears a Ye Olde Baker Boy, and can be found on the platform to the Ferris wheel.
- A fifth skull has glowing red eyes and wears a blue Toadstool Topper with Grenadier Helm's horns, and can be found behind the window on the upper floor of the RED tunnel.
- A Horseless Headless Horsemann animatronic can be found propped up against a Necro Smasher at the Pumpkin Smash attraction. Hitting it causes it to play various voice responses.
- Another Horsemann animatronic can be found broken in a sewer tunnel below the RED spawn. Shooting it causes it to play various Demoman Robot voice responses.
- A skeleton wearing a BLU Foul Cowl can be found peeking out of a coffin in the Monster Basher.
- Outside the Tunnel of Love near RED spawn, two Archimedes doves can be found on the rails close to the rooftops, with the Cloud 9 Unusual effect over them.
- The crocodiles that swim underneath the control point each wear a team-colored Sydney Straw Boat.
- When touching the resupply locker, sometimes a yellow skeleton appears and utters a Boo!, though it does not put the player into a scared state.
Gallery
- Attractions and shops
- Hidden skulls
- Other
Broken HHH animatronic under the RED spawn.
The misfortune teller (Merasmus) inside the Robotic Sideshow.
| ||||||||||||||||||||||||||||||||||||||||||||||
| |||||||||||||||||||||||||||||||||||||||||||||||||||||||||||||||||||
