Moldergrove
| Moldergrove | |
|---|---|
| |
| Basic Information | |
| Developer(s): | Unknown |
| Map Info | |
| Environment: | Halloween |
| Setting: | Night |
| Hazards: | Pitfall, Pumpkin bombs. |
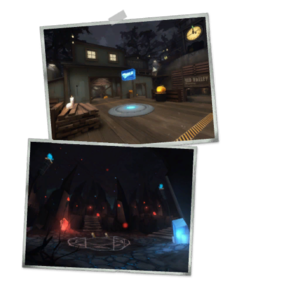
| Map Photos | |
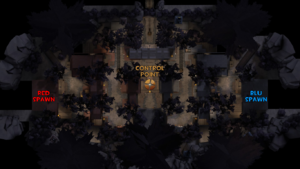
| Map Overview | |
| “ | Ah, the pristine wilderness: beloved home of unfettered wildlife, stalwart opponent of reckless human exploitation, immortal muse of the great Transcendentalists; in sum, a hardy testament to the limitless natural beauty of our world...
...until now! — Moldergrove publicity blurb
|
” |
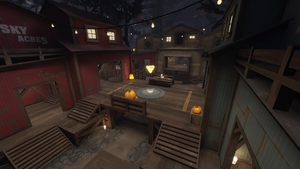
Moldergrove is a community-made Halloween-themed King of the Hill map with a symmetrical layout added in the Scream Fortress 2020 update. It is a Halloween-themed version of the custom map Undergrove.
Moldergrove was contributed to the Steam Workshop.
Locations
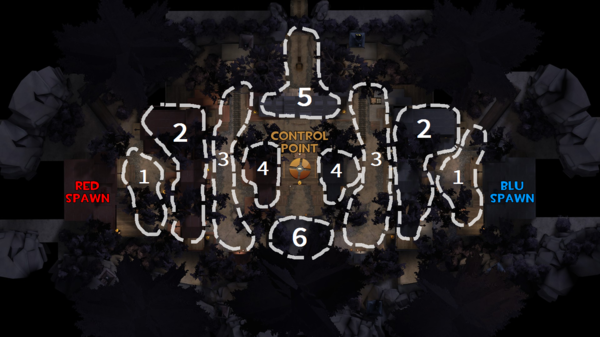
Note: If you are having trouble with finding the locations listed here, you can scroll down to the Helpful overview to see their exact position marked on the map.
The locations are described from RED's perspective from spawn to point, and are mirrored for BLU.
Spawn: A storeroom with two exits, a large and lower one to the left and a small and upper one to the right, and three resupply lockers, two in-between the exits and one on the left side of the back area.
Spawn Yard: The area just outside the spawn right before the Binksi Logging building. The right side is higher than the rest, connected by wide steps in-between spawn exits and a thin ramp a bit further.
Binksi Logging: The Binksi Logging building is split into three parts: left, middle, and right.
- The left part is a small corridor that starts with a right turn and then a few steps. At the end players can jump and drop down to the right or walk down to the left.
- The middle part has its entrance turned toward the left part. Players have to turn left and then go around a wall in its center.
- The right part is straight across the right spawn exit. It is a small corridor that begins with a right turn and then a U-turn to the left.
End of the Line: A long and narrow yard with a set of train tracks end to the left and an upper area accessible through a slope to the right. A medium ammo pack and health kit can be found between the Binksi Logging building's left and middle exits. Up the slope are a medium ammo pack and a small health kit. There are multiple routes players can take from here to the point.
Mine Pit: The Mine Pit building is right next to the train tracks and has two small entrances. An open window allows players to attack the point with relative cover, but also allows players on the point to attack incoming enemies. Up the steps and to the left is the Mine Pit, overlooked by a small ammo pack and health kit, and to the right is a slightly raised view of the point.
Players can go in-between the Mine Pit building and the Central Building through two wooden walls to the point, but it leaves them at a lower level compared to the point.
Central Building: The Central Building is split into two parts, the main one and the side one. The main one has a sheltered wooden entrance with a view of the point, blocked by a fence that players need to go around, and takes players straight to it. The side one, with the Cornhell sign (replaced on the BLU side with a Binder's Candy ad) is a very short corridor with a right turn, a left U-turn and another right turn that ends at one of the stairs to the point.
Wooden Platform: Accessible through a ramp right next to the Red Valley Mourning "No trespassing" entrance, it grants a clear overview of the control point's area. Scouts can easily double-jump from one platform to the other in order to reach the enemy side of the map.
Red Valley Mourning: A small underground room players can drop into that houses a small ammo pack and health kit. Classes with advanced jumping techniques can jump up the drop and onto the opposing side of the map.
Control Point: The control point sits on a wooden bridge that connects the main exits of the Central Buildings, with a small guardrail on either side. Two ramps on the Mine Pit side connect it to the ground and two stairs connect it to the side parts of the Central Buildings. Beneath it is a thin wooden plank with a medium health kit over a demonic pit.
Underworld: Once a team captures the control point, portals to the Underworld appear, where a 3v3 battle ensues. The Underworld consists of several islands floating over an abyss; three big ones where players spawn in connected to each other and four small, disconnected ones on either side, and a big, central one with two medium health kits on a summoning circle and two small ones with a medium ammo pack each. The big central island is connected to both small central islands and the middle big islands for each team.
Winning the 3v3 battle grants the winning players (who are returned to the normal map right after the victory) and all their teammates a crit boost for several seconds. The battle is timed, ending in a stalemate if time runs out even if one team has a numerical advantage over the other. Players can not attack enemies in the Underworld until the 3v3 battle has started.
After three players in a team have entered the Underworld, no more teammates may enter; players who attempt to do so are not transported. If not enough players join the 3v3 battle in time, those who joined are sent back to the End of the Line on their respective sides of the map with a speed boost.
The Underworld.
Helpful overview
1.Spawn Yard
2.Blinski Logging
3.End of the Line
4.Central Building
5.Mine Pit
6.Red Valley Mountain
Strategy
 | “Sun Tzu's got nothing on us!” This map's Community strategy page is a stub. As such, it is not complete. You can help the Team Fortress Wiki Community Strategy Project by expanding it. Notes: None added |
Update history
October 1, 2020 Patch (Scream Fortress 2020)
- Added Moldergrove to the game.
- 3v3 participants will now be healed and extinguished upon entering a 3v3 portal, in addition to when the 3v3 begins and ends.
- Reduced the delay after winning a 3v3 before players are teleported back to the overworld.
- Fixed Wrap Assassin/Pomson 6000 projectiles not firing correctly in the indoor areas.
- Polished clipping around the capture point.
- Polished some textures on RED's side.
- Fixed several console errors that appeared upon map load.
- Minor lighting fixes.
Gallery
| |||||||||||||||||||
| ||||||||||||||||||||||||||||||||||||||||||||||
