Difference between revisions of "Pit of Death"
m |
m (Removed 'stub' notice, some interesting features and areas were added in earlier revisions) |
||
| (57 intermediate revisions by 27 users not shown) | |||
| Line 1: | Line 1: | ||
| − | |||
{{Map infobox | {{Map infobox | ||
| − | | game-type | + | | map-status = community |
| − | | file-name | + | | map-game-type = Player Destruction |
| − | | map-image | + | | map-file-name = pd_pit_of_death_event |
| − | | | + | | map-image = Pd pit of death event.png |
| − | | | + | | map-released = {{Patch name|10|21|2016}} |
| − | |map-environment = Halloween | + | | map-released-major = Scream Fortress 2016 |
| − | |map-setting = Nighttime, overcast | + | | map-environment = Halloween |
| − | | map-hazards = [[Environmental death#Pitfalls|Pitfall]], [[Pumpkin bomb]]s | + | | map-setting = Nighttime, overcast |
| − | | map- | + | | map-stamp-link = https://steamcommunity.com/stats/TF2/leaderboards/1491253 |
| − | | map- | + | | map-hazards = [[Environmental death#Pitfalls|Pitfall]], [[Pumpkin bomb]]s |
| − | | map-health | + | | map-hazards-underworld = [[Environmental_death#Deadly_waters|Stygian waters]], [[Environmental_death#Health_drain|Health drain]] |
| − | | map-health | + | | map-has-magic-spells = yes |
| − | | map-health | + | | map-pickups-health-small = 7 |
| − | | map-ammo | + | | map-pickups-health-medium = 6 |
| − | | map-ammo | + | | map-pickups-health-large = 1 |
| − | | map-ammo-pickups- | + | | map-pickups-ammo-small = 3 |
| + | | map-pickups-ammo-medium = 4 | ||
| + | | map-pickups-ammo-large = 3 | ||
| + | | map-pickups-special-sgg = yes | ||
| + | | map-pickups-special-pumpkin = yes | ||
}} | }} | ||
| − | |||
| − | '''Pit of Death | + | {{Quotation|'''The Scout''' drops into the Pit of Death at the wrong time, and then he accepts his fate.|(screaming) Holy crap, this goes on forever.|sound=Scout_sf12_falling03.wav}} |
| − | + | '''Pit of Death''' is a [[Steam Workshop|community-created]] [[Player Destruction]] map added in the [[Scream Fortress 2016]] update. | |
| − | + | In this map, both teams must collect the souls of dead players and deliver them for "sacrifice" in the front yard of the Underworld's house. A team wins upon sacrificing a certain number of souls, which varies depending on the number of players currently in the server. | |
| − | |||
| − | + | Pit of Death was [https://steamcommunity.com/sharedfiles/filedetails/?id=537319626 contributed] to the Steam Workshop. | |
| − | + | == Witching Hour == | |
| + | Every so often, the [[Witching Hour]] begins, causing [[magic spells]] to appear throughout the map and a portal to the [[Underworld]] to open above the Pit, which players must take in order to reach the delivery area and score points to win the match. A timer in the bottom center of the [[HUD]] shows how long until the next Witching Hour and its duration. The Witching Hour's beginning and end are also announced by an eerie tune; players near the Pit will feel the ground shake beneath them and might spot bats flying off from the giant skull when it starts. | ||
| − | + | == Locations == | |
| + | The map has a symmetrical layout for each team, designed around two paths to the side that flank one central location. These paths are displayed early, with the spawn courtyard branching into two distinct paths. Both sides have equal amounts of elevation change, and the map is dominated by the titular pit in the center. | ||
| + | |||
| + | === Courtyards === | ||
| + | This acts as the very first location for either team. Both sides split into two distinct halves, making up the side routes the map revolves around. | ||
| + | * '''Bridge Route''': A long, narrow building that lets players leave directly towards the center, off towards the broken bridge, or directly above the broken bridge route. | ||
| + | * '''Dock Route''': Players follow an underpass, greeted with the option of either taking one of the hallway routes or proceeding directly into the docks. | ||
| + | |||
| + | <gallery widths=140px heights=80px> | ||
| + | File:Pod bridgeroute.jpg|Leading to the bridge. | ||
| + | File:Pod underpass.jpg|Towards the docks. | ||
| + | </gallery> | ||
| + | |||
| + | === 01/02 Docks === | ||
| + | On one side of the map lies this large warehouse-esque building, noted for its many walls, high ceiling, and varying elevations. | ||
| + | * '''The Staircases''': To the immediate left or right of a player's entry lies a wooden staircase and a platform. From here, the player can either exit up towards the pit, can follow a side building back to either spawn, or can look down upon the rest of the room from their elevated position. | ||
| + | * '''Pit Access''': Splitting the room in half is a smaller interior, leading directly up towards the pit. | ||
| + | * '''Basement''': On the other side of the pit access is the lowest part of the room, featuring [[Pickups|health and ammo pickups]]. | ||
| + | * '''Ledges''': In the corners of the warehouse are two ledges, accessible only from the outside or from blast jumping. They are the highest point in the building, and are advantageous for ambushes. | ||
| + | |||
| + | <gallery widths=140px heights=80px> | ||
| + | File:Pod docks.jpg|The exterior of the loading docks. | ||
| + | File:Pod staircase.jpg|The staircases inside the room. | ||
| + | File:Pod access.jpg|The access to the pit. | ||
| + | File:Pod ledge.jpg|One of the ledges, supervising the building. | ||
| + | </gallery> | ||
| + | |||
| + | === Pit Flanks === | ||
| + | Near the docks are two hills that run underneath the pit. | ||
| + | * '''Hallway''': Connecting the spawns to the pit are tight hallways, complete with small health and ammo pickups. | ||
| + | * '''Rooftop''': Outside of the hallways, players are able to take staircases to the hallways' roofs, placing them slightly above the pit and from a considerable distance away. | ||
| + | * '''Flatgrounds''': Between the pit and the hallway roof is level ground, connecting both the ledges in the docks and the alternative flanking route. | ||
| + | |||
| + | <gallery widths=140px heights=80px> | ||
| + | File:Pod hill.jpg|An overview of the flanks. | ||
| + | File:Pod hallway.jpg|One of the hallways. | ||
| + | File:Pod side.jpg|Further back from the flanks. | ||
| + | </gallery> | ||
| + | |||
| + | === Broken Bridge === | ||
| + | A sneaky but perilous path, a decrepit bridge lies to the other side of the map, surrounded by a [[Environmental hazards#Pitfalls|sheer drop]] in the form of a waterfall. | ||
| + | |||
| + | <gallery widths=140px heights=80px> | ||
| + | File:Pod bridge.jpg|The bridge in question. | ||
| + | File:Pod main.jpg|Directly opposite of the waterfall. | ||
| + | </gallery> | ||
| + | |||
| + | === The Pit === | ||
| + | * '''Walkway''': Directly underneath the clock tower is a walkway, lined with half-walls and a low ceiling. This spot offers great visibility, but minimal protection. Periodically, the portal to the Underworld opens over the Pit under the tower. | ||
| + | * '''Overlook Building''': This building lies opposite of the walkway, featuring a ledge that looks directly out at the skull opposite of the map. | ||
| + | |||
| + | <gallery widths=140px heights=80px> | ||
| + | File:Pod build1.jpg|The exterior of the central building. | ||
| + | File:Pod build2.jpg|The other exterior angle of the building. | ||
| + | File:Pod build3.jpg|The view out from inside the building. | ||
| + | File:PitofdeathImage.jpeg|The delivery portal to the Underworld. | ||
| + | </gallery> | ||
| + | |||
| + | === The Underworld === | ||
| + | The Underworld is accessed by jumping into the portal that spawns just above the Pit. The Underworld serves as the area where players can deposit souls. There are also a few regular and one rare magic spell in the area. | ||
| + | |||
| + | <gallery widths=140px heights=80px> | ||
| + | File:Pod underworld1.png|View of the underworld area. | ||
| + | File:Pod underworld2.png|The area to deposit the souls. | ||
| + | </gallery> | ||
| + | |||
| + | == Playing To Count == | ||
| + | {| class="wikitable grid" style="text-align:center" | ||
| + | ! class="header" | Player Count | ||
| + | ! class="header" | Playing To | ||
| + | |- | ||
| + | | 0 || 10 | ||
| + | |- | ||
| + | | 2 || 10 | ||
| + | |- | ||
| + | | 4 || 16 | ||
| + | |- | ||
| + | | 6 || 24 | ||
| + | |- | ||
| + | | 8 || 32 | ||
| + | |- | ||
| + | | 10 || 40 | ||
| + | |- | ||
| + | | 12 || 48 | ||
| + | |- | ||
| + | | 14 || 56 | ||
| + | |- | ||
| + | | 16 || 64 | ||
| + | |- | ||
| + | | 18 || 72 | ||
| + | |- | ||
| + | | 20 || 80 | ||
| + | |- | ||
| + | | 22 || 88 | ||
| + | |- | ||
| + | | 24 || 96 | ||
| + | |- | ||
| + | | 26 || 104 | ||
| + | |- | ||
| + | | 28 || 112 | ||
| + | |- | ||
| + | | 30 || 120 | ||
| + | |- | ||
| + | | 32 || 128 | ||
| + | |} | ||
| + | |||
| + | == Strategy == | ||
| + | {{map strategy link|Pit of Death|main=yes|stub=yes}} | ||
== Update history == | == Update history == | ||
| + | {{Update history| | ||
'''{{Patch name|10|21|2016}}''' ([[Scream Fortress 2016]]) | '''{{Patch name|10|21|2016}}''' ([[Scream Fortress 2016]]) | ||
* Pit of Death was added to the game. | * Pit of Death was added to the game. | ||
'''{{Patch name|10|25|2016}}''' | '''{{Patch name|10|25|2016}}''' | ||
| − | * Fixed an [[ | + | * Fixed an [[exploit]] which allowed players to enter the enemy spawn. |
* Fixed enemy players teleported to the Underworld spawning in one another. | * Fixed enemy players teleported to the Underworld spawning in one another. | ||
* Fixed finale particles not being drawn from certain distances. | * Fixed finale particles not being drawn from certain distances. | ||
| Line 46: | Line 156: | ||
* Added a [[vdc:Func_nobuild|nobuild]] to the area surrounding the portal. | * Added a [[vdc:Func_nobuild|nobuild]] to the area surrounding the portal. | ||
* Added signs in spawns to make the second door more obvious. | * Added signs in spawns to make the second door more obvious. | ||
| − | * Adjusted [[ | + | * Adjusted [[respawn]] times so that the losing team will respawn faster. |
| − | * Adjusted [[ | + | * Adjusted [[health]], [[ammo]], and [[magic spells]] around the map. |
* Changed the Underworld buff to use the Purgatory buff from [[Eyeaduct]]. | * Changed the Underworld buff to use the Purgatory buff from [[Eyeaduct]]. | ||
* Players killed during the finale will now turn into ghosts. | * Players killed during the finale will now turn into ghosts. | ||
* Decreased [[Scoreboard|score]] limit from 5 to 4 points per player. | * Decreased [[Scoreboard|score]] limit from 5 to 4 points per player. | ||
| + | }} | ||
| + | |||
| + | == Trivia == | ||
| + | * A basketball hoop can be seen attached to one of the dead trees sticking out of the lake below the Broken Bridge.<!-- Nothing happens if you "score" with a Scout's baseball or a ragdoll. --> | ||
| + | * A regular-sized skull can be found inside the giant skull's mouth, outside of normal view. | ||
| + | |||
| + | == Gallery == | ||
| + | <gallery> | ||
| + | File:Pit of Death shutters.png|Shutters neighboring respective spawns, Hiding a secret detail. | ||
| + | File:Pit of Death redspawn.jpeg|[[Blu]] spawn morgue with an interesting addition compared to red. | ||
| + | File:Pod basketball hoop.png|The basketball hoop attached to the dead tree. | ||
| + | File:Pod bigskull.png|The big skull found on the side of the map. | ||
| + | File:Pod skull.png|The normal sized skull found in the big skull. | ||
| + | File:Pickup Soul.png|The Soul Pickup. | ||
| + | File:Pit of Death Workshop image.jpg|Steam Workshop thumbnail for Pit of Death. | ||
| + | </gallery> | ||
{{Scream Fortress 2016 Nav}} | {{Scream Fortress 2016 Nav}} | ||
| + | {{Halloween Map Nav}} | ||
{{Maps Nav}} | {{Maps Nav}} | ||
Latest revision as of 13:25, 5 September 2024
| Pit of Death | |
|---|---|

| |
| Basic Information | |
| Map type: | Player Destruction |
| File name: | pd_pit_of_death_event
|
| Released: | October 21, 2016 Patch (Scream Fortress VIII) |
| Developer(s): | Christian "Roll" Richardson Kenny "Flip" Wheeler Michael Egan FissionMetroid101 Christian James DeRosa |
| Map Info | |
| Environment: | Halloween |
| Setting: | Nighttime, overcast |
| Hazards: | Pitfall, Pumpkin bombs |
| Hazards (Underworld): | Stygian waters, Health drain |
| Magic spells: | Yes |
| Map Items | |
| Map Photos | |
| Map Overview | |
| Map Stamp | |
| Supporters Leaderboard | |
| “ | (screaming) Holy crap, this goes on forever.
Click to listen
— The Scout drops into the Pit of Death at the wrong time, and then he accepts his fate.
|
” |
Pit of Death is a community-created Player Destruction map added in the Scream Fortress 2016 update.
In this map, both teams must collect the souls of dead players and deliver them for "sacrifice" in the front yard of the Underworld's house. A team wins upon sacrificing a certain number of souls, which varies depending on the number of players currently in the server.
Pit of Death was contributed to the Steam Workshop.
Contents
Witching Hour
Every so often, the Witching Hour begins, causing magic spells to appear throughout the map and a portal to the Underworld to open above the Pit, which players must take in order to reach the delivery area and score points to win the match. A timer in the bottom center of the HUD shows how long until the next Witching Hour and its duration. The Witching Hour's beginning and end are also announced by an eerie tune; players near the Pit will feel the ground shake beneath them and might spot bats flying off from the giant skull when it starts.
Locations
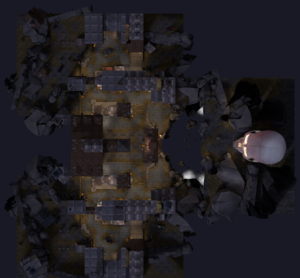
The map has a symmetrical layout for each team, designed around two paths to the side that flank one central location. These paths are displayed early, with the spawn courtyard branching into two distinct paths. Both sides have equal amounts of elevation change, and the map is dominated by the titular pit in the center.
Courtyards
This acts as the very first location for either team. Both sides split into two distinct halves, making up the side routes the map revolves around.
- Bridge Route: A long, narrow building that lets players leave directly towards the center, off towards the broken bridge, or directly above the broken bridge route.
- Dock Route: Players follow an underpass, greeted with the option of either taking one of the hallway routes or proceeding directly into the docks.
01/02 Docks
On one side of the map lies this large warehouse-esque building, noted for its many walls, high ceiling, and varying elevations.
- The Staircases: To the immediate left or right of a player's entry lies a wooden staircase and a platform. From here, the player can either exit up towards the pit, can follow a side building back to either spawn, or can look down upon the rest of the room from their elevated position.
- Pit Access: Splitting the room in half is a smaller interior, leading directly up towards the pit.
- Basement: On the other side of the pit access is the lowest part of the room, featuring health and ammo pickups.
- Ledges: In the corners of the warehouse are two ledges, accessible only from the outside or from blast jumping. They are the highest point in the building, and are advantageous for ambushes.
Pit Flanks
Near the docks are two hills that run underneath the pit.
- Hallway: Connecting the spawns to the pit are tight hallways, complete with small health and ammo pickups.
- Rooftop: Outside of the hallways, players are able to take staircases to the hallways' roofs, placing them slightly above the pit and from a considerable distance away.
- Flatgrounds: Between the pit and the hallway roof is level ground, connecting both the ledges in the docks and the alternative flanking route.
Broken Bridge
A sneaky but perilous path, a decrepit bridge lies to the other side of the map, surrounded by a sheer drop in the form of a waterfall.
The Pit
- Walkway: Directly underneath the clock tower is a walkway, lined with half-walls and a low ceiling. This spot offers great visibility, but minimal protection. Periodically, the portal to the Underworld opens over the Pit under the tower.
- Overlook Building: This building lies opposite of the walkway, featuring a ledge that looks directly out at the skull opposite of the map.
The Underworld
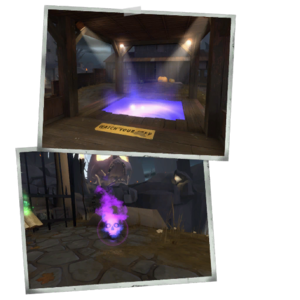
The Underworld is accessed by jumping into the portal that spawns just above the Pit. The Underworld serves as the area where players can deposit souls. There are also a few regular and one rare magic spell in the area.
Playing To Count
| Player Count | Playing To |
|---|---|
| 0 | 10 |
| 2 | 10 |
| 4 | 16 |
| 6 | 24 |
| 8 | 32 |
| 10 | 40 |
| 12 | 48 |
| 14 | 56 |
| 16 | 64 |
| 18 | 72 |
| 20 | 80 |
| 22 | 88 |
| 24 | 96 |
| 26 | 104 |
| 28 | 112 |
| 30 | 120 |
| 32 | 128 |
Strategy
 | “Sun Tzu's got nothing on us!” This map's Community strategy page is a stub. As such, it is not complete. You can help the Team Fortress Wiki Community Strategy Project by expanding it. Notes: None added |
Update history
- Pit of Death was added to the game.
- Fixed an exploit which allowed players to enter the enemy spawn.
- Fixed enemy players teleported to the Underworld spawning in one another.
- Fixed finale particles not being drawn from certain distances.
- Fixed certain overlays not rendering.
- Increased damage over time dealt in the Underworld.
- Added climbable props to the platforms near mid.
- Added a nobuild to the area surrounding the portal.
- Added signs in spawns to make the second door more obvious.
- Adjusted respawn times so that the losing team will respawn faster.
- Adjusted health, ammo, and magic spells around the map.
- Changed the Underworld buff to use the Purgatory buff from Eyeaduct.
- Players killed during the finale will now turn into ghosts.
- Decreased score limit from 5 to 4 points per player.
Trivia
- A basketball hoop can be seen attached to one of the dead trees sticking out of the lake below the Broken Bridge.
- A regular-sized skull can be found inside the giant skull's mouth, outside of normal view.
Gallery
Blu spawn morgue with an interesting addition compared to red.
| ||||||||||||||||||||||||||||||||||||||||||||||
| |||||||||||||||||||||||||||||||||||||||||||||||||||||||||||||||||||


