Difference between revisions of "Perks"
m |
GrampaSwood (talk | contribs) m (Undo edit by Cheezcracker (Talk) (3643127) This doesn't seem noteworthy, as it essentially just says "The Conversion perk works". The imgur link also does not work) (Tag: Undo) |
||
| (4 intermediate revisions by 3 users not shown) | |||
| Line 27: | Line 27: | ||
* '''Voting Area''': the starting location of each round, with the perks the team can choose from, the glass case displaying the perks that have been picked, and a resupply cabinet on each side of the room. | * '''Voting Area''': the starting location of each round, with the perks the team can choose from, the glass case displaying the perks that have been picked, and a resupply cabinet on each side of the room. | ||
* '''Start Yard''': the area players are taken to after voting for a perk ends. The Gate, with a "Control Point" sign above it, offers a shorter route to the Control Point, where they just have to go around or over the Rocks and a wooden fence with vines to reach it. The open doorway takes players to the Bar, which is connected by a simple wooden bridge to the Central Building. | * '''Start Yard''': the area players are taken to after voting for a perk ends. The Gate, with a "Control Point" sign above it, offers a shorter route to the Control Point, where they just have to go around or over the Rocks and a wooden fence with vines to reach it. The open doorway takes players to the Bar, which is connected by a simple wooden bridge to the Central Building. | ||
| − | * ''' | + | * '''Bar''': an enclosed space with doorways to the Start Yard, the Rocks, and the Central Building. |
| + | * '''Rocks''': big piles of rocks that serve as cover for those crossing the Gates and heading to the Control Point. It is possible to jump over and on them with [[jumping]] techniques like flare and explosive jumps. | ||
* '''Central Building''': the building right in front of the Control Point. Its front access, facing the point, is split in two by a wall. It also has two entrances on each side, one facing the Gate and one connected to the Bar, where there is also a staircase leading to the Graves. | * '''Central Building''': the building right in front of the Control Point. Its front access, facing the point, is split in two by a wall. It also has two entrances on each side, one facing the Gate and one connected to the Bar, where there is also a staircase leading to the Graves. | ||
* '''Graves''': the low ground between the Bar and the Central Building, below the bridge connecting the two. There are only two ways out: the aforementioned staircase of the Central Building and a stair to the Control Point. | * '''Graves''': the low ground between the Bar and the Central Building, below the bridge connecting the two. There are only two ways out: the aforementioned staircase of the Central Building and a stair to the Control Point. | ||
| + | * '''Control Point''': located in the middle of the map, it is the fountain in the town plaza. | ||
* '''Chapel''': a chapel right next to the Control Point. Its doors are on an elevated platform that is covered by a wall and have a small ammo pack in front of them. | * '''Chapel''': a chapel right next to the Control Point. Its doors are on an elevated platform that is covered by a wall and have a small ammo pack in front of them. | ||
| − | |||
<gallery widths=150px heights=90px> | <gallery widths=150px heights=90px> | ||
| Line 59: | Line 60: | ||
* As a [[Heavy]], if the Conversion perk is chosen, consuming the [[Buffalo Steak Sandvich]] whilst having the [[Holiday Punch]] equipped causes the converted crits to deal critical damage instead of forcing the victim to laugh. However, non-converted crits still force the victim to laugh. | * As a [[Heavy]], if the Conversion perk is chosen, consuming the [[Buffalo Steak Sandvich]] whilst having the [[Holiday Punch]] equipped causes the converted crits to deal critical damage instead of forcing the victim to laugh. However, non-converted crits still force the victim to laugh. | ||
* Using the [[Eureka Effect]] to teleport to the base after the round has started kills the player. | * Using the [[Eureka Effect]] to teleport to the base after the round has started kills the player. | ||
| + | * If the game is set to a language other than English, the translated names and descriptions for the perks remain in English.<ref>[https://imgur.com/a/aj2hQVq Screenshot] of perks still in English when the game is in Brazilian Portuguese.</ref> | ||
== Gallery == | == Gallery == | ||
| Line 64: | Line 66: | ||
File:Perks Workshop image.jpg|Steam Workshop thumbnail for Perks. | File:Perks Workshop image.jpg|Steam Workshop thumbnail for Perks. | ||
</gallery> | </gallery> | ||
| + | |||
| + | == References == | ||
| + | <references/> | ||
{{Scream Fortress 2023 Nav}} | {{Scream Fortress 2023 Nav}} | ||
{{Halloween Map Nav}} | {{Halloween Map Nav}} | ||
{{Maps Nav}} | {{Maps Nav}} | ||
Latest revision as of 08:43, 8 March 2024
| Perks | |
|---|---|

| |
| Basic Information | |
| Map type: | Arena |
| File name: | arena_perks
|
| Released: | October 9, 2023 Patch (Scream Fortress XV) |
| Developer(s): | Philippe "Le Codex" Lefebvre Liam "Diva Dan" Moffitt Daniel "DJ" Bennett Seb "Tianes" Necula Ase "pont" Kirkham E-Arkham |
| Map Info | |
| Environment: | Town |
| Setting: | Nighttime |
| Hazards: | Fire (environmental) |
| Map Overview | |
| Map Stamp | |
| Supporters Leaderboard | |
| “ | We have an ability in store for everyone's wishes, no matter your choice, you'll find all of our boons quite satisfactory.
— Perks publicity blurb
|
” |
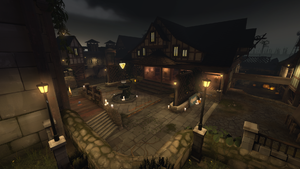
Perks is a community-created Arena map. It is set in a medieval town at night.
The map takes its name from its perks system: during the setup time of 30 seconds, the teams receive different sets of three randomly selected perks, which last until the end of the match. To vote, a player has to be near the desired perk when the setup timer reaches 0. The chosen perks are then displayed in a glass case before players are sent into the main portion of the map after 7 seconds. If no players in a team vote for a perk, the game randomly selects one for that team.
Perks was contributed to the Steam Workshop.
Perks
Locations
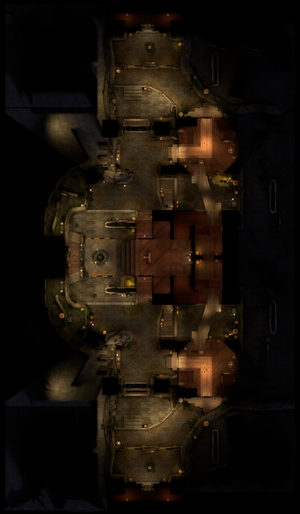
- Voting Area: the starting location of each round, with the perks the team can choose from, the glass case displaying the perks that have been picked, and a resupply cabinet on each side of the room.
- Start Yard: the area players are taken to after voting for a perk ends. The Gate, with a "Control Point" sign above it, offers a shorter route to the Control Point, where they just have to go around or over the Rocks and a wooden fence with vines to reach it. The open doorway takes players to the Bar, which is connected by a simple wooden bridge to the Central Building.
- Bar: an enclosed space with doorways to the Start Yard, the Rocks, and the Central Building.
- Rocks: big piles of rocks that serve as cover for those crossing the Gates and heading to the Control Point. It is possible to jump over and on them with jumping techniques like flare and explosive jumps.
- Central Building: the building right in front of the Control Point. Its front access, facing the point, is split in two by a wall. It also has two entrances on each side, one facing the Gate and one connected to the Bar, where there is also a staircase leading to the Graves.
- Graves: the low ground between the Bar and the Central Building, below the bridge connecting the two. There are only two ways out: the aforementioned staircase of the Central Building and a stair to the Control Point.
- Control Point: located in the middle of the map, it is the fountain in the town plaza.
- Chapel: a chapel right next to the Control Point. Its doors are on an elevated platform that is covered by a wall and have a small ammo pack in front of them.
Strategy
Main article: Community Perks strategy
 | “Sun Tzu's got nothing on us!” This map's Community strategy page is a stub. As such, it is not complete. You can help the Team Fortress Wiki Community Strategy Project by expanding it. Notes: None added |
Update history
October 9, 2023 Patch #1 (Scream Fortress XV)
- Added Perks to the game.
- Replaced the Cloaking perk with the Patience perk (gain up to 7 health/sec).
- Fixed missing barricades in the voting area.
- Fixed certain items having missing textures on the map.
- Removed crumpkins (with help from LizardOfOz).
- Fixed stalemates causing extra rounds where no perks would appear.
- Added a new HUD, with an alive player counter.
Bugs
- As a Heavy, if the Conversion perk is chosen, consuming the Buffalo Steak Sandvich whilst having the Holiday Punch equipped causes the converted crits to deal critical damage instead of forcing the victim to laugh. However, non-converted crits still force the victim to laugh.
- Using the Eureka Effect to teleport to the base after the round has started kills the player.
- If the game is set to a language other than English, the translated names and descriptions for the perks remain in English.[1]
Gallery
References
- ↑ Screenshot of perks still in English when the game is in Brazilian Portuguese.
| ||||||||||||||||||||||||||||||||||||||||||||||
| |||||||||||||||||||||||||||||||||||||||||||||||||||||||||||||||||||


