Emerge/es
| Emerge | |
|---|---|

| |
| Información básica | |
| Desarrollado por: | Desconocido |
| Información del mapa | |
| Entorno: | Alaska |
| Escenario: | De día, soleado |
| Peligros: | Pitfalls, Payload Cart explosion |
| Imágenes del mapa | |
 | |
| Vista general | |
 | |
| « | Take the fight to the Alaskan wilderness in this compact three-point Payload map!
— Emerge publicity blurb
|
» |
Emerge es un mapa creado por la comunidad de Carga Explosiva. Toma lugar en un complejo industrial en Aalaska, Estados Unidos de América.
Emerge fue contribuido a Steam Workshop.
Índice
Ubicaciones
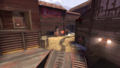
Punto de Control A
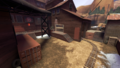
- Primera Zona de Regeneración de BLU: la zona de regeneración inicial de BLU tiene tres puertas; una detrás de la vagoneta, otra en el puente directamente encima de la vagoneta, y otra en una caída delante de la vagoneta. También tiene dos armarios de reabastecimiento; uno cerca de la puerta detrás de la vagoneta y uno cerca de la puerta con caída.
- Primer Patio: la zona abierta inicial del mapa. Una estructura en el centro sirve como soporte de un puente simple de madera que conecta la zona de regeneración de BLU y el Edificio de Presión.
- Edificio de Presión: un edificio de dos pisos que la vagoneta debe atravesar. En el lado de BLU, se puede acceder a través de la entrada de la vagoneta (y su puerta adyacente), por el puente, y a través de una puerta en el extremo izquierdo. En el lado de RED, se puede entrar a través de la salida de la vagoneta, a través de una ventana abierta en el segundo piso en el extremo izquierdo, y a través de una puerta lateral con algunas vías que conducen a una un callejón sin salida a la derecha.
- Segundo Piso: mientras que el segundo piso en la zona por la que pasa el carro, se extiende hacia otro edificio y sigue, pasando por una puerta de la zona de regeneración de BLU y una caída, conduciendo hacia la otra puerta de de la zona de regeneración de BLU y a una ruta de ataque que lleva pasado el punto A.
- Segundo Patio: la segunda zona abierta del mapa, donde la vagoneta debe subir mediante una rampa para alcanzar el punto A. La rampa no está empinada, por lo que la vagoneta no retrocede inmediatamente se se deja sola, y tiene un paquete de salud pequeño debajo.
- Flanco 1: una ruta que flanco detrás del edificio frente al Edificio de Presión. Mientras que la primera salida lleva a los jugadores hasta pasado el punto A, la ruta sigue avanzando hasta llegar a la tercera zona de regeneración de BLU.
- Segunda Zona de Regeneración de BLU: una gran habitación que se activa si BLU consigue capturar el punto A. Tiene dos puertas, una dentro y otra fuera del Edificio de Presión (izquierda y derecha cuando se ve dentro de la habitación, respectivamente), con un armario de reabastecimiento cerca de cada una.
Primera zona de regeneración de BLU.
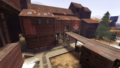
Primer patio.
Segundo patio.
La ruta de flanqueo.
Punto de control A.
Segunda zona de regeneración de BLU.


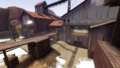
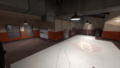
Punto de Control B
- Habitación de Escaleras: the interior of the building to the left of point A. It is the shortest route between A and B.
- Arco: a narrow passage under a building's arch that the cart must go through.
- Tercer Patio: the third large open area of the map.
- Edificio de Vías: a building sheltering part of the tracks in a short corridor.
- Plataforma de Observación: the most elevated part of the area, it is a room with a big opening overseeing the Third Yard.
- Flank 2: going up the stairs in the Tracks Building and passing by the Observation Deck is the Flank 2, which connects with the Warehouse's interior and, eventually, to the RED spawn.
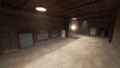
- BLU's Third Spawn: BLU's third spawn becomes active if they manage to capture B. It has two doors and two resupply cabinets.
The stairs room.
The Arch.
The third yard.
The tracks building.
The second flank.
Third BLU spawn.


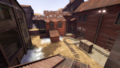
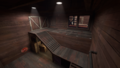
Punto de Control C
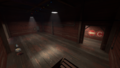
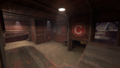
- RED's Spawn: RED's only spawn has three doors, two facing one another, and one with a resupply cabinet near it.
- RED's Room: the sheltered area immediately outside of RED's spawn.
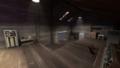
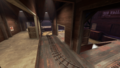
- Entry Yard: the small open space in front of point B before the cart enters the Warehouse. A door on the right leads to the Warehouse's catwalk where the Flank 2 is connected.
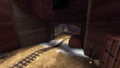
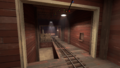
- Warehouse: the big and last building the cart must enter. It has one large room containing a large ammo pack and a small health kit, as well as the Cart's Corridor.
- Cart's Corridor: a long and narrow passage that the cart must go through, with a few crates providing some cover for the players entering with the cart.
- Final Yard: the final open area of the map.
- Veranda: a slightly elevated platform accessible through RED's Room with an overview of the Final Yard and a long sight line of the Cart's Corridor.
- Checkpoint C: the hole in the ground that the cart must be thrown into. Once the cart goes over the steep ramp at the end of the tracks, it hits the planks below as it falls, breaking the improvised bridge and taking the large health kit (as well as any players unlucky to be crossing at that moment) down with it.
RED spawn.
The cart corridor.
The warehouse.

Final point.


Estrategias
Artículo principal: Estrategia de la comunidad para Emerge
 | «¡Sun Tzu no nos dijo qué hacer!» La página de estrategia de la Comunidad de este mapa está en construcción. Por lo tanto, está incompleta. Puedes contribuir con el proyecto de estrategias de la Comunidad de la Wiki de Team Fortress expandiéndolo. Notas: Ninguna |
Historial de actualización
Parche del 7 de diciembre de 2023 (Navidad 2023)
- Se añadió Emerge al juego.
Parche del 8 de diciembre de 2023
- Se actualizó
pl_emergepara corregir el archivo.navque faltaba.
Parche del 15 de diciembre de 2023
- Se corrigieron defectos geométricos en el primer punto de regeneración del equipo BLU.
- Se corrigió un punto donde apostarse que se encontraba por error fuera del primer punto de regeneración del equipo BLU.
Curiosidades
- A Tux can be seen under the stairs in BLU's first spawn.
- In the skybox and outside of the normal view is a frog's head coming out of a rock formation.
- On a wall of the second floor of the first building the car must go through, near the Auto-Borax sign and hidden behind a crate, is a drawing of one of the map creator's characters.
- Inside the wooden structure supporting the bridge above the cart's starting position are three Jimi Jam mascots painted on one of the walls.
- Behind the Maintenance doors next to the cart's starting position is a hidden room, lit by candles and braziers, containing four regular ghosts, the ghost of Zepheniah Mann, and a picture of the cat "Muji" ("2012 - 2022").
Galería
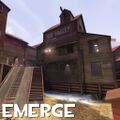
Miniatura de Emerge en Steam Workshop.


| |||||||||||||||||||||||||||||||||||||||||||||||||||||||||||||||||||